# Build with AI for Sim APIs
Source: https://docs.sim.dune.com/build-with-ai
Build faster with Sim APIs using LLMs and AI assistants.
We provide several resources to help you use LLMs and AI coding assistants to build much faster with Sim APIs.
## OpenAPI Specifications
To help AI tools understand our API structure, we provide OpenAPI specifications for each of our endpoints. These files detail available parameters, request bodies, and response schemas, making them ideal for generating client code or for use in custom AI agents.
You can find our OpenAPI specifications in the following directories:
* EVM API specifications: [`/evm/openapi/`](https://github.com/duneanalytics/sim-docs/tree/main/evm/openapi)
* SVM API specifications: [`/svm/openapi/`](https://github.com/duneanalytics/sim-docs/tree/main/svm/openapi)
## Add Docs to Cursor
To integrate our documentation directly into your Cursor editor for easy reference:
1. Go to **Cursor Settings -> Indexing & Docs -> Add Doc**.
2. Enter `docs.sim.dune.com` in the URL field.
3. Provide a name (e.g., "@simdocs").
4. Hit confirm. The documentation will sync automatically.
5. Reference Sim APIs documentation by typing `@simdocs` (or your chosen name) in your Cursor chat window.
## AI Search
To ask questions about our documentation, click the **Ask AI** button in the header of the site. This opens a chat interface, powered by Mintlify, that understands natural language queries. Ask questions about endpoints, authentication, or specific data points, and it will answer you with the most relevant, accurate information.
## Use with LLMs
### Complete Documentation for LLMs
For LLM applications such as custom agents, RAG systems, or any scenario requiring our complete documentation, we provide an optimized text file at [`https://docs.sim.dune.com/llms-full.txt`](https://docs.sim.dune.com/llms-full.txt).
### Per-Page Access
You can get the Markdown version of any documentation page by appending `.md` to its URL. For example, `/evm/activity` becomes [`https://docs.sim.dune.com/evm/activity.md`](https://docs.sim.dune.com/evm/activity.md).
Additionally, in the top-right corner of each page, you will find several options to access the page's content in LLM-friendly formats:
* **Copy Page:** Copies the fully rendered content of the current page.
* **View Markdown:** Provides a URL with the raw Markdown source. This is ideal for direct input into LLMs.
* **Open with ChatGPT:** Instantly loads the page's content into a new session with ChatGPT. Ask questions, summarize, or generate code based on the page's content.
You can also type `⌘C` or `Ctrl+C` to copy any page's Markdown content.
Try it now.
# Compute Units
Source: https://docs.sim.dune.com/compute-units
Understand how Sim bills API usage using Compute Units (CUs) and how they're calculated per endpoint.
export const DefaultChainCount = ({endpoint}) => {
const dataState = useState(null);
const data = dataState[0];
const setData = dataState[1];
useEffect(function () {
fetch("https://api.sim.dune.com/v1/evm/supported-chains", {
method: "GET"
}).then(function (response) {
return response.json();
}).then(function (responseData) {
setData(responseData);
});
}, []);
if (data === null) {
return <>N>;
}
if (!data.chains || !Array.isArray(data.chains)) {
return <>N>;
}
var uniqueDefaultChains = new Set();
for (var i = 0; i < data.chains.length; i++) {
var chain = data.chains[i];
var hasDefaultTag = Array.isArray(chain.tags) && chain.tags.indexOf("default") !== -1;
if (!hasDefaultTag) {
continue;
}
if (endpoint !== undefined) {
if (chain[endpoint] && chain[endpoint].supported === true) {
uniqueDefaultChains.add(chain.name);
}
} else {
uniqueDefaultChains.add(chain.name);
}
}
var count = uniqueDefaultChains.size;
return <>{count}>;
};
Compute Units (CUs) are how we measure API usage in Sim. CUs reflect the actual computational work of each API call. For example, querying Balances across 30 chains uses more CUs than querying just two chains.
| Endpoint | Type | Compute Units | Default Chains (no chain\_ids) |
| -------------------------------- | --------------- | ------------------------------------------------------------------------------------------------------------------ | ----------------------------------------------- |
| Balances (EVM & SVM) | Chain-dependent | N compute units, where N is the number of chains processed in the `chain_ids` query parameter after tag expansion | {} |
| Balances (single token sub-path) | Fixed | 1 compute unit per request. Accepts exactly one `chain_ids` value (single chain only) | - |
| Collectibles | Chain-dependent | N compute units, where N is the number of chains processed in the `chain_ids` query parameter after tag expansion | {} |
| DeFi Positions | Chain-dependent | 2N compute units, where N is the number of chains processed in the `chain_ids` query parameter after tag expansion | — |
| Activity | Fixed | 3 compute units per request | — |
| Transactions (EVM & SVM) | Fixed | 1 compute unit per request | — |
| Token Info | Fixed | 2 compute units per request, even though `chain_ids` is required | — |
| Token Holders | Fixed | 2 compute units per request | — |
| Subscriptions | Event-based | 1 compute unit per event sent to your webhook. Note that a single webhook payload can contain multiple events. | — |
## How CUs work
For chain-dependent endpoints, CU equals the number of distinct chains the request processes. If you pass tags (like `default`, `mainnet`, or `testnet`) via `chain_ids`, we expand them to specific chains before computing CU. If you omit `chain_ids` in the Collectibles or Balances endpoints, the endpoint uses its default chain set. CU equals the size of that set at request time, currently {} for Balances and {} for Collectibles, and may change as Sim adds more chains.
For fixed endpoints, each request consumes exactly specified number of compute units regardless of how many chains you query or what parameters you provide.
## Chain selection and tags
Chain count is computed after we expand any tags you pass. To keep CU predictable over time, specify explicit `chain_ids` (EVM). If you use tags like `default` or `mainnet`, we expand them to specific chains at request time. Tags can grow as we add more networks. Pin chains explicitly to keep CU stable. See [Supported Chains](/evm/supported-chains#tags).
## Examples
Use `?chain_ids=1,8453,137` to process three chains. This consumes three CUs.
Omitting `chain_ids` uses the endpoint's chains tagged `default`. CU equals the size of that set at request time ({} as of now, and subject to change). See [Supported Chains](/evm/supported-chains#tags).
Passing `?chain_ids=mainnet` expands to all supported mainnet chains for the endpoint. CU equals the expanded chain count.
Each request consumes 1 CU and must specify exactly one chain via `chain_ids`.
Omitting `chain_ids` uses the endpoint's chains tagged `default`. CU equals the size of that set at request time ({} as of now, and subject to change).
Activity uses a fixed-cost model. Each request consumes the same CU regardless of chains queried.
Token Info is fixed-cost per request, even though `chain_ids` is required. CU does not scale with the number of chains.
Each event sent to your webhook consumes 1 CU. A single webhook payload may contain multiple events, resulting in multiple CUs per webhook delivery.
## FAQs
For chain-dependent endpoints, count the chains you include (after any tag expansion). For fixed-CU endpoints, see the table at the top of the page.
No. CU is based on chain count or a fixed per-request cost, not on token filtering. See [Token Filtering](/token-filtering).
If you omit `chain_ids` for endpoints where it can be passed, we use the endpoint's `default` chain set, which may grow as new chains are added. Pin explicit chains to keep CU stable.
Visit your Sim Dashboard.
# Sim APIs vs Dune Analytics API
Source: https://docs.sim.dune.com/dune-analytics-api/overview
Learn about the Dune Analytics API and how it compares to Sim APIs, helping you choose the right tool for data analysis vs. realtime apps.
While Sim APIs provide low-latency, realtime data for building apps, Dune also offers a separate suite of analytical APIs.
Both are part of the Dune ecosystem, but they are designed for different use cases.
Dive into the official documentation for the Dune Analytics API to see all available endpoints, guides, and references.
## When to Use Which API
Use Sim APIs if you need low-latency app data (balances, activity, NFTs) via simple REST endpoints so your UI can react to onchain events without writing SQL.
Use the [Dune Analytics API](https://docs.dune.com/api-reference/overview/introduction) if you need custom SQL for analysis, dashboards, BI/warehousing, or exporting large historical datasets.
## Core Differences
| Aspect | Sim APIs | Dune Analytics API |
| ------------------------- | --------------------------------------------------------- | ------------------------------------------------------------------------------------------------------------ |
| Data access & flexibility | Ready-made realtime REST endpoints optimized for apps. | Run custom SQL across Dune’s dataset. Connect with the DuneSQL Trino connector. |
| Performance & latency | Very low latency for realtime experiences. | Built for analytical workloads. Queries may take seconds to minutes. |
| Primary use cases | Wallets, activity feeds, DeFi dashboards, onchain agents. | Market research and internal dashboards. BI integration such as PowerBI and Metabase, plus CSV exports. |
## What You Get with the Dune Analytics API
The [Dune Analytics API](https://docs.dune.com/api-reference/overview/introduction) offers a unique set of capabilities tailored for deep data analysis and custom queries. Here are some of the powerful features you can leverage that differ from Sim APIs.
Programmatically run your Dune queries. Fetch exactly the data you need in your preferred format.
Connect through the DuneSQL Trino connector. Use tools such as PowerBI, Metabase, DBeaver, and notebooks.
Push query results to your endpoints on a custom schedule using webhooks.
Upload your datasets to Dune and join them with onchain data in SQL. Enrich analyses with your internal or off-chain information.
# Error Handling
Source: https://docs.sim.dune.com/error-handling
How to handle errors when using Sim APIs
This guide explains how to handle errors when using Sim APIs, including common error codes, troubleshooting steps, and code examples for proper error handling.
## Error Response Format
When an error occurs, Sim APIs return a JSON response with error information:
```json theme={null}
{
"error": "Description of what went wrong"
}
```
The error property can be either `"error"` or `"message"` depending on the type of error.
## Common Error Codes
| HTTP Status | Description | Troubleshooting |
| ----------- | ---------------------------- | ---------------------------------------------------------------------------------------------------------------- |
| 401 | Invalid or missing API key | Check that you're including the correct API key in the `X-Sim-Api-Key` header |
| 400 | Malformed request | Verify the address format and other parameters in your request |
| 402 | Compute units quota exceeded | You are out of compute units. Please contact sales to upgrade your plan: [sales@dune.com](mailto:sales@dune.com) |
| 404 | Resource not found | Verify the endpoint URL and resource identifiers |
| 429 | Too many requests | Implement backoff strategies and consider upgrading your plan if you consistently hit limits |
| 500 | Server-side error | Retry the request after a short delay; if persistent, contact support |
## Handling Errors in Code
Here are examples of how to properly handle errors in different programming languages:
```javascript theme={null}
fetch('https://api.sim.dune.com/v1/evm/balances/0xd8da6bf26964af9d7eed9e03e53415d37aa96045', {
method: 'GET',
headers: {'X-Sim-Api-Key': 'YOUR_API_KEY'}
})
.then(response => {
if (!response.ok) {
return response.json().then(err => {
const errorMessage = err.error || err.message || response.statusText;
throw new Error(`API error: ${errorMessage}`);
});
}
return response.json();
})
.then(data => {
console.log('Success:', data);
// Process your data here
})
.catch(err => {
console.error('Error fetching balances:', err);
// Handle error appropriately in your application
// e.g., show user-friendly message, retry, or fallback behavior
});
```
```python theme={null}
import requests
import time
def get_balances(address, api_key, max_retries=3):
url = f"https://api.sim.dune.com/v1/evm/balances/{address}"
headers = {"X-Sim-Api-Key": api_key}
for attempt in range(max_retries):
try:
response = requests.get(url, headers=headers)
response.raise_for_status() # Raises an exception for 4XX/5XX responses
return response.json()
except requests.exceptions.HTTPError as err:
status_code = err.response.status_code
error_data = {}
try:
error_data = err.response.json()
except:
pass
# Get error message from either 'error' or 'message' property
error_message = error_data.get('error') or error_data.get('message', 'Unknown error')
print(f"HTTP Error {status_code}: {error_message}")
# Handle specific error codes
if status_code == 429: # Rate limit exceeded
wait_time = min(2 ** attempt, 60) # Exponential backoff
print(f"Rate limit exceeded. Retrying in {wait_time} seconds...")
time.sleep(wait_time)
continue
elif status_code == 500: # Server error
if attempt < max_retries - 1:
wait_time = 2 ** attempt
print(f"Server error. Retrying in {wait_time} seconds...")
time.sleep(wait_time)
continue
# For other errors or if we've exhausted retries
return {"error": error_message, "status_code": status_code}
except requests.exceptions.RequestException as err:
print(f"Request error: {err}")
return {"error": "Network or connection error", "details": str(err)}
return {"error": "Max retries exceeded"}
# Usage
result = get_balances("0xd8da6bf26964af9d7eed9e03e53415d37aa96045", "YOUR_API_KEY")
if "error" in result:
print(f"Failed to get balances: {result['error']}")
else:
print(f"Found {len(result['balances'])} token balances")
```
## Best Practices for Error Handling
1. **Always check for errors**: Don't assume API calls will succeed.
2. **Use HTTP status codes**: Rely on HTTP status codes rather than parsing error message strings for programmatic decisions.
3. **Implement retry logic with backoff**: For transient errors (like rate limits or server errors), implement exponential backoff.
4. **Provide meaningful error messages**: Transform API error responses into user-friendly messages.
5. **Log errors for debugging**: Maintain detailed logs of API errors for troubleshooting.
6. **Implement fallbacks**: When possible, have fallback behavior when API calls fail.
## Debugging Tips
If you're experiencing persistent errors:
1. **Verify your API key**: Ensure it's valid and has the necessary permissions.
2. **Check request format**: Validate that your request parameters match the API specifications.
3. **Inspect full error responses**: The error message often contains specific details about what went wrong.
4. **Monitor your usage**: Check if you're approaching or exceeding rate limits.
5. **Test with cURL**: Isolate issues by testing the API directly with cURL:
```bash theme={null}
curl -v -X GET "https://api.sim.dune.com/v1/evm/balances/0xd8da6bf26964af9d7eed9e03e53415d37aa96045" \
-H "X-Sim-Api-Key: YOUR_API_KEY"
```
## Need More Help?
If you're still experiencing issues after following these guidelines, please reach out through our [support channels](/support).
# Activity
Source: https://docs.sim.dune.com/evm/activity
evm/openapi/activity.json get /v1/evm/activity/{address}
View chronologically ordered transactions including native transfers, ERC20 movements, NFT transfers, and decoded contract interactions.
export const SupportedChains = ({endpoint, title}) => {
const dataState = useState(null);
const data = dataState[0];
const setData = dataState[1];
useEffect(function () {
var url = "https://api.sim.dune.com/v1/evm/supported-chains";
if (endpoint === 'defi_positions') {
url = "https://api.sim.dune.com/idx/supported-chains";
}
fetch(url, {
method: "GET"
}).then(function (response) {
return response.json();
}).then(function (responseData) {
setData(responseData);
});
}, [endpoint]);
if (data === null) {
return
Loading chain information...
;
}
if (!data.chains) {
return
No chain data available
;
}
var supportedChains = [];
var totalChains = data.chains.length;
if (endpoint !== undefined && endpoint !== 'defi_positions') {
for (var i = 0; i < data.chains.length; i++) {
var chain = data.chains[i];
if (chain[endpoint] && chain[endpoint].supported) {
supportedChains.push(chain);
}
}
} else {
supportedChains = data.chains;
}
var count = supportedChains.length;
var endpointName = endpoint ? endpoint.charAt(0).toUpperCase() + endpoint.slice(1).replace(/_/g, " ") : "All";
var accordionTitle = title ? title + " (" + count + ")" : "Supported Chains (" + count + ")";
return
name
chain_id
tags
{supportedChains.map(function (chain) {
return
{chain.name}
{chain.chain_id}
{chain.tags ? chain.tags.join(", ") : ""}
;
})}
;
};
The Activity API provides a realtime feed of onchain activity for any EVM address.
The newest activity is returned first and includes the following activity types:
* **send** - Outgoing transfers of tokens or native assets
* **receive** - Incoming transfers of tokens or native assets
* **mint** - Token minting activities
* **burn** - Token burning activities
* **swap** - Token swaps and exchanges
* **approve** - Token approval transactions
* **call** - Generic contract interactions that don't fall into the above categories
Each activity includes detailed information such as:
* Native token transfers
* ERC20 token transfers with metadata (symbol, decimals)
* ERC721 (NFT) transfers with token IDs
* Contract interactions with decoded function calls
Activities are mostly indexed events. There are, of course, no events for native token transfers (wen [7708](https://ethereum-magicians.org/t/eip-7708-eth-transfers-emit-a-log/20034)?). We do have a heuristic to catch very simple native token transfers, where the native token transfer is the entirety of the transaction, but unfortunately we don't currently catch native token transfers that happen within internal txns.
## Data Finality & Re-orgs
Sim APIs are designed to automatically detect and handle blockchain re-organizations.
We detect any potentially broken parent-child block relationships as soon as they arise and update our internal state to match the onchain state, typically within a few hundred milliseconds.
This re-org handling is an automatic, non-configurable feature designed to provide the most reliable data.
## Token Filtering
We include all the data needed for custom filtering in the responses, allowing you to implement your own filtering logic. For a detailed explanation of our approach, see our [Token Filtering](/token-filtering) guide.
## Compute Unit Cost
The Activity endpoint has a fixed CU cost of **3** per request. See the [Compute Units](/compute-units) page for detailed information.
# Add Account Activity
Source: https://docs.sim.dune.com/evm/add-account-activity
Expand your realtime crypto wallet by integrating a dynamic feed of onchain activity.
Now that you have a wallet capable of showing realtime token balances and total portfolio value, let's enhance it by adding an *Activity* tab.
A key feature for any wallet is the ability to view past transaction activity.
This includes native currency transfers, ERC20 token movements, NFT transfers, and decoded interactions with smart contracts.
The [Activity API](/evm/activity) provides a comprehensive, realtime feed of this onchain activity, letting you implement this functionality with a single API request across 60+ EVM chains.
Access the complete source code for this wallet on GitHub
Interact with the finished wallet app
This guide assumes you've completed the first guide, [Build a Realtime Wallet](/evm/build-a-realtime-wallet).
Your project should already be set up to fetch and display token balances.
## See It in Action
You can see the activity feed in action by trying the live demo below. Click on the "Activity" tab to explore transaction history for the sample wallet:
## Fetch Wallet Activity
Let's start by adding a new `getWalletActivity` async function to our `server.js` file to fetch activity data from Sim APIs.
```javascript server.js (getWalletActivity) theme={null}
async function getWalletActivity(walletAddress, limit = 25) { // Default to fetching 25 activities
if (!walletAddress) return [];
// The Activity API is currently in beta.
// We add a 'limit' query parameter to control how many activities are returned.
const url = `https://api.sim.dune.com/v1/evm/activity/${walletAddress}?limit=${limit}`;
try {
const response = await fetch(url, {
headers: {
'X-Sim-Api-Key': SIM_API_KEY, // Your API key from .env
'Content-Type': 'application/json'
}
});
if (!response.ok) {
const errorBody = await response.text();
console.error(`Activity API request failed with status ${response.status}: ${response.statusText}`, errorBody);
throw new Error(`Activity API request failed: ${response.statusText}`);
}
const data = await response.json();
// The API returns activity items in the 'activity' key of the JSON response.
return data.activity || [];
} catch (error) {
console.error("Error fetching wallet activity:", error.message);
return []; // Return empty array on error
}
}
```
The function creates the request URL for the `/v1/evm/activity/{address}` endpoint, adding the `limit` as a query parameter.
The [Activity API](/evm/activity) conveniently packages the transaction data within an `activity` array in the response.
The array provides rich context for each event, such as `block_time`, `transaction_hash`, `from` and `to` addresses, `value`, `value_usd`, and more.
The [Activity API](/evm/activity) supports pagination via `offset` and `limit` query parameters. For a production wallet, you might implement infinite scrolling or "Load More" buttons to fetch subsequent pages of activity.
## Add Activity into the Server Route
Next, modify the `app.get('/')` route handler, add a call to `getWalletActivity`, and include its results in the data passed to `res.render`.
```javascript server.js (app.get('/') updated for activity) {16, 18, 45} theme={null}
app.get('/', async (req, res) => {
const {
walletAddress = '',
tab = 'tokens'
} = req.query;
let tokens = [];
let activities = [];
let collectibles = [];
let totalWalletUSDValue = 0;
let errorMessage = null;
if (walletAddress) {
try {
[tokens, activities] = await Promise.all([
getWalletBalances(walletAddress),
getWalletActivity(walletAddress, 25) // Fetching 25 recent activities
]);
// Calculate the total USD value from the fetched tokens
if (tokens && tokens.length > 0) {
tokens.forEach(token => {
let individualValue = parseFloat(token.value_usd);
if (!isNaN(individualValue)) {
totalWalletUSDValue += individualValue;
}
});
}
totalWalletUSDValue = numbro(totalWalletUSDValue).format('$0,0.00');
} catch (error) {
console.error("Error in route handler:", error);
errorMessage = "Failed to fetch wallet data. Please try again.";
// tokens will remain empty, totalWalletUSDValue will be 0
}
}
res.render('wallet', {
walletAddress: walletAddress,
currentTab: tab,
totalWalletUSDValue: totalWalletUSDValue, // We'll calculate this in the next section
tokens: tokens,
activities: activities, // Placeholder for Guide 2
collectibles: [], // Placeholder for Guide 3
errorMessage: errorMessage
});
});
```
Our updated `app.get('/')` route handler now handles fetching of both token balances and wallet activity.
Both the `tokens` and the newly fetched `activities` arrays are then passed to the `res.render` method.
This makes the complete dataset available to our `wallet.ejs` template, enabling it to populate both the "Tokens" and "Activity" tabs with relevant, realtime onchain information.
## Show Activity in the Frontend
The final step is to update our `views/wallet.ejs` template to render the fetched activity data within the "Activity" tab.
CTRL+F for `id="activity"` and locate the section for the *Activity* tab.
It currently contains a placeholder paragraph.
Replace that entire `div` with the following EJS code:
```ejs views/wallet.ejs (Activity tab content) [expandable] theme={null}
<%= new Date(activity.block_time).toLocaleDateString(); %>
<% if (activity.type === 'call') { %>
Interaction
<% } else if (activity.value) { %>
<%
let amountDisplay = '0';
const decimals = typeof activity.token_metadata?.decimals === 'number' ? activity.token_metadata.decimals : 18;
if (decimals !== null) {
const valueStr = activity.value.toString();
const padded = valueStr.padStart(decimals + 1, '0');
let intPart = padded.slice(0, -decimals);
let fracPart = padded.slice(-decimals).replace(/0+$/, '');
if (!intPart) intPart = '0';
if (fracPart) {
amountDisplay = `${intPart}.${fracPart}`;
} else {
amountDisplay = intPart;
}
const amountNum = parseFloat(amountDisplay);
if (amountNum > 0 && amountNum < 0.0001) {
amountDisplay = '<0.0001';
}
if (amountNum > 1e12 || amountDisplay.length > 12) {
amountDisplay = amountNum.toExponential(2);
}
} else {
amountDisplay = activity.id || String(activity.value);
}
// Clean up the symbol: remove $ and anything after space/dash/bracket, and limit length
let symbol = activity.token_metadata?.symbol || (activity.asset_type === 'native'
? (activity.chain_id === 1 || activity.chain_id === 8453 || activity.chain_id === 10 ? 'ETH' : 'NTV')
: (activity.id ? '' : 'Tokens'));
if (symbol) {
symbol = symbol.replace('$', '').split(/[\s\-\[]/)[0].substring(0, 8);
}
%>
<% if (activity.type === 'receive') { %>+<% } else if (activity.type === 'send') { %>-<% } %><%= amountDisplay %> <%= symbol %>
<% } %>
<% }); %>
<% } else if (walletAddress) { %>
No activity found for this wallet.
<% } else { %>
Enter a wallet address to see activity.
<% } %>
```
This EJS transforms the raw data from the Activity API into an intuitive and visual transaction history.
Here's a breakdown of how it processes each activity item:
* A **list entry** is generated for each transaction.
* An **icon** visually indicates the transaction's nature: receive (↓), send (↑), or contract call (⇆).
* A **descriptive title** is dynamically constructed using the `activity.type` (and `activity.function.name` for contract calls).
* The transaction's **timestamp** (`block_time`) is converted to a readable local date/time string.
* The **chain ID** (`chain_id`) is displayed, providing important multichain context.
Beyond these descriptive elements, the template also focuses on presenting the value and financial aspects of each transaction:
* The **transaction amount** (raw `value`) is converted into a user-friendly decimal format (e.g., "1.5 ETH"). This conversion utilizes the `decimals` property from `token_metadata`.
* For **NFTs**, if a standard decimal value isn't applicable, the template displays the `token_id`.
* The **USD value** (`value_usd`), if provided by the API, is formatted to two decimal places and shown, giving a sense of the transaction's monetary worth.
***
Restart your server by running `node server.js` and refresh the app in the browser.
When you click on the *Activity* tab, you should now see a list of the latest transactions, similar to the screenshot at the beginning of this guide.
## Conclusion
You successfully added a realtime, fully functional activity feed to your multichain wallet with a single API request.
In the next and final guide of this series, [Display NFTs & Collectibles](/evm/show-nfts-collectibles), we will complete the wallet by adding support for viewing NFT collections.
# Balances
Source: https://docs.sim.dune.com/evm/balances
evm/openapi/balances.json get /v1/evm/balances/{address}
Access realtime token balances. Get comprehensive details about native and ERC20 tokens, including token metadata and USD valuations.
export const SupportedChains = ({endpoint, title}) => {
const dataState = useState(null);
const data = dataState[0];
const setData = dataState[1];
useEffect(function () {
var url = "https://api.sim.dune.com/v1/evm/supported-chains";
if (endpoint === 'defi_positions') {
url = "https://api.sim.dune.com/idx/supported-chains";
}
fetch(url, {
method: "GET"
}).then(function (response) {
return response.json();
}).then(function (responseData) {
setData(responseData);
});
}, [endpoint]);
if (data === null) {
return
Loading chain information...
;
}
if (!data.chains) {
return
No chain data available
;
}
var supportedChains = [];
var totalChains = data.chains.length;
if (endpoint !== undefined && endpoint !== 'defi_positions') {
for (var i = 0; i < data.chains.length; i++) {
var chain = data.chains[i];
if (chain[endpoint] && chain[endpoint].supported) {
supportedChains.push(chain);
}
}
} else {
supportedChains = data.chains;
}
var count = supportedChains.length;
var endpointName = endpoint ? endpoint.charAt(0).toUpperCase() + endpoint.slice(1).replace(/_/g, " ") : "All";
var accordionTitle = title ? title + " (" + count + ")" : "Supported Chains (" + count + ")";
return
name
chain_id
tags
{supportedChains.map(function (chain) {
return
{chain.name}
{chain.chain_id}
{chain.tags ? chain.tags.join(", ") : ""}
;
})}
;
};
export const DefaultChainCount = ({endpoint}) => {
const dataState = useState(null);
const data = dataState[0];
const setData = dataState[1];
useEffect(function () {
fetch("https://api.sim.dune.com/v1/evm/supported-chains", {
method: "GET"
}).then(function (response) {
return response.json();
}).then(function (responseData) {
setData(responseData);
});
}, []);
if (data === null) {
return <>N>;
}
if (!data.chains || !Array.isArray(data.chains)) {
return <>N>;
}
var uniqueDefaultChains = new Set();
for (var i = 0; i < data.chains.length; i++) {
var chain = data.chains[i];
var hasDefaultTag = Array.isArray(chain.tags) && chain.tags.indexOf("default") !== -1;
if (!hasDefaultTag) {
continue;
}
if (endpoint !== undefined) {
if (chain[endpoint] && chain[endpoint].supported === true) {
uniqueDefaultChains.add(chain.name);
}
} else {
uniqueDefaultChains.add(chain.name);
}
}
var count = uniqueDefaultChains.size;
return <>{count}>;
};
The Token Balances API provides accurate and fast real time balances of the native and ERC20 tokens of accounts on supported EVM blockchains.
Looking for the balance of a single token for a wallet? See Single token balance.
## Token Prices
Sim looks up prices onchain. We use the most liquid onchain pair to determine a USD price. We return the available liquidity in `pool_size` as part of the response, and show a warning `low_liquidity: true` if this value is less than \$10k.
You can include `metadata=pools` in your request to see which liquidity pool was used for pricing each token.
## Token Filtering
We also include the `pool_size` field in all responses, allowing you to implement custom filtering logic based on your specific requirements. For a detailed explanation of our approach, see our [Token Filtering](/token-filtering) guide.
### Exclude tokens with less than 100 USD liquidity
Use the optional `exclude_spam_tokens` query parameter to automatically filter out tokens with less than 100 USD of liquidity. Include the query parameter `exclude_spam_tokens=true` so that those tokens are excluded from the response entirely. This is distinct from the `low_liquidity` field in the response, which is `true` when liquidity is below 10,000. To learn more about how Sim calculates liquidity data, visit the [Token Filtering](/token-filtering) guide.
## Compute Unit Cost
The Balances endpoint’s CU cost equals the number of chains you include via the `chain_ids` query parameter.
For example, `?chain_ids=1,8453,137` processes three chains and consumes three CUs.
If you omit `chain_ids`, the endpoint uses its `default` chain set (low-latency networks), which equals {} chains at request time (subject to change). See the tags section of the Supported Chains page and the Compute Units page for details.
## Historical prices
You can request historical point-in-time prices by adding the `historical_prices` query parameter. Use whole numbers to specify the number of hours in the past. You can request up to three offsets. For example, `&historical_prices=168` returns the price 168 hours (1 week) ago. `&historical_prices=720,168,24` returns prices 720 hours (1 month) ago, 168 hours (1 week) ago, and 24 hours ago.
The `historical_prices` parameter is currently supported only on the EVM Balances and EVM Token Info endpoints.
When set, each balance includes a `historical_prices` array with one entry per offset:
```json theme={null}
{
"balances": [
{
"symbol": "ETH",
"price_usd": 3896.8315,
"historical_prices": [
{ "offset_hours": 8760, "price_usd": 2816.476803 },
{ "offset_hours": 720, "price_usd": 3710.384068 },
{ "offset_hours": 168, "price_usd": 3798.632723 }
]
}
]
}
```
**Percent changes are not returned**. You can compute your own differences using the `price_usd` on the balance and the values in `historical_prices[].price_usd`.
The maximum number of historical price offsets is 3. If more than 3 are provided, the API returns an error.
## Pagination
This endpoint is using cursor based pagination. You can use the `limit` query parameter to define the maximum page size.
Results might at times be less than the maximum page size.
The `next_offset` value is passed back by the initial response and can be used to fetch the next page of results, by passing it as the `offset` query parameter in the next request.
You can only use the value from `next_offset` to set the `offset` query parameter of the next page of results.
## Single token balance
Use the token sub-path of the Balances endpoint to fetch a wallet’s balance for one token on one chain.
This sub-path accepts exactly one chain via the `chain_ids` query parameter.
Use the ERC-20 contract address in `{token_address}`.
```bash theme={null}
curl -s -X GET 'https://api.sim.dev.dune.com/v1/evm/balances/0xd8dA6BF26964aF9D7eEd9e03E53415D37aA96045/token/0x146523e8db6337291243a63a5555f446fa6c279f?chain_ids=1' \
-H 'X-Sim-Api-Key: YOUR_API_KEY'
```
```json theme={null}
{
"request_time": "2025-10-11T03:47:29.364380268+00:00",
"response_time": "2025-10-11T03:47:29.380032150+00:00",
"wallet_address": "0xd8da6bf26964af9d7eed9e03e53415d37aa96045",
"balances": [
{
"chain": "ethereum",
"chain_id": 1,
"address": "0x146523e8db6337291243a63a5555f446fa6c279f",
"amount": "7156868995423049840501842481",
"symbol": "AiMeme",
"name": "Ai Meme",
"decimals": 18,
"price_usd": 102826.739324412,
"value_usd": 735917502571333,
"pool_size": 9.09741149400001,
"low_liquidity": true
}
]
}
```
Set `{token_address}` to `native`.
```bash theme={null}
curl -s -X GET 'https://api.sim.dev.dune.com/v1/evm/balances/0xd8dA6BF26964aF9D7eEd9e03E53415D37aA96045/token/native?chain_ids=1' \
-H 'X-Sim-Api-Key: YOUR_API_KEY'
```
```json theme={null}
{
"request_time": "2025-10-11T03:48:00.471500727+00:00",
"response_time": "2025-10-11T03:48:00.485194141+00:00",
"wallet_address": "0xd8da6bf26964af9d7eed9e03e53415d37aa96045",
"balances": [
{
"chain": "ethereum",
"chain_id": 1,
"address": "native",
"amount": "783060447601684229",
"symbol": "ETH",
"decimals": 18,
"price_usd": 3779.154092,
"value_usd": 2959.30609483726
}
]
}
```
### Compute Unit Cost
This sub-path has a fixed CU cost of **1** per request.
# Build a Realtime Chat Agent
Source: https://docs.sim.dune.com/evm/build-a-realtime-chat-agent
Create an AI-powered chat app that can answer questions about blockchain data using Dune's Sim APIs and OpenAI's function calling feature.
In this guide, you'll learn how to build **Simchat**, an AI chat agent that can provide realtime blockchain insights through natural conversation.
Users can ask questions about wallet balances, transaction history, NFT collections, and token information across 60+ EVM chains and Solana, and the agent will fetch and explain the data in a friendly way.
By combining OpenAI's LLMs with the realtime blockchain data provided by Sim APIs, you'll create a chat agent that makes onchain data accessible to everyone, regardless of their technical expertise.
Access the complete source code for Simchat on GitHub
Chat with the finished assistant
## Prerequisites
Before we begin, ensure you have:
* Node.js >= 18.0.0
* A [Sim API key](/#authentication)
* An [OpenAI API key](https://platform.openai.com/docs/api-reference/introduction)
Learn how to obtain your Sim API key
## Features
When you complete this guide, your chat agent will have these capabilities:
Automatically triggers API requests based on user queries using OpenAI's function calling feature
Retrieves native and ERC20/SPL token balances with USD values for any wallet address across EVM chains and Solana
Displays chronological wallet activity including transfers and contract interactions on EVM networks
Shows ERC721 and ERC1155 collectibles owned by wallet addresses across supported EVM chains
Provides detailed token information, pricing, and holder distributions for EVM and Solana tokens
Users ask questions in plain English about blockchain data, no technical knowledge required
## Try the Live Demo
Before diving into building, you can interact with the live chat agent app below.
Try these example questions:
* What tokens does vitalik.eth have?
* Show me the NFTs in wallet `0xd8da6bf26964af9d7eed9e03e53415d37aa96045`
* What's the price of USDC?
* Get token balances for `DYw8jCTfwHNRJhhmFcbXvVDTqWMEVFBX6ZKUmG5CNSKK` on Solana
## Project Setup
Let's start by creating the project structure and installing dependencies.
Open your terminal and create a new directory:
```bash theme={null}
mkdir simchat
cd simchat
```
Initialize a new Node.js project:
```bash theme={null}
npm init -y
npm pkg set type="module"
```
Install the required packages:
```bash theme={null}
npm install express openai dotenv
```
These packages provide:
* **express**: Web server framework
* **openai**: Official OpenAI client library
* **dotenv**: Environment variable management
Create a `.env` file in your project root:
```bash theme={null}
touch .env
```
Add your API keys:
```plaintext .env theme={null}
# Required API keys
OPENAI_API_KEY=your_openai_api_key_here
SIM_API_KEY=your_sim_api_key_here
```
Never commit your `.env` file to version control. Add it to `.gitignore` to keep your API keys secure.
Create the main app files:
```bash theme={null}
touch server.js
touch chat.html
```
The `server.js` file will handle our backend Express server and API logic, while `chat.html` contains our frontend chat interface.
Populate the `server.js` with this basic Express code:
```javascript [expandable] theme={null}
import express from 'express';
import { OpenAI } from 'openai';
import path from 'path';
import { fileURLToPath } from 'url';
import dotenv from 'dotenv';
dotenv.config();
// Set up __dirname for ES modules
const __filename = fileURLToPath(import.meta.url);
const __dirname = path.dirname(__filename);
// Initialize Express
const app = express();
app.use(express.json());
// Initialize OpenAI client
const openai = new OpenAI({
apiKey: process.env.OPENAI_API_KEY
});
// Sim API key
const SIM_API_KEY = process.env.SIM_API_KEY;
// Serve the HTML file
app.get('/', (req, res) => {
res.sendFile(path.join(__dirname, 'chat.html'));
});
// Start server
const PORT = process.env.PORT || 3001;
app.listen(PORT, () => {
console.log(`Server running on http://localhost:${PORT}`);
});
```
Add the initial frontend template to `chat.html`:
```html [expandable] theme={null}
Sim APIs Chat
```
Your project structure should now look like:
```
simchat/
├── server.js # Express server with OpenAI integration
├── chat.html # Chat interface
├── package.json # Project configuration
├── .env # API keys (keep private)
└── node_modules/ # Dependencies
```
Run `node server.js` in the terminal to start the server.
Visit `http://localhost:3001` to see the newly scaffolded chat app.
If you try to send a message at this point, you'll get a server error since we haven't implemented the back-end functionality yet.
If you encounter errors, make sure your `.env` file contains the correct `OPENAI_API_KEY` and `SIM_API_KEY`.
Check your terminal for any error messages from `server.js`.
## Add OpenAI LLM Chat
Now let's add the core chat functionality to our Express server using OpenAI's GPT-4o-mini.
We'll start by defining a system prompt that instructs the LLM on its role and capabilities.
Add this `SYSTEM_PROMPT` variable to your `server.js` file:
```javascript (server.js) theme={null}
// System prompt that instructs the AI assistant
const SYSTEM_PROMPT = `You are a helpful assistant that can answer questions about blockchain data using Dune's Sim APIs. You have access to various functions that can fetch realtime blockchain data including:
- Token balances for wallets across 60+ EVM chains
- Transaction activity and history
- NFT collections and collectibles
- Token metadata and pricing information
- Token holder distributions
- Supported blockchain networks
When users ask about blockchain data, wallet information, token details, or transaction history, use the appropriate functions to fetch realtime data. Always provide clear, helpful explanations of the data you retrieve.
Keep your responses concise and focused. When presenting large datasets, summarize the key findings rather than listing every detail.`;
```
This system prompt sets the context for the LLM, explaining its capabilities and how it should behave when interacting with users.
Now let's implement the basic chat endpoint with Express.js that uses this system prompt.
The `/chat` endpoint will receive POST requests from our frontend chat interface, process them through the LLM, and return responses to display in the chat:
```javascript theme={null}
// Basic chat endpoint
app.post('/chat', async (req, res) => {
try {
const { message } = req.body;
if (!message) return res.status(400).json({ error: 'Message is required' });
// Create conversation with system prompt
const messages = [
{ role: "system", content: SYSTEM_PROMPT },
{ role: "user", content: message }
];
// Call OpenAI
const response = await openai.chat.completions.create({
model: "gpt-4o-mini",
messages: messages,
max_tokens: 2048
});
const assistantMessage = response.choices[0].message.content;
res.json({
message: assistantMessage
});
} catch (error) {
console.error('Chat error:', error);
res.status(500).json({
error: 'An error occurred while processing your request',
details: error.message
});
}
});
```
Run `node server.js` again and visit `http://localhost:3001`.
You'll have a working chat interface powered by OpenAI's `gpt-4o-mini` model with a custom system prompt, but it won't be able to fetch realtime blockchain data yet.
## Define OpenAI Functions
To make our chatbot fetch realtime blockchain data, we need to use OpenAI's [function calling](https://platform.openai.com/docs/guides/function-calling?api-mode=responses) feature.
When the model determines it needs external data, it will call one of these functions with appropriate parameters, and we can then execute the actual API call and provide the results back to the model.
Add this `functions` array to your `server.js` file:
```javascript [expandable] theme={null}
// Function definitions for OpenAI function calling
const functions = [
{
type: "function",
function: {
name: "get_token_balances",
description: "Get realtime token balances for an EVM wallet address across multiple chains. Returns native and ERC20 token balances with USD values.",
parameters: {
type: "object",
properties: {
address: {
type: "string",
description: "The wallet address to get balances for (e.g., 0xd8da6bf26964af9d7eed9e03e53415d37aa96045)"
},
description: "Whether to exclude spam tokens from results",
default: true
}
},
required: ["address"],
additionalProperties: false
}
}
},
{
type: "function",
function: {
name: "get_wallet_activity",
description: "Get chronologically ordered transaction activity for an EVM wallet including transfers, contract interactions, and decoded function calls.",
parameters: {
type: "object",
properties: {
address: {
type: "string",
description: "The wallet address to get activity for"
},
limit: {
type: "number",
description: "Maximum number of activities to return (default: 25)",
default: 25
}
},
required: ["address"],
additionalProperties: false
}
}
},
{
type: "function",
function: {
name: "get_nft_collectibles",
description: "Get NFT collectibles (ERC721 and ERC1155) owned by an EVM wallet address.",
parameters: {
type: "object",
properties: {
address: {
type: "string",
description: "The wallet address to get NFTs for"
},
limit: {
type: "number",
description: "Maximum number of collectibles to return (default: 50)",
default: 50
}
},
required: ["address"],
additionalProperties: false
}
}
},
{
type: "function",
function: {
name: "get_token_info",
description: "Get detailed metadata and pricing information for a specific token on EVM chains.",
parameters: {
type: "object",
properties: {
token_address: {
type: "string",
description: "The token contract address or 'native' for native tokens"
},
chain_ids: {
type: "string",
description: "Chain IDs to search on (e.g., '1,137,8453' or 'all')",
default: "all"
}
},
required: ["token_address"],
additionalProperties: false
}
}
},
{
type: "function",
function: {
name: "get_token_holders",
description: "Get token holders for a specific ERC20 token, ranked by balance descending.",
parameters: {
type: "object",
properties: {
chain_id: {
type: "number",
description: "The chain ID where the token exists (e.g., 1 for Ethereum)"
},
token_address: {
type: "string",
description: "The token contract address"
},
limit: {
type: "number",
description: "Maximum number of holders to return (default: 100)",
default: 100
}
},
required: ["chain_id", "token_address"],
additionalProperties: false
}
}
},
{
type: "function",
function: {
name: "get_transactions",
description: "Get detailed transaction information for an EVM wallet address.",
parameters: {
type: "object",
properties: {
address: {
type: "string",
description: "The wallet address to get transactions for"
},
limit: {
type: "number",
description: "Maximum number of transactions to return (default: 25)",
default: 25
}
},
required: ["address"],
additionalProperties: false
}
}
},
{
type: "function",
function: {
name: "get_supported_chains",
description: "Get list of all supported EVM chains and their capabilities.",
parameters: {
type: "object",
properties: {},
additionalProperties: false
}
}
},
{
type: "function",
function: {
name: "get_svm_token_balances",
description: "Get token balances for a Solana (SVM) address. Returns native and SPL token balances with USD values.",
parameters: {
type: "object",
properties: {
address: {
type: "string",
description: "The Solana wallet address to get balances for (e.g., DYw8jCTfwHNRJhhmFcbXvVDTqWMEVFBX6ZKUmG5CNSKK)"
},
limit: {
type: "number",
description: "Maximum number of balances to return (default: 100)",
default: 100
},
chains: {
type: "string",
description: "Comma-separated list of chains to include",
default: "all"
}
},
required: ["address"],
additionalProperties: false
}
}
},
{
type: "function",
function: {
name: "get_svm_token_metadata",
description: "Get metadata for a Solana token mint address.",
parameters: {
type: "object",
properties: {
mint: {
type: "string",
description: "The Solana token mint address (e.g., So11111111111111111111111111111111111111112)"
}
},
required: ["mint"],
additionalProperties: false
}
}
}
];
```
Each function corresponds to a different Sim API endpoint that we'll implement next.
## Integrate Sim APIs
Now we need to connect OpenAI's function calls to actual Sim API requests. When the model calls a function like `get_token_balances`, we need to:
1. Map that OpenAI function call to the correct Sim API endpoint
2. Make the HTTP request with proper authentication
3. Return the data back to the model
We'll implement this with three components: a generic API caller, endpoint configurations, and an execution function that ties them together.
### Build the Generic API Caller
First, let's create a reusable function that handles all HTTP requests to Sim APIs:
```javascript theme={null}
// Generic API call function for Sim APIs
async function apiCall(endpoint, params = {}) {
try {
const queryString = Object.keys(params).length
? '?' + new URLSearchParams(params).toString()
: '';
const response = await fetch(`https://api.sim.dune.com${endpoint}${queryString}`, {
headers: {
'X-Sim-Api-Key': SIM_API_KEY,
'Content-Type': 'application/json'
}
});
if (!response.ok) throw new Error(`API request failed: ${response.statusText}`);
return await response.json();
} catch (error) {
return { error: error.message };
}
}
```
This function handles all the common functionality needed for Sim API requests:
* URL construction with query parameters
* Authentication headers
* Error handling
* JSON parsing
By centralizing this logic, we avoid code duplication and ensure consistent error handling across all API calls.
### Configure API Endpoints
Next, we'll create a more comprehensive configuration object that handles all the different parameter patterns used by Sim APIs:
```javascript theme={null}
// API endpoint configurations
const API_CONFIGS = {
get_token_balances: (address) => {
const queryParams = new URLSearchParams({ metadata: 'url,logo' });
return [`/v1/evm/balances/${address}`, queryParams];
},
get_wallet_activity: (address, limit = 25) =>
[`/v1/evm/activity/${address}`, { limit: Math.min(limit, 10) }],
get_nft_collectibles: (address, limit = 50) =>
[`/v1/evm/collectibles/${address}`, { limit: Math.min(limit, 10) }],
get_token_info: (token_address, chain_ids = 'all') =>
[`/v1/evm/token-info/${token_address}`, { chain_ids }],
get_token_holders: (chain_id, token_address, limit = 100) =>
[`/v1/evm/token-holders/${chain_id}/${token_address}`, { limit: Math.min(limit, 10) }],
get_transactions: (address, limit = 25) =>
[`/v1/evm/transactions/${address}`, { limit: Math.min(limit, 10) }],
get_supported_chains: () =>
['/v1/evm/supported-chains', {}],
get_svm_token_balances: (address, limit = 100, chains = 'all') => {
const queryParams = new URLSearchParams();
if (chains) queryParams.append('chains', chains);
if (limit) queryParams.append('limit', Math.min(limit, 20));
return [`/beta/svm/balances/${address}`, queryParams];
},
get_svm_token_metadata: (mint) =>
[`/beta/svm/token-metadata/${mint}`, {}]
};
```
This configuration handles all the different patterns of Sim APIs: simple objects for basic query parameters, `URLSearchParams` for complex query strings, multiple path parameters, and endpoints with no parameters.
### Execute Function Calls
Now we need an enhanced `callFunction` that can handle both regular objects and `URLSearchParams`:
```javascript theme={null}
// Function to execute API calls based on function name
async function callFunction(name, args) {
if (!API_CONFIGS[name]) return JSON.stringify({ error: `Unknown function: ${name}` });
const [endpoint, params] = API_CONFIGS[name](...Object.values(args));
const result = await apiCall(endpoint, params);
return JSON.stringify(result);
}
```
This approach maintains the streamlined `API_CONFIGS` pattern while properly handling all the different parameter types and patterns used by the various Sim API endpoints.
The `apiCall` function can handle both `URLSearchParams` objects (for complex queries) and regular objects (for simple query parameters).
### Update the Chat Endpoint
Finally, we need to update our chat endpoint to handle function calls.
Replace your existing `/chat` endpoint with this version that includes function calling support:
```javascript [expandable] theme={null}
// Enhanced chat endpoint with function calling
app.post('/chat', async (req, res) => {
try {
const { message } = req.body;
if (!message) return res.status(400).json({ error: 'Message is required' });
// Create conversation with system prompt
const messages = [
{ role: "system", content: SYSTEM_PROMPT },
{ role: "user", content: message }
];
// Call OpenAI with function definitions
const response = await openai.chat.completions.create({
model: "gpt-4o-mini",
messages: messages,
tools: functions,
tool_choice: "auto",
max_tokens: 2048
});
let assistantMessage = response.choices[0].message;
// Handle function calls if present
if (assistantMessage.tool_calls) {
messages.push(assistantMessage);
// Execute each function call
for (const toolCall of assistantMessage.tool_calls) {
const functionResult = await callFunction(
toolCall.function.name,
JSON.parse(toolCall.function.arguments)
);
messages.push({
role: "tool",
tool_call_id: toolCall.id,
content: functionResult
});
}
// Get final response with function results
const finalResponse = await openai.chat.completions.create({
model: "gpt-4o-mini",
messages: messages,
tools: functions,
tool_choice: "auto",
max_tokens: 2048
});
assistantMessage = finalResponse.choices[0].message;
}
res.json({
message: assistantMessage.content,
function_calls: assistantMessage.tool_calls || []
});
} catch (error) {
console.error('Chat error:', error);
res.status(500).json({
error: 'An error occurred while processing your request',
details: error.message
});
}
});
```
This enhanced endpoint now supports the full function calling workflow: it sends the user's message to OpenAI with the available functions, executes any function calls that the model makes, and then sends the function results back to get the final conversational response.
Restart your server and test the function calling functionality. Try asking questions like *What tokens does vitalik.eth have?* and watch as your chat agent fetches realtime data from Sim APIs to provide accurate, up-to-date responses.
## Conclusion
You've successfully built a realtime chat agent that makes blockchain data accessible through natural conversation.
By combining OpenAI's LLMs with Sim APIs' comprehensive blockchain data, you've created a tool that can instantly fetch and explain complex onchain information across 60+ EVM chains and Solana.
This foundation provides everything you need to build your own specialized blockchain chat assistants.
Consider extending it for specific use cases like:
* **NFT Discovery Bot**: Integrate marketplace data, rarity rankings, and collection insights
* **Portfolio Manager**: Include transaction categorization, P\&L tracking, and tax reporting features
* **Trading Assistant**: Add price alerts, technical indicators, and market sentiment analysis
The [complete source code on GitHub](https://github.com/duneanalytics/sim-guides/tree/main/simchat) includes additional features like full session management and enhanced error handling that weren't covered in this guide
Explore the repository to see the additional features in action.
# Build a Realtime Wallet
Source: https://docs.sim.dune.com/evm/build-a-realtime-wallet
Create a multichain wallet that displays realtime balances, transactions, and NFTs using Sim APIs and Express.js
This is the first guide in our series on building a realtime, multichain wallet using Sim APIs.
In this one, we will lay the foundation for our wallet.
You will set up a Node project with Express.js, fetch and display token balances from 60+ EVM chains using the Balances API, and calculate the wallet's total portfolio value in USD.
Access the complete source code for this wallet on GitHub
Interact with the finished wallet app
## Prerequisites
Before we begin, make sure you have:
* Node.js >= 18.0.0
* A Sim API key
Learn how to obtain your API key to properly authenticate requests.
## Features
By the end of this series, our wallet will have four main features:
1. **Token Balances**: Realtime balance tracking with USD values using the [Balances API](/evm/balances).
2. **Total Portfolio Value**: Aggregated USD value across all chains.
3. **Wallet Activity**: Comprehensive transaction history showing transfers and contract interactions using the [Activity API](/evm/activity)
4. **NFTs**: A display of owned NFTs using the [Collectibles API](/evm/collectibles)
In this first guide, we will focus on implementing the first two: **Token Balances** and **Total Portfolio Value**.
## Try the Live Demo
Before diving into building, you can interact with the finished wallet app below.
Enter any Ethereum wallet address to explore its token balances, transaction history, and NFT collection across multiple chains.
## Project Setup
Let's start by scaffolding our project.
This initial setup will provide a basic Express.js server and frontend templates, allowing us to focus on integrating Sim APIs.
Open your terminal and create a new directory for the project:
```bash theme={null}
mkdir wallet-ui
cd wallet-ui
```
Now you are in the `wallet-ui` directory.
Next, initialize a new Node.js project with npm:
```bash theme={null}
npm init -y
npm pkg set type="module"
```
These commands create a `package.json` file with default values and configure it to use ES modules.
Afterward, install the required packages:
```bash theme={null}
npm install express ejs dotenv numbro
```
We are using three packages for our wallet:
* **Express.js**: A popular Node.js web framework for creating our server.
* **EJS**: A simple templating engine that lets us generate dynamic HTML.
* **dotenv**: A package to load environment variables from a `.env` file.
* **numbro**: For formatting numbers and currency.
Create a new `.env` file in your project root:
```bash theme={null}
touch .env
```
Open the `.env` file in your code editor and add your Sim API key:
```plaintext .env theme={null}
# Your Sim API key (required)
SIM_API_KEY=your_api_key_here
```
Never commit your `.env` file to version control. If you are using Git, add `.env` to your `.gitignore` file.
Create the necessary directories for views and public assets:
```bash theme={null}
mkdir views
mkdir public
```
`views` will hold our EJS templates, and `public` will serve static assets like CSS.
Now, create the core files:
```bash theme={null}
touch server.js
touch views/wallet.ejs
touch public/styles.css
```
Populate `server.js` with this basic Express server code:
```javascript server.js [expandable] theme={null}
import express from 'express';
import numbro from 'numbro';
import dotenv from 'dotenv';
import path from 'path';
import { fileURLToPath } from 'url';
// Load environment variables
dotenv.config();
const SIM_API_KEY = process.env.SIM_API_KEY;
if (!SIM_API_KEY) {
console.error("FATAL ERROR: SIM_API_KEY is not set in your environment variables.");
process.exit(1);
}
// Set up __dirname for ES modules
const __filename = fileURLToPath(import.meta.url);
const __dirname = path.dirname(__filename);
// Initialize Express
const app = express();
// Configure Express settings
app.set('view engine', 'ejs');
app.set('views', path.join(__dirname, 'views'));
app.use(express.static(path.join(__dirname, 'public')));
// Add our home route
app.get('/', async (req, res) => {
const {
walletAddress = '',
tab = 'tokens' // Default to tokens tab
} = req.query;
let tokens = [];
let totalWalletUSDValue = 0;
let activities = []; // For Guide 2
let collectibles = []; // For Guide 3
// In later steps, these arrays will be populated with API data.
res.render('wallet', {
walletAddress: walletAddress,
currentTab: tab,
totalWalletUSDValue: '$0.00', // Will be calculated later in this guide.
tokens: tokens,
activities: activities,
collectibles: collectibles
});
});
// Start the server
app.listen(3001, () => {
console.log(`Server running at http://localhost:3001`);
});
```
Add the initial frontend template to `views/wallet.ejs`:
```ejs views/wallet.ejs [expandable] theme={null}
Sim APIs Wallet UI
Enter a wallet address above to see token balances.
<% } %>
Activity feature will be added in the next guide.
Collectibles feature will be added in a future guide.
```
Add basic styles to `public/styles.css`:
```css public/styles.css [expandable] theme={null}
:root {
--font-primary: 'IBM Plex Sans', sans-serif;
--font-mono: 'IBM Plex Mono', monospace;
--color-bg-deep: #e1e2f9;
--color-bg-container: #141829;
--color-border-primary: #2c3040;
--color-border-secondary: #222636;
--color-text-primary: #ffffff;
--color-text-secondary: #e0e0e0;
--color-text-muted: #a0a3b1;
--color-text-subtle: #808391;
--color-accent-green: #50e3c2;
--color-accent-purple: #7e87ef;
--color-accent-red: #ff7875;
--color-placeholder-bg: #3a3f58;
}
body {
font-family: var(--font-primary);
background-color: var(--color-bg-deep);
color: var(--color-text-secondary);
margin: 0;
padding: 0;
display: flex;
justify-content: center;
align-items: center;
min-height: 100vh;
padding-top: 0;
padding-bottom: 0;
height: 100vh;
}
.mobile-container {
width: 100%;
max-width: 420px;
height: 90vh;
max-height: 800px;
min-height: 600px;
background-color: var(--color-bg-container);
border-radius: 20px;
display: flex;
flex-direction: column;
overflow: hidden;
align-self: center;
box-shadow: 0 8px 32px rgba(20, 24, 41, 0.18), 0 1.5px 6px rgba(20, 24, 41, 0.10);
}
/* Header Styles */
.app-header {
display: flex;
justify-content: space-between;
align-items: center;
padding: 20px;
border-bottom: 1px solid var(--color-border-primary);
flex-shrink: 0;
}
.profile-pic-placeholder {
width: 36px;
height: 36px;
background-color: var(--color-placeholder-bg);
border-radius: 50%;
}
.header-title {
font-family: var(--font-primary);
font-size: 1.4em;
font-weight: 600; /* IBM Plex Sans SemiBold */
color: var(--color-text-primary);
}
.settings-icon {
width: 22px;
height: 22px;
background-image: url("data:image/svg+xml,%3Csvg xmlns='http://www.w3.org/2000/svg' viewBox='0 0 24 24' fill='%23e0e0e0'%3E%3Cpath d='M19.43 12.98c.04-.32.07-.64.07-.98s-.03-.66-.07-.98l2.11-1.65c.19-.15.24-.42.12-.64l-2-3.46c-.12-.22-.39-.3-.61-.22l-2.49 1c-.52-.4-1.08-.73-1.69-.98l-.38-2.65C14.46 2.18 14.25 2 14 2h-4c-.25 0-.46.18-.49.42l-.38 2.65c-.61.25-1.17.59-1.69.98l-2.49-1c-.23-.09-.49 0-.61.22l-2 3.46c-.13.22-.07.49.12.64l2.11 1.65c-.04.32-.07.65-.07.98s.03.66.07.98l-2.11 1.65c-.19.15-.24.42-.12-.64l2 3.46c.12.22.39.3.61.22l2.49-1c.52.4 1.08.73 1.69.98l.38 2.65c.03.24.24.42.49.42h4c.25 0 .46-.18.49.42l.38-2.65c.61-.25 1.17-.59 1.69-.98l2.49 1c.23.09.49 0 .61-.22l2-3.46c.12-.22.07-.49-.12-.64l-2.11-1.65zM12 15.5c-1.93 0-3.5-1.57-3.5-3.5s1.57-3.5 3.5-3.5 3.5 1.57 3.5 3.5-1.57 3.5-3.5 3.5z'/%3E%3C/svg%3E");
background-repeat: no-repeat;
background-size: contain;
cursor: pointer;
opacity: 0.8;
}
/* Total Balance Section */
.total-balance-section {
padding: 25px 20px;
text-align: center;
border-bottom: 1px solid var(--color-border-primary);
flex-shrink: 0;
}
.total-balance-amount {
font-family: var(--font-mono); /* Mono for large number */
font-size: 2.3em;
font-weight: 700;
margin: 0;
color: var(--color-accent-green);
}
.total-balance-label {
font-family: var(--font-primary);
font-size: 0.85em;
color: var(--color-text-muted);
margin-top: 2px;
cursor: pointer; /* Make it look clickable */
}
.total-balance-label:hover {
color: var(--color-text-primary);
}
/* Tabs Section */
.tabs {
display: flex;
border-bottom: 1px solid var(--color-border-primary);
flex-shrink: 0;
position: relative;
z-index: 1;
}
.tab-button {
font-family: var(--font-primary);
flex-grow: 1;
padding: 14px;
text-align: center;
cursor: pointer;
background-color: transparent;
border: none;
color: var(--color-text-muted);
font-size: 0.95em;
font-weight: 500; /* IBM Plex Sans Medium */
border-bottom: 3px solid transparent;
transition: color 0.2s ease, border-bottom-color 0.2s ease;
}
.tab-button:hover {
color: var(--color-text-primary);
}
.tab-button.active {
color: var(--color-text-primary);
border-bottom: 3px solid var(--color-accent-purple);
}
.tab-content {
padding: 0px 20px 20px 20px;
flex-grow: 1;
min-height: 0;
max-height: calc(100vh - 220px);
overflow-y: auto;
}
.tab-pane { display: none; }
.tab-pane.active { display: block; }
/* Tokens Tab & Activity Tab Styles */
.list-item {
display: flex;
align-items: center;
padding: 16px 0;
border-bottom: 1px solid var(--color-border-secondary);
}
.list-item:last-child { border-bottom: none; }
.item-icon-placeholder {
width: 38px;
height: 38px;
background-color: #2c3040; /* Using a specific color, not var for contrast */
border-radius: 50%;
margin-right: 15px;
display: flex;
justify-content: center;
align-items: center;
font-family: var(--font-mono); /* Mono for symbols like ETH */
font-weight: 500;
font-size: 0.9em;
color: #c0c3d1; /* Using specific color */
flex-shrink: 0;
overflow: hidden; /* Prevents text overflow if symbol is too long */
}
.item-info {
flex-grow: 1;
min-width: 0; /* Prevents text overflow issues in flex children */
}
.item-name { /* Token Name, Activity Type like "Received", "Sent" */
font-family: var(--font-primary);
font-size: 1.05em;
font-weight: 500; /* IBM Plex Sans Medium */
margin: 0 0 3px 0;
color: var(--color-text-primary);
white-space: nowrap;
overflow: hidden;
text-overflow: ellipsis;
}
.item-sub-info { /* "1.2345 ETH on Ethereum", "Price: $800.00" */
font-family: var(--font-primary); /* Sans for descriptive part */
font-size: 0.85em;
color: var(--color-text-muted);
margin: 0;
white-space: nowrap;
overflow: hidden;
text-overflow: ellipsis;
}
.item-sub-info .mono { /* Span class for monospaced parts within sub-info */
font-family: var(--font-mono);
}
.item-value-right {
text-align: right;
flex-shrink: 0;
padding-left: 10px;
}
.item-usd-value { /* USD value of holding */
font-family: var(--font-mono); /* Mono for numerical USD value */
font-size: 1.05em;
font-weight: 500;
margin: 0 0 3px 0;
color: var(--color-text-primary);
}
/* Activity Tab Specifics */
.activity-direction { /* "Received ETH", "Sent USDC" */
font-family: var(--font-primary);
font-size: 1.05em;
font-weight: 500; /* IBM Plex Sans Medium */
margin: 0 0 3px 0;
}
.activity-direction.sent { color: var(--color-accent-red); }
.activity-direction.receive { color: var(--color-accent-green); } /* Ensure class name consistency with JS */
.activity-address, .activity-timestamp {
font-family: var(--font-primary); /* Sans for "From:", "To:" */
font-size: 0.8em;
color: var(--color-text-subtle);
margin: 0;
}
.activity-address .mono, .activity-timestamp .mono { /* For address itself and timestamp value */
font-family: var(--font-mono);
}
.activity-amount-right { /* "+0.5 ETH" */
font-family: var(--font-mono); /* Mono for amount + symbol */
font-size: 1.05em;
font-weight: 500;
}
.activity-amount-right.sent { color: var(--color-accent-red); }
.activity-amount-right.receive { color: var(--color-accent-green); }
/* NFT Grid Container */
.collectibles-grid {
display: grid;
grid-template-columns: repeat(1, 1fr);
gap: 1rem;
padding-top: 20px;
width: 100%;
}
/* NFT Item Container */
.collectible-item-link {
text-decoration: none;
color: inherit;
display: block;
transition: transform 0.2s ease;
}
.collectible-item-link:hover {
transform: translateY(-2px);
}
.collectible-item {
position: relative;
border-radius: 12px;
overflow: hidden;
background: var(--color-bg-container);
border: 1px solid var(--color-border-secondary);
box-shadow: 0 2px 8px rgba(0, 0, 0, 0.1);
}
/* Image Container */
.collectible-image-container {
position: relative;
width: 100%;
padding-bottom: 100%; /* Creates a square aspect ratio */
background: var(--color-placeholder-bg);
}
.collectible-image {
position: absolute;
top: 0;
left: 0;
width: 100%;
height: 100%;
object-fit: cover;
}
/* Image Placeholder */
.collectible-image-placeholder {
position: absolute;
top: 0;
left: 0;
width: 100%;
height: 100%;
display: flex;
align-items: center;
justify-content: center;
background: linear-gradient(135deg, #667eea 0%, #764ba2 100%);
color: white;
font-family: var(--font-primary);
font-weight: 600;
font-size: 0.875rem;
}
/* NFT Info Container - Static (always visible) */
.collectible-info-static {
padding: 0.75rem;
background: var(--color-bg-container);
border-top: 1px solid var(--color-border-secondary);
}
/* NFT Info Container - Hover (keep for backwards compatibility but not used) */
.collectible-info {
position: absolute;
bottom: 0;
left: 0;
right: 0;
padding: 0.75rem;
background: linear-gradient(transparent, rgba(0, 0, 0, 0.85));
color: white;
opacity: 0;
transition: opacity 0.3s ease;
}
.collectible-item-link:hover .collectible-info {
opacity: 1;
}
/* NFT Text Styles */
.collectible-name {
font-family: var(--font-primary);
font-size: 0.9rem;
font-weight: 600;
margin-bottom: 0.25rem;
white-space: nowrap;
overflow: hidden;
text-overflow: ellipsis;
color: var(--color-text-primary);
}
.collectible-collection {
font-family: var(--font-mono);
font-size: 0.8rem;
margin-bottom: 0;
opacity: 0.9;
white-space: nowrap;
overflow: hidden;
text-overflow: ellipsis;
color: var(--color-text-muted);
}
.collectible-chain {
font-family: var(--font-primary);
font-size: 0.7rem;
opacity: 0.8;
color: white;
}
```
Run `ls` in your terminal. Your project directory `wallet-ui/` should now contain:
```bash theme={null}
wallet-ui/
├── server.js # Main application file with Express server
├── views/ # Directory for EJS templates
│ └── wallet.ejs # Main wallet UI template
├── public/ # Directory for static assets
│ └── styles.css # CSS styling for the wallet UI
├── package.json # Project configuration
├── package-lock.json # Dependency lock file (if `npm install` was run)
├── node_modules/ # Installed packages (if `npm install` was run)
└── .env # Your environment variables
```
Run `node server.js` in the terminal to start the server.
Visit `http://localhost:3001` to see the blank wallet.
If you encounter errors, ensure your `.env` file contains the correct `SIM_API_KEY` and that it is loaded correctly.
Also, verify the `walletAddress` in the URL is a valid EVM wallet address.
Check your terminal for any error messages from `server.js`.
Now, let's integrate the Sim API to fetch real data.
## Fetch and Show Token Balances
We will use the [Balances API](/evm/balances) to get realtime token balances for a given wallet address.
This endpoint provides comprehensive details about native and ERC20 tokens, including metadata and USD values across more than 60+ EVM chains.
First, let's create an async function in `server.js` to fetch these balances. Add this function before your `app.get('/')` route handler:
```javascript server.js (getWalletBalances) {7,9,14,28} theme={null}
async function getWalletBalances(walletAddress) {
if (!walletAddress) return []; // Return empty if no address
// Construct the query parameters
// metadata=url,logo fetches token URLs and logo images
const queryParams = `metadata=url,logo`;
const url = `https://api.sim.dune.com/v1/evm/balances/${walletAddress}?${queryParams}`;
try {
const response = await fetch(url, {
headers: {
'X-Sim-Api-Key': SIM_API_KEY, // Your API key from .env
'Content-Type': 'application/json'
}
});
if (!response.ok) {
const errorBody = await response.text();
console.error(`API request failed with status ${response.status}: ${response.statusText}`, errorBody);
throw new Error(`API request failed: ${response.statusText}`);
}
const data = await response.json();
// The API returns JSON with a "balances" key. We return that directly.
return data.balances;
} catch (error) {
console.error("Error fetching wallet balances:", error.message);
return []; // Return empty array on error
}
}
```
This function creates the API request using Node's `fetch`.
It includes your `SIM_API_KEY` in the headers and sends a GET request to the `/v1/evm/balances/{address}` endpoint.
The Balances API gives you access to various [*URL query parameters*](/evm/balances) that you can include to modify the response.
We have included `metadata=url,logo` to include a token's URL and logo.
Next, modify your `app.get('/')` route handler in `server.js` to call `getWalletBalances` and pass the fetched tokens to your template:
```javascript server.js {13} theme={null}
app.get('/', async (req, res) => {
const {
walletAddress = '',
tab = 'tokens'
} = req.query;
let tokens = [];
let totalWalletUSDValue = 0;
let errorMessage = null;
if (walletAddress) {
try {
tokens = await getWalletBalances(walletAddress);
} catch (error) {
console.error("Error in route handler:", error);
errorMessage = "Failed to fetch wallet data. Please try again.";
// tokens will remain empty, totalWalletUSDValue will be 0
}
}
res.render('wallet', {
walletAddress: walletAddress,
currentTab: tab,
totalWalletUSDValue: `$0.00`, // We'll calculate this in the next section
tokens: tokens,
activities: [], // Placeholder for Guide 2
collectibles: [], // Placeholder for Guide 3
errorMessage: errorMessage
});
});
```
We've updated the route to:
1. Call `getWalletBalances` if a `walletAddress` is provided.
2. Pass the retrieved `balances` to the `wallet.ejs` template.
The `views/wallet.ejs` file you created earlier is already set up to display these tokens.
Restart your server with `node server.js` and refresh your browser, providing a `walletAddress` in the URL.
For example: [`http://localhost:3001/?walletAddress=0xd8da6bf26964af9d7eed9e03e53415d37aa96045`](http://localhost:3001/?walletAddress=0xd8da6bf26964af9d7eed9e03e53415d37aa96045)
You should now see the wallet populated with token balances, logos, prices for each token, and how much of that token the wallet holds.
## Format Balances
The Balances API returns token amounts in their smallest denomination. This will be in wei for ETH-like tokens.
To display these amounts in a user-friendly way, like `1.23` ETH instead of `1230000000000000000` wei, we need to adjust the amount using the token's `decimals` property, which is also returned from the Balances API.
We can add a new property, `balanceFormatted`, to each token object.
Modify your `getWalletBalances` function in `server.js` as follows. The main change is mapping over `data.balances` to add the `balanceFormatted` property:
```javascript server.js (getWalletBalances with formatting) {24, 25, 26, 27, 28, 29, 30, 31, 32, 33, 34, 35, 36, 37, 38} theme={null}
async function getWalletBalances(walletAddress) {
if (!walletAddress) return [];
const queryParams = `metadata=url,logo`;
const url = `https://api.sim.dune.com/v1/evm/balances/${walletAddress}?${queryParams}`;
try {
const response = await fetch(url, {
headers: {
'X-Sim-Api-Key': SIM_API_KEY,
'Content-Type': 'application/json'
}
});
if (!response.ok) {
const errorBody = await response.text();
console.error(`API request failed with status ${response.status}: ${response.statusText}`, errorBody);
throw new Error(`API request failed: ${response.statusText}`);
}
const data = await response.json();
// Return formatted values and amounts
return (data.balances || []).map(token => {
// 1. Calculate human-readable token amount
const numericAmount = parseFloat(token.amount) / Math.pow(10, parseInt(token.decimals));
// 2. Get numeric USD value
const numericValueUSD = parseFloat(token.value_usd);
// 3. Format using numbro
const valueUSDFormatted = numbro(numericValueUSD).format('$0,0.00');
const amountFormatted = numbro(numericAmount).format('0,0.[00]A');
return {
...token,
valueUSDFormatted,
amountFormatted
};
}).filter(token => token.symbol !== 'RTFKT'); // Removing Spam Tokens. Add more if you like.
} catch (error) {
console.error("Error fetching wallet balances:", error.message);
return [];
}
}
```
Now, each token object returned by `getWalletBalances` will include a `balanceFormatted` string, which our EJS template (`views/wallet.ejs`) already uses: `<%= token.balanceFormatted || token.amount %>`.
Restart the server and refresh the browser. You will now see formatted balances.
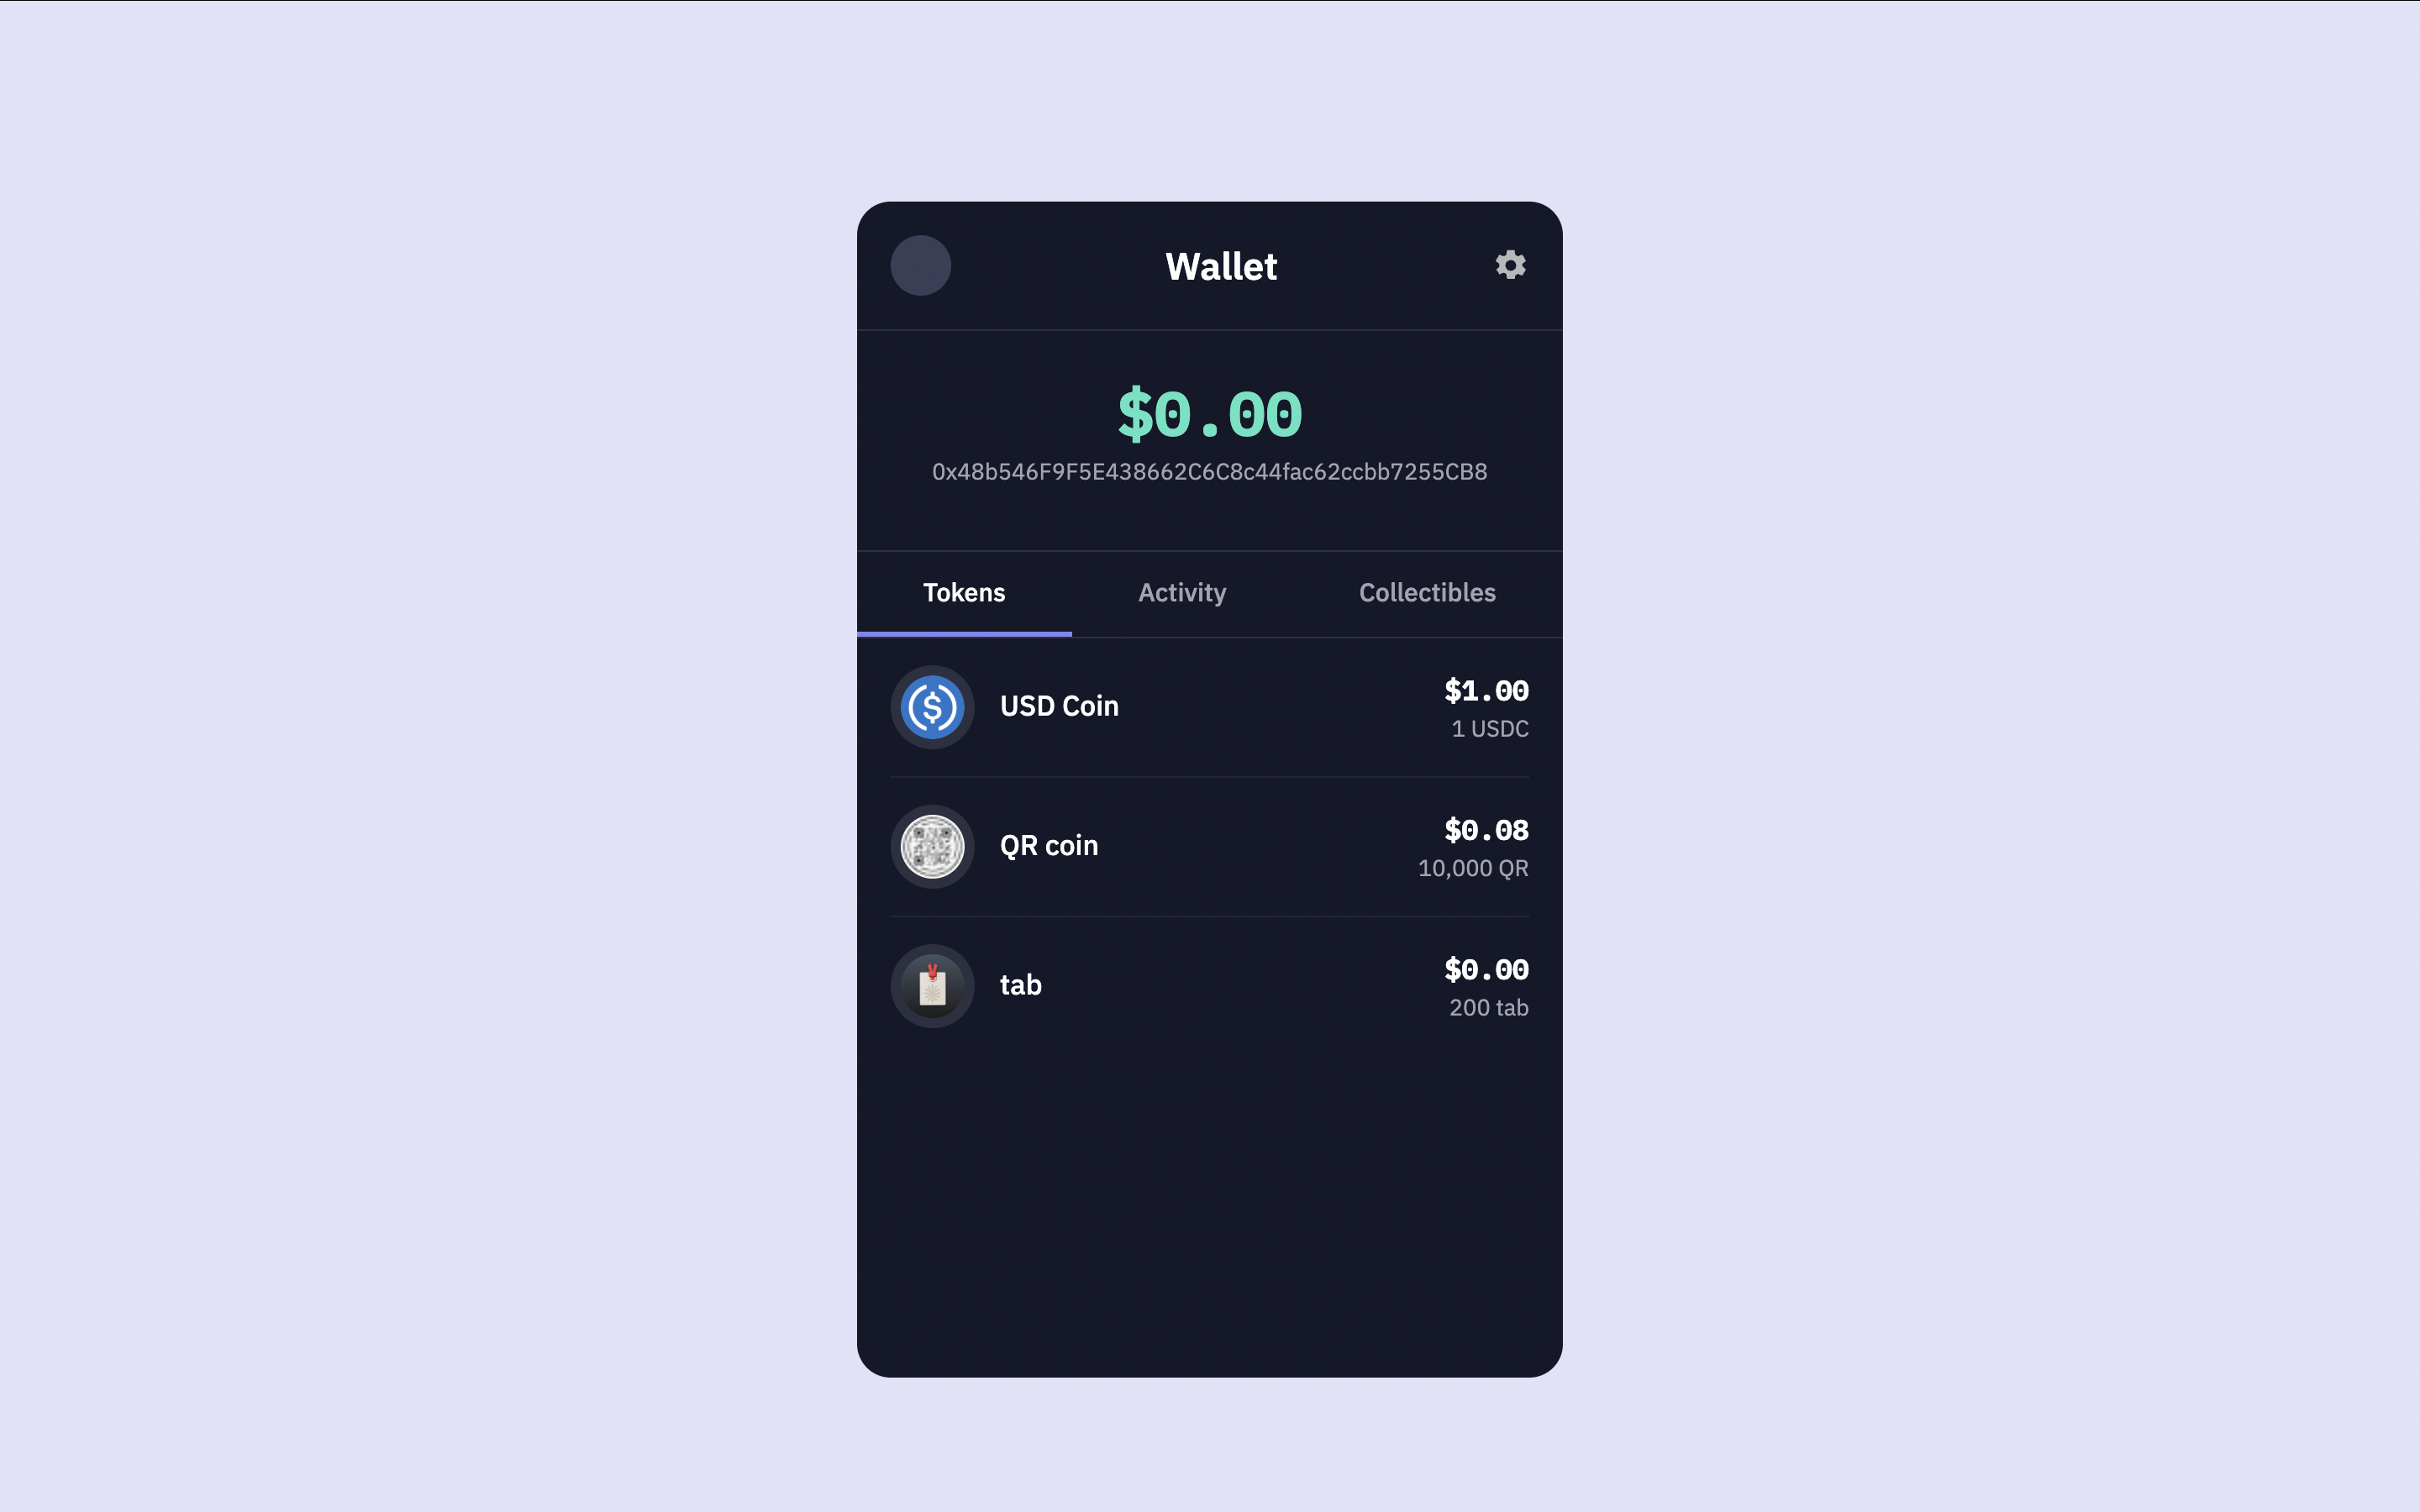
## Calculate Total Portfolio Value
The wallet's total value at the top of the UI still says `$0.00`.
Let's calculate the total USD value of the wallet and properly show it.
The Balances API provides a `value_usd` field with each token.
This field represents the total U.S. dollar value of the wallet's entire holding for that specific token.
Let's modify the `app.get('/')` route handler to iterate through the fetched tokens and sum their individual `value_usd` to calculate the `totalWalletUSDValue`.
```javascript server.js (app.get('/') with total value calculation) {16, 17, 18, 19, 20, 21, 22, 23, 24, 25, 37} theme={null}
app.get('/', async (req, res) => {
const {
walletAddress = '',
tab = 'tokens'
} = req.query;
let tokens = [];
let totalWalletUSDValue = 0; // Will be updated
let errorMessage = null;
if (walletAddress) {
try {
tokens = await getWalletBalances(walletAddress);
// Calculate the total USD value from the fetched tokens
if (tokens && tokens.length > 0) {
tokens.forEach(token => {
let individualValue = parseFloat(token.value_usd);
if (!isNaN(individualValue)) {
totalWalletUSDValue += individualValue;
}
});
}
totalWalletUSDValue = numbro(totalWalletUSDValue).format('$0,0.00');
} catch (error) {
console.error("Error in route handler:", error);
errorMessage = "Failed to fetch wallet data. Please try again.";
// tokens will remain empty, totalWalletUSDValue will be 0
}
}
res.render('wallet', {
walletAddress: walletAddress,
currentTab: tab,
totalWalletUSDValue: totalWalletUSDValue, // Pass the calculated total
tokens: tokens,
activities: [], // Placeholder for Guide 2
collectibles: [], // Placeholder for Guide 3
errorMessage: errorMessage
});
});
```
We use the `reduce` method to iterate over the `tokens` array.
For each `token`, we access its `value_usd` property, parse it as a float, and add it to the running `sum`.
The calculated `totalWalletUSDValue` is then formatted to two decimal places and passed to the template.
The `views/wallet.ejs` template already has `
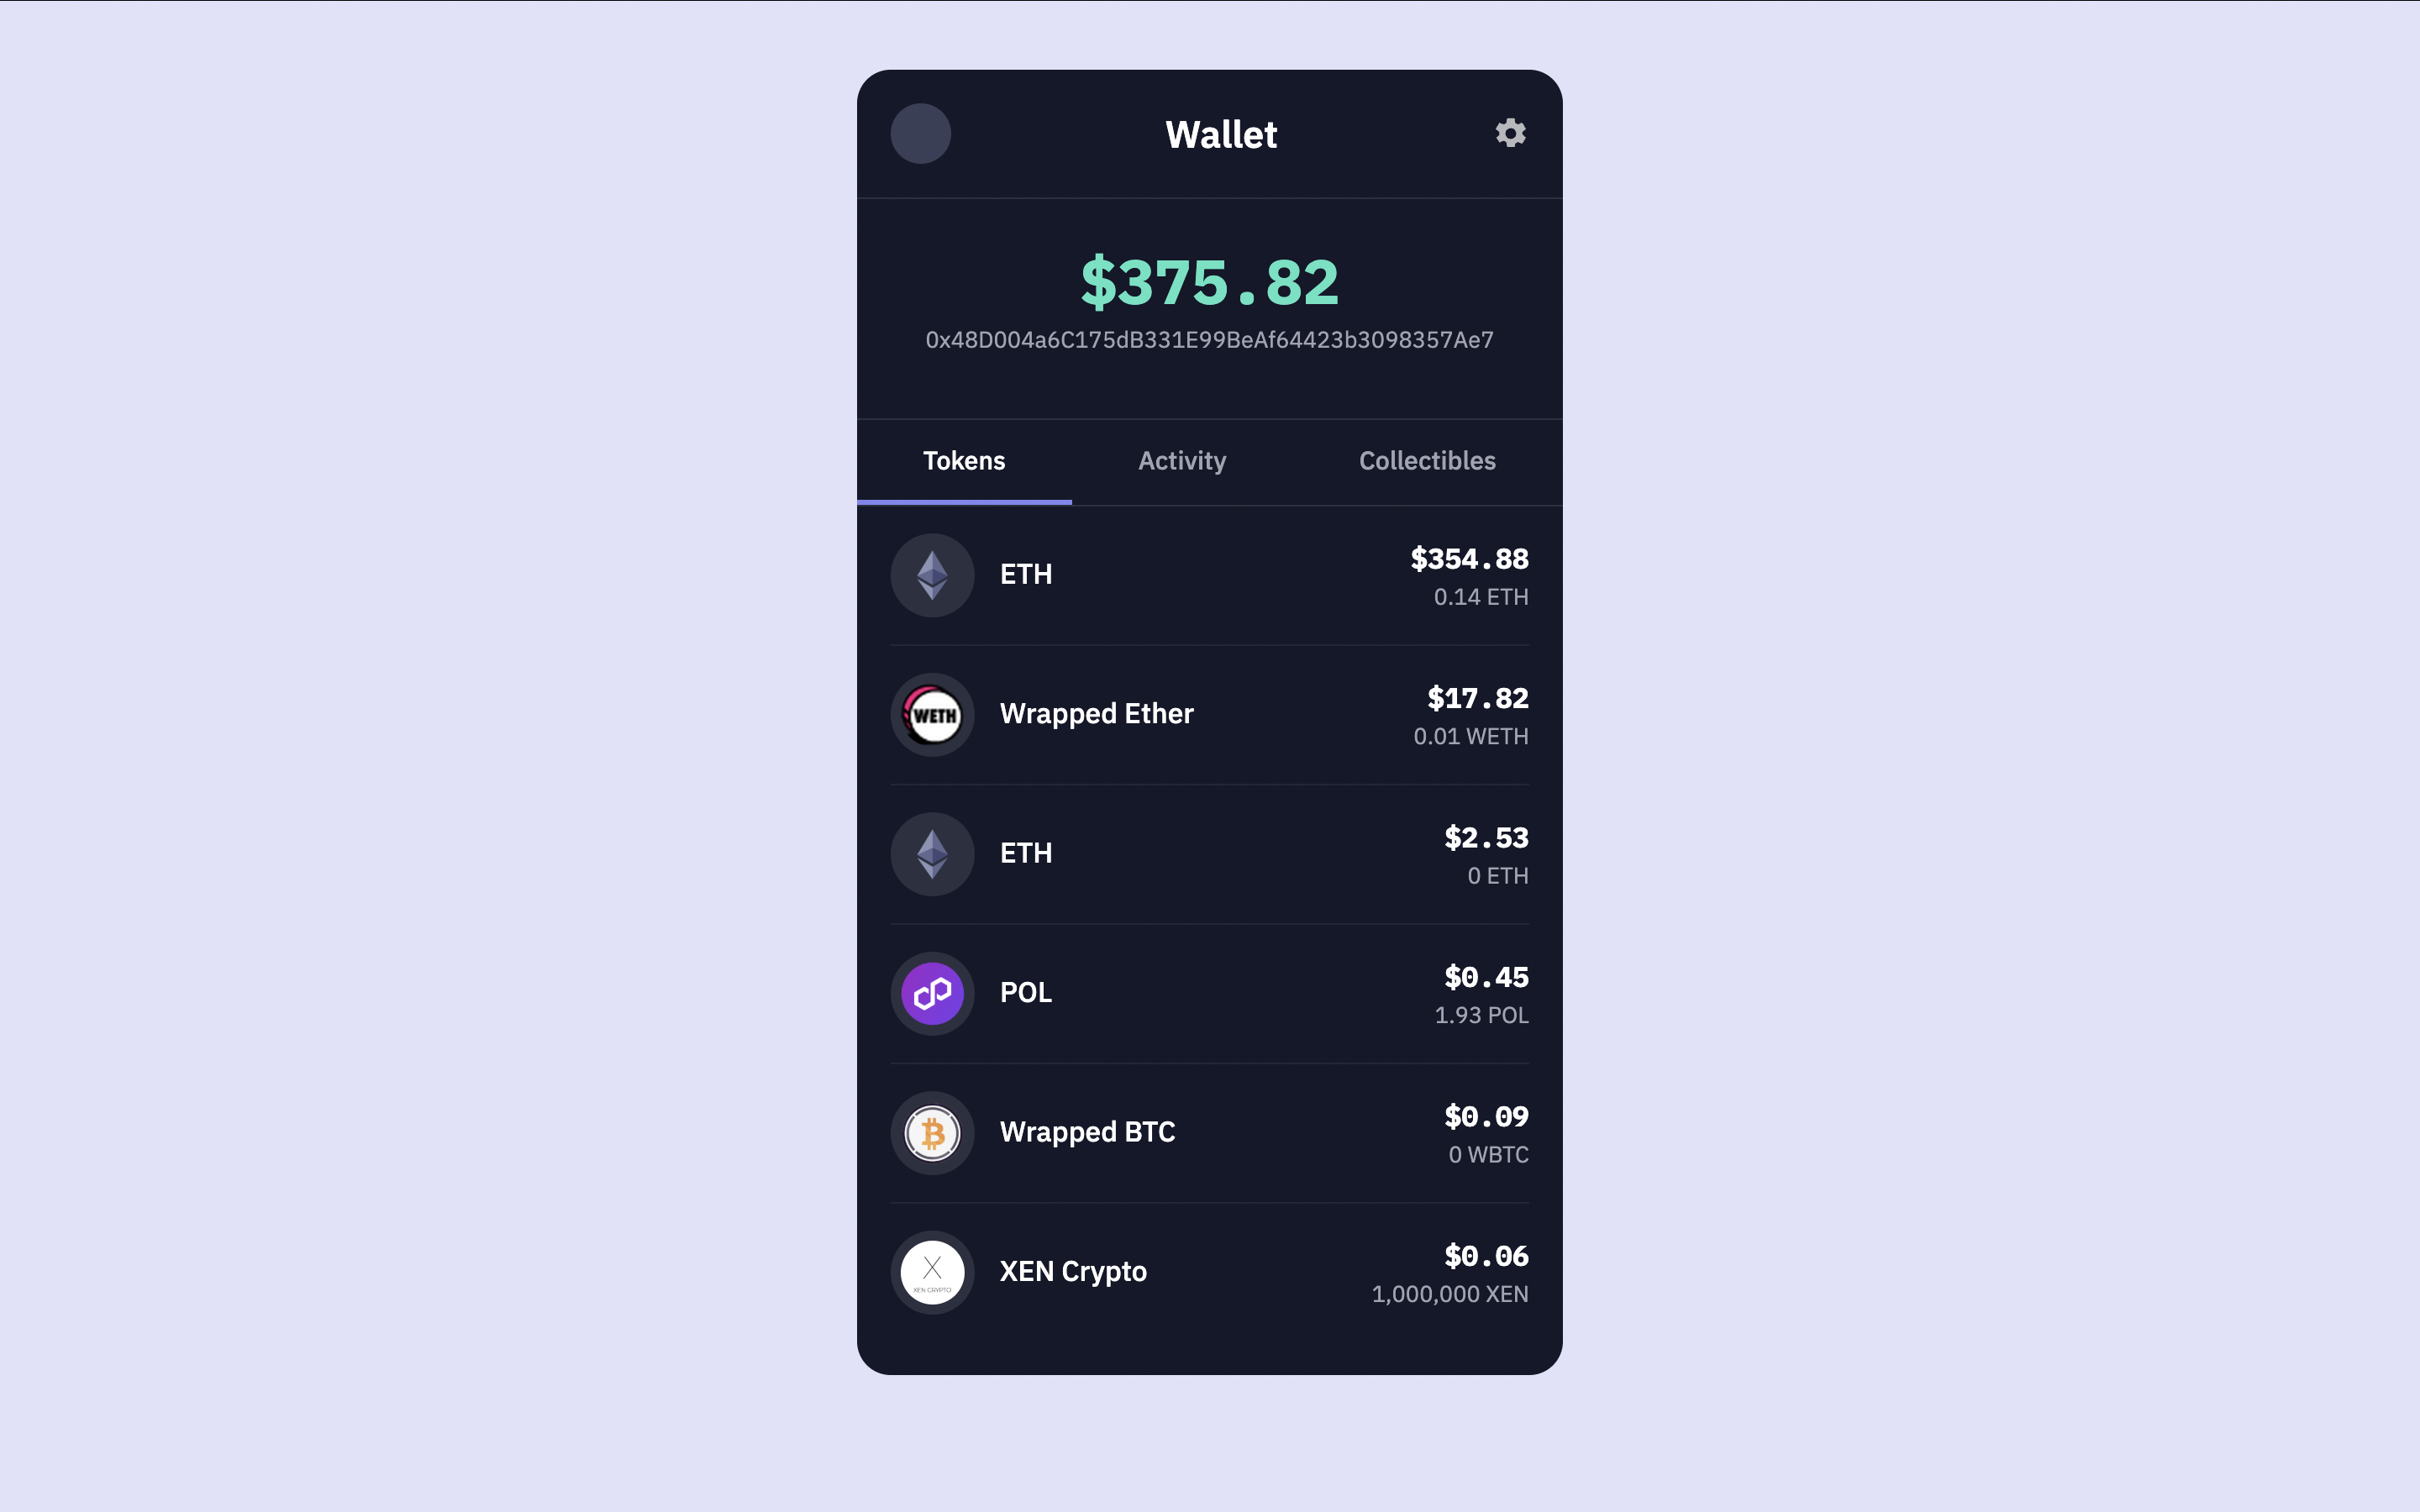
<%= totalWalletUSDValue %>
`, so it will display the calculated total correctly.
Restart your server and refresh the browser page with a wallet address.
You should now see the total wallet value at the top of the UI accurately reflecting the sum of all token balance USD values.
## Add Historical Price Tracking
Now let's improve the wallet by showing price movement over time. Historical price context helps users understand how their tokens are gaining or losing value. The [Balances API](/evm/balances) can return historical price points when you include the `historical_prices` query parameter, which lets you display price changes for any hour offset from 1 to 24 hours ago.
To learn more about historical prices, visit the [historical prices section](/evm/balances#historical-prices) in the Balances API documentation.
### Understanding historical price data
When you pass the `historical_prices` query parameter, the API accepts a comma separated list of hour offsets such as `1,6,24`. Each token in the response will then include a `historical_prices` array. Each entry contains an `offset_hours` value that indicates how many hours ago the price was recorded and a `price_usd` value that represents the token price at that time.
### Create price utilities
Add a small utility module to calculate percentage changes and format them for display. Create `utils/prices.js` and include the following code.
```javascript utils/prices.js theme={null}
export const pct = (curr, past) =>
curr == null || past == null || past === 0 ? null : ((curr - past) / past) * 100;
export const priceAt = (hist, h) =>
Array.isArray(hist) ? (hist.find(p => p && p.offset_hours === h)?.price_usd) : undefined;
export const change1h = (price, hist) => pct(price, priceAt(hist, 1));
export const change6h = (price, hist) => pct(price, priceAt(hist, 6));
export const change24h = (price, hist) => pct(price, priceAt(hist, 24));
export const formatSignedPercent = (x) =>
x == null ? '—' : `${x >= 0 ? '+' : ''}${x.toFixed(2)}%`;
```
These utility functions are necessary because the API returns only raw prices at specific times. You need these utilities to convert the price differences into percentage changes for display.
### Request historical prices in your balances call
Update `getWalletBalances` to optionally include historical prices. Only request this data when viewing the tokens tab to keep responses fast.
```javascript server.js (getWalletBalances with historical prices) [expandable] {5,9,16,17,18,19,20,21,22,23,24} theme={null}
/**
* Fetch wallet balances. Optionally include historical prices for deltas.
* @param {string} walletAddress
* @param {{ includeHistoricalPrices?: boolean }} [options]
*/
async function getWalletBalances(walletAddress, options = {}) {
const { includeHistoricalPrices = false } = options;
if (!walletAddress) return [];
// Construct the query parameters
// metadata=url,logo fetches token URLs and logo images
// exclude_spam_tokens filters out known spam tokens
const baseParams = new URLSearchParams({
'metadata': 'url,logo'
});
if (includeHistoricalPrices) {
baseParams.set('historical_prices', '1,6,24');
}
const queryParams = `${baseParams.toString()}&exclude_spam_tokens`;
const url = `https://api.sim.dune.com/v1/evm/balances/${walletAddress}?${queryParams}`;
try {
const response = await fetch(url, {
headers: {
'X-Sim-Api-Key': SIM_API_KEY,
'Content-Type': 'application/json'
}
});
if (!response.ok) {
const errorBody = await response.text();
console.error(`API request failed with status ${response.status}: ${response.statusText}`, errorBody);
throw new Error(`API request failed: ${response.statusText}`);
}
const data = await response.json();
return (data.balances || []).map(token => {
const numericAmount = parseFloat(token.amount) / Math.pow(10, parseInt(token.decimals));
const numericValueUSD = parseFloat(token.value_usd);
const valueUSDFormatted = numbro(numericValueUSD).format('$0,0.00');
const amountFormatted = numbro(numericAmount).format('0,0.[00]A');
return {
...token,
valueUSDFormatted,
amountFormatted
};
}).filter(token => token.symbol !== 'RTFKT');
} catch (error) {
console.error("Error fetching wallet balances:", error.message);
return [];
}
}
```
This change adds an optional `includeHistoricalPrices` parameter, conditionally appends `historical_prices=1,6,24` to the request, and preserves the existing formatting behavior.
### Make price utilities available to the template
Import the utilities in `server.js`, request historical prices when the tokens tab is active, and pass the helpers into the template render context.
```javascript server.js (imports and route updates) [expandable] {4,18,30,49} theme={null}
import express from 'express';
import numbro from 'numbro';
import dotenv from 'dotenv';
import * as priceUtils from './utils/prices.js';
import path from 'path';
import { fileURLToPath } from 'url';
// ... existing setup code ...
app.get('/', async (req, res) => {
const {
walletAddress = '',
tab = 'tokens'
} = req.query;
let tokens = [];
let totalWalletUSDValue = 0;
let errorMessage = null;
if (walletAddress) {
try {
const includeHistorical = tab === 'tokens';
tokens = await getWalletBalances(walletAddress, { includeHistoricalPrices: includeHistorical });
if (tokens && tokens.length > 0) {
tokens.forEach(token => {
const individualValue = parseFloat(token.value_usd);
if (!isNaN(individualValue)) {
totalWalletUSDValue += individualValue;
}
});
}
totalWalletUSDValue = numbro(totalWalletUSDValue).format('$0,0.00');
} catch (error) {
console.error("Error in route handler:", error);
errorMessage = "Failed to fetch wallet data. Please try again.";
}
}
res.render('wallet', {
walletAddress: walletAddress,
currentTab: tab,
totalWalletUSDValue: totalWalletUSDValue,
tokens: tokens,
activities: [],
collectibles: [],
errorMessage: errorMessage,
priceUtils
});
});
```
### Show twenty four hour change in the UI
Add a compact badge below the amount display for each token. Insert this snippet in `views/wallet.ejs` within the tokens list item, after the amount text.
```ejs views/wallet.ejs (price change badges) theme={null}
<% if (typeof token.price_usd === 'number' && Array.isArray(token.historical_prices)) { %>
<%
const d24 = priceUtils.change24h(token.price_usd, token.historical_prices);
const d24Text = priceUtils.formatSignedPercent(d24);
const badgeClass = d24 == null ? 'neutral' : (d24 >= 0 ? 'pos' : 'neg');
%>
<% if (d24 != null) { %>
<%= d24Text %> 24h
<% } %>
<% } %>
```
### Style the badges
Add these styles to `public/styles.css` so the badges match the existing design system.
```css public/styles.css (price change styles) [expandable] theme={null}
.price-delta-badges {
display: flex;
gap: 6px;
justify-content: flex-end;
margin-top: 4px;
}
.delta-badge {
font-family: var(--font-mono);
font-size: 0.75em;
padding: 2px 6px;
border-radius: 999px;
border: 1px solid var(--color-border-secondary);
background: rgba(255,255,255,0.03);
color: var(--color-text-muted);
}
.delta-badge.pos {
color: var(--color-accent-green);
border-color: rgba(80, 227, 194, 0.5);
}
.delta-badge.neg {
color: var(--color-accent-red);
border-color: rgba(255, 120, 117, 0.5);
}
.delta-badge.neutral {
color: var(--color-text-muted);
}
```
Historical prices are not available for every token. If the API does not return historical data for a token, the badge will not appear and the layout remains consistent.
## Conclusion
You have successfully set up the basic structure of your multichain wallet and integrated Sim APIs `Balances API` endpoint to display realtime token balances and total portfolio value.
In the next guide, [Add Account Activity](/evm/add-account-activity), we will enhance this wallet by adding a transaction history feature in the UI using the [Activity API](/evm/activity).
# Collectibles
Source: https://docs.sim.dune.com/evm/collectibles
evm/openapi/collectibles.json get /v1/evm/collectibles/{address}
Retrieve EVM compatiable NFTs (ERC721 and ERC1155) that include token identifiers, token standard, chain information, balance, and basic token attributes.
export const SupportedChains = ({endpoint, title}) => {
const dataState = useState(null);
const data = dataState[0];
const setData = dataState[1];
useEffect(function () {
var url = "https://api.sim.dune.com/v1/evm/supported-chains";
if (endpoint === 'defi_positions') {
url = "https://api.sim.dune.com/idx/supported-chains";
}
fetch(url, {
method: "GET"
}).then(function (response) {
return response.json();
}).then(function (responseData) {
setData(responseData);
});
}, [endpoint]);
if (data === null) {
return
Loading chain information...
;
}
if (!data.chains) {
return
No chain data available
;
}
var supportedChains = [];
var totalChains = data.chains.length;
if (endpoint !== undefined && endpoint !== 'defi_positions') {
for (var i = 0; i < data.chains.length; i++) {
var chain = data.chains[i];
if (chain[endpoint] && chain[endpoint].supported) {
supportedChains.push(chain);
}
}
} else {
supportedChains = data.chains;
}
var count = supportedChains.length;
var endpointName = endpoint ? endpoint.charAt(0).toUpperCase() + endpoint.slice(1).replace(/_/g, " ") : "All";
var accordionTitle = title ? title + " (" + count + ")" : "Supported Chains (" + count + ")";
return
name
chain_id
tags
{supportedChains.map(function (chain) {
return
{chain.name}
{chain.chain_id}
{chain.tags ? chain.tags.join(", ") : ""}
;
})}
;
};
export const DefaultChainCount = ({endpoint}) => {
const dataState = useState(null);
const data = dataState[0];
const setData = dataState[1];
useEffect(function () {
fetch("https://api.sim.dune.com/v1/evm/supported-chains", {
method: "GET"
}).then(function (response) {
return response.json();
}).then(function (responseData) {
setData(responseData);
});
}, []);
if (data === null) {
return <>N>;
}
if (!data.chains || !Array.isArray(data.chains)) {
return <>N>;
}
var uniqueDefaultChains = new Set();
for (var i = 0; i < data.chains.length; i++) {
var chain = data.chains[i];
var hasDefaultTag = Array.isArray(chain.tags) && chain.tags.indexOf("default") !== -1;
if (!hasDefaultTag) {
continue;
}
if (endpoint !== undefined) {
if (chain[endpoint] && chain[endpoint].supported === true) {
uniqueDefaultChains.add(chain.name);
}
} else {
uniqueDefaultChains.add(chain.name);
}
}
var count = uniqueDefaultChains.size;
return <>{count}>;
};
The Collectibles API provides information about NFTs (ERC721 and ERC1155 tokens) owned by a specific address on supported EVM blockchains, with built-in spam filtering.
## Compute Unit Cost
The Collectibles endpoint’s CU cost equals the number of chains you include via the `chain_ids` query parameter. If you omit `chain_ids`, we use the endpoint’s chains tagged `default` (currently {} chains, subject to change). See the [Supported Chains](/evm/supported-chains#tags) page to learn about chain tags.
For example, `?chain_ids=1,8453,137` processes three chains and currently consumes three CUs. Omitting `chain_ids` uses the default set at request time and consumes {} CUs (equal to the size of that set).
See the [Compute Units](/compute-units) page for detailed information.
## Spam Filtering
By default, spam filtering for collectibles is enabled. Use `filter_spam=false` to disable it. You can omit the parameter or set `filter_spam=true` to keep spam filtering enabled.
We provide spam scores to explain how a collectible is classified as spam or not.
Spam scores are *off* by default. Enable them with `show_spam_scores=true`.
Scores are computed as a weighted average across signals.
These include whether the collection has been flagged by external providers, trade volume since launch, and the number of unique buyers and sellers.
See the table below for the full list.
| Feature | Description |
| ---------------------- | ----------------------------------------------------------------------------------------------------------------------------------------------------------------------- |
| `trade_volume` | This is the total number of trades since collection launch. Very low activity can indicate spam. Collections launched in the last 7 days are excluded from this signal. |
| `unique_buyers` | This is the count of distinct buyers. Low buyer diversity can indicate inorganic activity. |
| `unique_sellers` | This is the count of distinct sellers. Low seller diversity can indicate inorganic activity. |
| `externally_flagged` | Whether the collection has been flagged as spam by third-party providers. `true` increases the spam likelihood. |
| `ipfs_uri_present` | This indicates whether token metadata URIs use IPFS. Certain patterns can correlate with spam when combined with other signals. |
| `suspicious_words` | Whether names, symbols, or URIs include suspicious terms commonly associated with scams. |
| `url_shortener_in_uri` | This indicates whether metadata URIs use link shorteners. For example, Bitly links can obscure destinations. |
These spam score features are included in the response's `explanations` field and may be omitted if signals are unavailable.
# DeFi Positions
Source: https://docs.sim.dune.com/evm/defi-positions
evm/openapi/defi-positions.json get /beta/evm/defi/positions/{address}
Access a wallet's DeFi positions along with USD values and metadata across supported EVM chains.
export const SupportedChains = ({endpoint, title}) => {
const dataState = useState(null);
const data = dataState[0];
const setData = dataState[1];
useEffect(function () {
var url = "https://api.sim.dune.com/v1/evm/supported-chains";
if (endpoint === 'defi_positions') {
url = "https://api.sim.dune.com/idx/supported-chains";
}
fetch(url, {
method: "GET"
}).then(function (response) {
return response.json();
}).then(function (responseData) {
setData(responseData);
});
}, [endpoint]);
if (data === null) {
return
Loading chain information...
;
}
if (!data.chains) {
return
No chain data available
;
}
var supportedChains = [];
var totalChains = data.chains.length;
if (endpoint !== undefined && endpoint !== 'defi_positions') {
for (var i = 0; i < data.chains.length; i++) {
var chain = data.chains[i];
if (chain[endpoint] && chain[endpoint].supported) {
supportedChains.push(chain);
}
}
} else {
supportedChains = data.chains;
}
var count = supportedChains.length;
var endpointName = endpoint ? endpoint.charAt(0).toUpperCase() + endpoint.slice(1).replace(/_/g, " ") : "All";
var accordionTitle = title ? title + " (" + count + ")" : "Supported Chains (" + count + ")";
return
name
chain_id
tags
{supportedChains.map(function (chain) {
return
{chain.name}
{chain.chain_id}
{chain.tags ? chain.tags.join(", ") : ""}
;
})}
;
};
The DeFi Positions API returns a wallet's active positions across liquidity pools, lending protocols, yield strategies, and tokenized DeFi assets.
Each position includes token holdings, USD valuations, underlying asset metadata, and protocol-specific details such as tick ranges, collateral status, or reward accruals.
This endpoint is currently available at the beta path (`/beta/evm/defi/positions`).
Schemas are stable, but response fields may expand as we onboard new protocols.
Also, **Arbitrum support is not currently available but is coming soon**.
## Supported Protocols
Protocol coverage is organized by position type. Each protocol specifies its supported chains and the API response type under which it appears.
| Protocol / Standard | Ethereum (1) | Base (8453) | Optimism (10) | Unichain (130) | Zora (7777777) | World Chain (480) | Ink (57073) | Soneium (1868) | Mode (34443) | BOB (60808) | Shape (360) |
| ------------------- | ------------ | ----------- | ------------- | -------------- | -------------- | ----------------- | ----------- | -------------- | ------------ | ----------- | ----------- |
| Uniswap V2 | ✓ | ✓ | ✓ | ✓ | ✓ | ✓ | ✓ | ✓ | | | |
| Uniswap V2 Forks | ✓ | ✓ | ✓ | ✓ | ✓ | ✓ | ✓ | ✓ | | | |
| Uniswap V3 | ✓ | ✓ | ✓ | ✓ | ✓ | ✓ | ✓ | ✓ | | | |
| Uniswap V4 | ✓ | ✓ | ✓ | ✓ | ✓ | ✓ | ✓ | ✓ | | | |
| Algebra V3 | | | | | | | | | | | |
| iZumi Swap | | ✓ | | | | | | | | | |
| Aave v2 | ✓ | | | | | | | | | | |
| Aave v3 | ✓ | ✓ | ✓ | | | | | ✓ | | | |
| Compound v2 | ✓ | | | | | | | | | | |
| Compound v3 (Comet) | ✓ | ✓ | ✓ | | | | | | | | |
| Moonwell | | ✓ | ✓ | | | | | | | | |
| ERC‑4626 Vaults | ✓ | ✓ | ✓ | ✓ | ✓ | ✓ | ✓ | ✓ | ✓ | ✓ | ✓ |
| Pendle v3 | ✓ | ✓ | ✓ | | | | | | | | |
| EigenLayer | ✓ | | | | | | | | | | |
### Liquidity Pool Positions
Liquidity pool positions represent token pairs deposited into automated market makers (AMMs). These positions may be fungible ERC-20 LP tokens or non-fungible NFT-based positions for concentrated liquidity.
**Type:** `UniswapV2`\
**Chains:** Ethereum (1), Base (8453), Ink (57073), World Chain (480), Soneium (1868), Unichain (130), Zora (7777777), Optimism (10)\
**Description:** Fungible LP tokens representing constant-product AMM positions. Includes balances of both tokens in the pair and total USD value.
**Example Response:**
```json [expandable] theme={null}
{
"wallet_address": "0x3ddfa8ec3052539b6c9549f12cea2c295cff5296",
"positions": [
{
"type": "UniswapV2",
"chain_id": 1,
"protocol": "UniswapV2",
"pool": "0x2d0ba902badaa82592f0e1c04c71d66cea21d921",
"token0": "0xc02aaa39b223fe8d0a0e5c4f27ead9083c756cc2",
"token0_name": "Wrapped Ether",
"token0_symbol": "WETH",
"token0_decimals": 18,
"token1": "0xc669928185dbce49d2230cc9b0979be6dc797957",
"token1_name": "BitTorrent",
"token1_symbol": "BTT",
"token1_decimals": 18,
"lp_balance": "0x9fb1af75d00c86824442",
"token0_price": 3604.8860123436993,
"token1_price": 4.791346462915666e-07,
"calculated_balance": 754133.9877176014,
"price_in_usd": 0.499768653034215,
"usd_value": 376892.5272489469,
"logo": "https://api.sim.dune.com/beta/token/logo/1/0xc02aaa39b223fe8d0a0e5c4f27ead9083c756cc2"
}
],
"aggregations": {
"total_usd_value": 376892.5272489469,
"total_by_chain": {
"1": 376892.5272489469
}
}
}
```
**Type:** `UniswapV2`\
**Chains:** Same as Uniswap V2\
**Recognized Forks:** SushiSwapV2, PancakeSwapV2, ShibaSwapV2, RingSwap, CroDefiSwap, DXSwap, SquadSwap, TrebleSwapV2, BaseSwap, SharkSwap, RocketSwap, Aerodrome, Infusion, GammaSwap\
**Description:** Forks are detected by factory address and returned under the same `UniswapV2` type.
**Example Response (SushiSwap):**
```json [expandable] theme={null}
{
"wallet_address": "0x5dd596c901987a2b28c38a9c1dfbf86fffc15d77",
"positions": [
{
"type": "UniswapV2",
"chain_id": 1,
"protocol": "SushiSwapV2",
"pool": "0x54bcf4948e32a8706c286416e3ced37284f17fc9",
"token0": "0x66c0dded8433c9ea86c8cf91237b14e10b4d70b7",
"token0_name": "MarsToken",
"token0_symbol": "Mars",
"token0_decimals": 18,
"token1": "0xdac17f958d2ee523a2206206994597c13d831ec7",
"token1_name": "Tether USD",
"token1_symbol": "USDT",
"token1_decimals": 6,
"lp_balance": "0x2",
"token0_price": 7.981024983046692e-06,
"token1_price": 0.9976281228808364,
"calculated_balance": 2e-18,
"price_in_usd": 6009.914272265951,
"usd_value": 1.2019828544531902e-14,
"logo": "https://api.sim.dune.com/beta/token/logo/1/0x66c0dded8433c9ea86c8cf91237b14e10b4d70b7"
}
],
"aggregations": {
"total_usd_value": 1.2019828544531902e-14,
"total_by_chain": {
"1": 1.2019828544531902e-14
}
}
}
```
**Type:** `Nft`\
**Chains:** Ethereum (1), Base (8453), Ink (57073), Unichain (130), Zora (7777777), World Chain (480), Soneium (1868), Optimism (10)\
**Description:** NFT-based concentrated liquidity positions. Each position includes tick ranges, token holdings, unclaimed fees, and per-position USD valuations.
**Example Response:**
```json [expandable] theme={null}
{
"wallet_address": "0x020ca66c30bec2c4fe3861a94e4db4a498a35872",
"positions": [
{
"type": "Nft",
"chain_id": 1,
"protocol": "UniswapV3",
"pool": "0x286431024acfab509d5d6beb64066c52e205f460",
"token0": "0xc02aaa39b223fe8d0a0e5c4f27ead9083c756cc2",
"token0_name": "Wrapped Ether",
"token0_symbol": "WETH",
"token0_decimals": 18,
"token1": "0xe957ea0b072910f508dd2009f4acb7238c308e29",
"token1_name": "Ethcoin",
"token1_symbol": "ETHC",
"token1_decimals": 18,
"positions": [
{
"tick_lower": -887200,
"tick_upper": 887200,
"token_id": "0xd28a4",
"token0_price": 3604.962479958635,
"token0_holdings": 0.8508188676223404,
"token0_rewards": 0.0,
"token1_price": 0.045373374904882045,
"token1_holdings": 68599.0469105992,
"token1_rewards": 0.0
}
],
"logo": "https://api.sim.dune.com/beta/token/logo/1/0xc02aaa39b223fe8d0a0e5c4f27ead9083c756cc2",
"usd_value": 6179.740368611638
}
],
"aggregations": {
"total_usd_value": 6179.740368611638,
"total_by_chain": {
"1": 6179.740368611638
}
}
}
```
**Type:** `Nft`\
**Chains:** Ethereum (1), Unichain (130), Optimism (10), Base (8453), Zora (7777777), World Chain (480), Ink (57073), Soneium (1868)\
**Description:** Next-generation concentrated liquidity positions with hook support. Similar structure to V3 with additional metadata for pool hooks and custom logic.
**Type:** `Nft`\
**Chains:**\
**Description:** Concentrated liquidity positions compatible with the Algebra V3 architecture. Includes tick ranges and liquidity metadata.
**Type:** `Nft`\
**Chains:** Base (8453)\
**Description:** Concentrated liquidity positions on the iZumi Swap protocol. Returns NFT-based position data with tick ranges and holdings.
### Lending Positions
Lending positions include supplied collateral (e.g., aTokens, cTokens) and outstanding debt across major lending protocols.
**Type:** `Tokenized`\
**Token Types:** `AtokenV2`, `AaveV2VariableDebt`\
**Chains:** Ethereum (1)\
**Description:** Supply positions (aTokens) and variable debt positions on Aave v2. Each position includes the underlying asset, calculated balance, and USD value.
**Example Response:**
```json [expandable] theme={null}
{
"wallet_address": "0x8b529ef78046008f9d1fbc91c7407030de96ee32",
"positions": [
{
"type": "Tokenized",
"chain_id": 1,
"token_type": "AaveV2VariableDebt",
"token": "0x619beb58998ed2278e08620f97007e1116d5d25b",
"token_name": "Aave variable debt bearing USDC",
"token_symbol": "variableDebtUSDC",
"calculated_balance": 4.565517,
"price_in_usd": 0.00042242904592455,
"usd_value": 0.0019286069904623138,
"logo": "https://api.sim.dune.com/beta/token/logo/1/0xc02aaa39b223fe8d0a0e5c4f27ead9083c756cc2"
}
],
"aggregations": {
"total_usd_value": 0.0019286069904623138,
"total_by_chain": {
"1": 0.0019286069904623138
}
}
}
```
**Type:** `Tokenized`\
**Token Types:** `AtokenV3`, `AaveV3VariableDebt`\
**Chains:** Ethereum (1), Base (8453), Soneium (1868), Optimism (10)\
**Description:** Supply positions (aTokens) and variable debt positions on Aave v3. Includes underlying token metadata and USD valuations.
**Example Response:**
```json [expandable] theme={null}
{
"wallet_address": "0xc0979af67786f30dea9335665592d6813b21b819",
"positions": [
{
"type": "Tokenized",
"chain_id": 1,
"token_type": "AtokenV3",
"token": "0xbdfa7b7893081b35fb54027489e2bc7a38275129",
"token_name": "Aave Ethereum weETH",
"token_symbol": "aEthweETH",
"calculated_balance": 4600.399946538124,
"price_in_usd": 3911.29585515,
"usd_value": 17993525.242926843,
"logo": null
}
],
"aggregations": {
"total_usd_value": 17993525.242926843,
"total_by_chain": {
"1": 17993525.242926843
}
}
}
```
**Type:** `CompoundV2` (combined in API response)\
**Token Types:** `CTOKEN`, `CTOKEN_BORROW`\
**Chains:** Ethereum (1)\
**Description:** Supply and borrow positions across Compound v2 markets. Responses include separate supply and debt quotes with USD values.
**Example Response:**
```json [expandable] theme={null}
{
"wallet_address": "0x0f4ee9631f4be0a63756515141281a3e2b293bbe",
"positions": [
{
"type": "CompoundV2",
"chain_id": 1,
"token_type": "Ctoken",
"token": "0x5d3a536e4d6dbd6114cc1ead35777bab948e3643",
"token_name": "Compound Dai",
"token_symbol": "cDAI",
"supply_quote": {
"calculated_balance": 1958.09737575,
"price_in_usd": 0.025019102381892096,
"usd_value": 48.98983871760349
},
"logo": null,
"usd_value": 48.98983871760349
}
],
"aggregations": {
"total_usd_value": 48.98983871760349,
"total_by_chain": {
"1": 48.98983871760349
}
}
}
```
**Type:** `CompoundV3`\
**Chains:** Ethereum (1), Base (8453), Optimism (10)\
**Description:** Base asset supply and borrow positions in Compound v3. Also includes collateral positions for each supported asset in Comet markets.
**Type:** `Moonwell` (combined in API response)\
**Token Types:** `MTOKEN`, `MTOKEN_BORROW`\
**Chains:** Base (8453), Optimism (10)\
**Description:** Supply and borrow positions on Moonwell (a Compound v2 fork). Includes separate supply and debt quotes.
**Example Response:**
```json [expandable] theme={null}
{
"wallet_address": "0x8b529ef78046008f9d1fbc91c7407030de96ee32",
"positions": [
{
"type": "Moonwell",
"chain_id": 8453,
"token_type": "Mtoken",
"token": "0xf877acafa28c19b96727966690b2f44d35ad5976",
"token_name": "Moonwell cbBTC",
"token_symbol": "mcbBTC",
"supply_quote": {
"calculated_balance": 4.3e-07,
"price_in_usd": 2140.029374370961,
"usd_value": 0.0009202126309795131
},
"logo": null,
"usd_value": 0.0009202126309795131
}
],
"aggregations": {
"total_usd_value": 0.0009202126309795131,
"total_by_chain": {
"8453": 0.0009202126309795131
}
}
}
```
### Yield Positions
Yield positions represent deposits into vaults, structured products, or yield-generating strategies.
**Type:** `Erc4626`\
**Chains:** Ethereum (1), Base (8453), World Chain (480), Mode (34443), Ink (57073), Unichain (130), Zora (7777777), BOB (60808), Soneium (1868), Shape (360), Optimism (10)\
**Description:** Tokenized vaults conforming to the ERC-4626 standard. Includes vault share balances, underlying asset metadata, and USD valuations. Examples include Yearn v3 vaults and Pendle Yield Principal Tokens (PTs) when wrapped as ERC-4626.
**Example Response:**
```json [expandable] theme={null}
{
"wallet_address": "0x9cb21ce0ff81e55db73bbb36d5a9eac9d50a938b",
"positions": [
{
"type": "Erc4626",
"chain_id": 1,
"token": "0xbc65ad17c5c0a2a4d159fa5a503f4992c7b545fe",
"token_name": "Spark USDC Vault",
"token_symbol": "sUSDC",
"underlying_token": "0xa0b86991c6218b36c1d19d4a2e9eb0ce3606eb48",
"underlying_token_name": "USD Coin",
"underlying_token_symbol": "USDC",
"underlying_token_decimals": 6,
"calculated_balance": 948.1633593101873,
"price_in_usd": 1.0690361554703132,
"usd_value": 1013.6209123947798,
"logo": "https://api.sim.dune.com/beta/token/logo/1/0xa0b86991c6218b36c1d19d4a2e9eb0ce3606eb48"
}
],
"aggregations": {
"total_usd_value": 1013.6209123947798,
"total_by_chain": {
"1": 1013.6209123947798
}
}
}
```
**Type:** `Pendle`\
**Token Types:** `Principal`, `Yield`, `LP` (in `token_type` field)\
**Chains:** Ethereum (1), Optimism (10), Base (8453)\
**Description:** Principal Tokens (PT), Yield Tokens (YT), and LP positions in Pendle v3 markets. Each position includes the underlying asset, market address, and USD value based on the asset price.
**Example Response (Yield Token):**
```json [expandable] theme={null}
{
"wallet_address": "0x9cb21ce0ff81e55db73bbb36d5a9eac9d50a938b",
"positions": [
{
"type": "Pendle",
"chain_id": 1,
"token": "0x1de6ff19fda7496ddc12f2161f6ad6427c52abbe",
"token_type": "Yield",
"balance": "0xfa50f5ee142bb44f982",
"token_name": "YT Ethena sUSDE 29MAY2025",
"token_symbol": "YT-sUSDE-29MAY2025",
"token_decimals": 18,
"market": "0xb162b764044697cf03617c2efbcb1f42e31e4766",
"asset": "0x4c9edd5852cd905f086c759e8383e09bff1e68b3",
"asset_name": "USDe",
"asset_symbol": "USDe",
"asset_decimals": 18,
"calculated_balance": 73880.31758544187,
"price_in_usd": 0.0,
"usd_value": 0.0,
"logo": "https://api.sim.dune.com/beta/token/logo/1/0x4c9edd5852cd905f086c759e8383e09bff1e68b3"
}
],
"aggregations": {
"total_usd_value": 0.0,
"total_by_chain": {
"1": 0.0
}
}
}
```
### Restaking Positions
**Type:** `EigenStrategy` (or similar in API response)\
**Chains:** Ethereum (1)\
**Description:** Share balances in EigenLayer restaking strategies. Includes the strategy contract, underlying token, and USD-denominated position value.
## Compute Units
Each request consumes **two Compute Units per processed chain ID**. Filtering to fewer chains lowers usage. Aggregations are calculated server-side and included in the same response.
To learn more specifics, please visit the [Compute Units](/compute-units) page.
# EVM Overview
Source: https://docs.sim.dune.com/evm/overview
Access realtime token balances. Get comprehensive details about native and ERC20 tokens, including token metadata and USD valuations.
View chronologically ordered transactions including native transfers, ERC20 movements, NFT transfers, and decoded contract interactions.
All NFT (ERC721 and ERC1155) balances, including IDs and metadata
Retrieve granular transaction details including block information, gas data, transaction types, and raw transaction values.
Get detailed metadata and realtime price information for any native asset or ERC20 token including symbol, name, decimals, supply information, USD pricing, and logo URLs.
Discover token distribution across ERC20 token holders, ranked by balance descending.
# Show NFT Collectibles in Your Wallet
Source: https://docs.sim.dune.com/evm/show-nfts-collectibles
Complete your realtime crypto wallet by adding a visual display of a user's NFT collection.
Your wallet now displays token balances, calculates total portfolio value, and tracks detailed account activity.
To give users a holistic view of their onchain assets, the final piece is to **showcase their NFT collections**.
In this third and final guide of our wallet series, we will focus on implementing the *Collectibles* tab.
Access the complete source code for this wallet on GitHub
Interact with the finished wallet app
This guide assumes you have completed the previous guides:
1. [Build a Realtime Wallet](/evm/build-a-realtime-wallet)
2. [Add Account Activity](/evm/add-account-activity)
## Explore the NFT Collection
See the collectibles feature in action with the live demo below. Click on the "Collectibles" tab to browse the sample wallet's NFT collection:
## Fetch NFT Collectibles
Let's add a new asynchronous `getWalletCollectibles` function to `server.js` to fetch a user's NFT collection using the [Collectibles API](/evm/collectibles).
```javascript server.js (getWalletCollectibles function) {4} theme={null}
async function getWalletCollectibles(walletAddress, limit = 50) {
if (!walletAddress) return [];
const url = `https://api.sim.dune.com/v1/evm/collectibles/${walletAddress}?limit=${limit}`;
try {
const response = await fetch(url, {
headers: {
'X-Sim-Api-Key': SIM_API_KEY,
'Content-Type': 'application/json'
}
});
if (!response.ok) {
const errorBody = await response.text();
console.error(`Collectibles API request failed with status ${response.status}: ${response.statusText}`, errorBody);
throw new Error(`Collectibles API request failed: ${response.statusText}`);
}
const data = await response.json();
const collectibles = data.entries || [];
// Use Sim APIs data directly
return collectibles.map(collectible => {
return {
...collectible,
// Use collection_name field, fallback to name if not available
collection_name: collectible.name || `Token #${collectible.token_id}`
};
}).filter(collectible => collectible.image_url); // Only show collectibles with images
} catch (error) {
console.error("Error fetching wallet collectibles:", error.message);
return [];
}
}
```
The NFT data is extracted from the `entries` array within this response, providing comprehensive information including contract addresses, token IDs, chain data, and rich metadata.
The [Collectibles API](/evm/collectibles) supports pagination using `limit` and `offset` query parameters.
For wallets with many NFTs, you can implement logic to fetch subsequent pages using the `next_offset` value returned by the API to provide a complete view of the user's collection.
## Rich NFT Data and Images
The Sim APIs [Collectibles API](/evm/collectibles) provides comprehensive NFT data including images, metadata, and collection information directly in the response.
The Collectibles API includes:
Direct access to NFT artwork via `image_url` field
Rich metadata including attributes, descriptions, and collection details
Names, symbols, and collection-specific data
When the NFT was last acquired and sale price information
Contract addresses, token IDs, token standards (ERC-721, ERC-1155)
NFTs from Ethereum, Polygon, Optimism, Base, and other supported chains
## Add Collectibles into the Server Route
Next, we update our main `app.get('/')` route handler in `server.js` to call this new function:
```javascript server.js (app.get('/') updated for collectibles) {16, 19, 41} theme={null}
app.get('/', async (req, res) => {
const {
walletAddress = '',
tab = 'tokens'
} = req.query;
let tokens = [];
let activities = [];
let collectibles = []; // Initialize collectibles array
let totalWalletUSDValue = 0;
let errorMessage = null;
if (walletAddress) {
try {
// Fetch balances, activities, and collectibles concurrently for better performance
[tokens, activities, collectibles] = await Promise.all([
getWalletBalances(walletAddress),
getWalletActivity(walletAddress, 25), // Fetching 25 recent activities
getWalletCollectibles(walletAddress, 50) // Fetching up to 50 collectibles
]);
// Calculate total portfolio value from token balances (Guide 1)
if (tokens && tokens.length > 0) {
totalWalletUSDValue = tokens.reduce((sum, token) => {
const value = parseFloat(token.value_usd);
return sum + (isNaN(value) ? 0 : value);
}, 0);
}
} catch (error) {
console.error("Error in route handler fetching all data:", error);
errorMessage = "Failed to fetch wallet data. Please try again.";
}
}
res.render('wallet', {
walletAddress: walletAddress,
currentTab: tab,
totalWalletUSDValue: `$${totalWalletUSDValue.toFixed(2)}`,
tokens: tokens,
activities: activities,
collectibles: collectibles, // Pass collectibles to the template
errorMessage: errorMessage
});
});
```
The route handler now fetches balances, activities, and collectibles data concurrently for optimal performance.
The `collectibles` array, containing comprehensive blockchain data and image URLs directly from Sim APIs, is passed to the `wallet.ejs` template.
## Display Collectibles in the Frontend
The final step is to modify `views/wallet.ejs` to render the fetched collectibles within the "Collectibles" tab.
We will use a grid layout to display NFT images with their collection names and token IDs.
In `views/wallet.ejs`, find the section for the "Collectibles" tab (you can search for `id="collectibles"`).
It currently contains a placeholder paragraph.
Replace that entire `div` with the following EJS:
```ejs views/wallet.ejs (Collectibles tab content) [expandable] theme={null}
<% if (collectibles && collectibles.length > 0) { %>
```
The EJS template iterates through the `collectibles` array and displays each NFT with its comprehensive metadata directly from Sim APIs.
Each collectible shows the `image_url`, the `collection_name` or fallback name, and a truncated `token_id` for identification.
***
Restart your server using `node server.js` and navigate to your wallet app in the browser.
When you click on the "Collectibles" tab, and if the wallet has NFTs, you should see the NFT collection displayed with rich visual metadata.
## Conclusion
That concludes this three-part series!
With just three API requests - [Balances](/evm/balances), [Activity](/evm/activity), and [Collectibles](/evm/collectibles) - you've built a fully functional, multichain wallet that displays token balances, calculates portfolio value, tracks detailed transaction activity, and showcases NFT collections with rich visual displays.
**This project serves as a solid foundation for a wallet**.
You can now expand upon it by exploring other Sim API features.
Whether you want to add more sophisticated analytics, deeper NFT insights, or advanced transaction tracking, Sim APIs provides the blockchain data you need to build the next generation of onchain apps.
# Subscriptions API
Source: https://docs.sim.dune.com/evm/subscriptions
Get realtime onchain data pushed directly to your app with webhook subscriptions.
export const SupportedChains = ({endpoint, title}) => {
const dataState = useState(null);
const data = dataState[0];
const setData = dataState[1];
useEffect(function () {
var url = "https://api.sim.dune.com/v1/evm/supported-chains";
if (endpoint === 'defi_positions') {
url = "https://api.sim.dune.com/idx/supported-chains";
}
fetch(url, {
method: "GET"
}).then(function (response) {
return response.json();
}).then(function (responseData) {
setData(responseData);
});
}, [endpoint]);
if (data === null) {
return
Loading chain information...
;
}
if (!data.chains) {
return
No chain data available
;
}
var supportedChains = [];
var totalChains = data.chains.length;
if (endpoint !== undefined && endpoint !== 'defi_positions') {
for (var i = 0; i < data.chains.length; i++) {
var chain = data.chains[i];
if (chain[endpoint] && chain[endpoint].supported) {
supportedChains.push(chain);
}
}
} else {
supportedChains = data.chains;
}
var count = supportedChains.length;
var endpointName = endpoint ? endpoint.charAt(0).toUpperCase() + endpoint.slice(1).replace(/_/g, " ") : "All";
var accordionTitle = title ? title + " (" + count + ")" : "Supported Chains (" + count + ")";
return
name
chain_id
tags
{supportedChains.map(function (chain) {
return
{chain.name}
{chain.chain_id}
{chain.tags ? chain.tags.join(", ") : ""}
;
})}
;
};
The Subscriptions API allows you to receive realtime onchain data through webhooks. Instead of repeatedly polling endpoints to check for new data, the Subscriptions API pushes data directly to your app as soon as events occur. This makes it a great way to build reactive apps that respond instantly to onchain activity.
Essentially, the Subscriptions API provides a webhook-based version of our existing [Balances](/evm/balances), [Activity](/evm/activity), and [Transactions](/evm/transactions) endpoints. Supported chains vary by subscription type.
Get notified when a wallet's ERC20 token balance changes.
Receive updates when a wallet has new activity, such as token transfers or contract interactions.
Be alerted when a wallet sends or receives a transaction.
## Setting Up Webhooks
You can set up and manage your subscriptions in two ways:
Use our set of endpoints to [create](/evm/subscriptions/create-webhook), [update](/evm/subscriptions/update-webhook), [list](/evm/subscriptions/list-webhooks), and [delete](/evm/subscriptions/delete-webhook) your webhook subscriptions. Ideal for apps that need to manage subscriptions dynamically.
Log in to your [Sim account](https://sim.dune.com) and navigate to **Subscriptions** in the sidebar. Click **Create Webhook** to set up a new webhook subscription.
## Compute Unit Cost
The Subscriptions API costs **1 CU per event** sent to your webhook. Note that a single webhook call may include multiple events. For example, multiple balance changes or transactions.
Creating and managing webhook subscriptions through the API does not consume compute units. However, your account must have an active plan to use the Subscriptions API.
See the [Compute Units](/compute-units) page for detailed information.
## Webhook Payloads
When a subscribed event occurs, Sim APIs will send a `POST` request to your specified webhook URL. The request body will contain a JSON payload with the event data. Each subscription type returns different data structures and is available on different sets of supported chains.
All webhook deliveries include a set of `dune-webhook-*` headers to provide metadata about the event and delivery attempt.
| Header | Description |
| --------------------------------- | ----------------------------------------------------------------------- |
| `dune-webhook-id` | The unique ID of the webhook subscription that triggered this event. |
| `dune-webhook-type` | The type of subscription (`transactions`, `activities`, or `balances`). |
| `dune-webhook-chain-id` | The ID of the chain where the event occurred. |
| `dune-webhook-dispatch-timestamp` | The timestamp (ISO 8601) when the webhook was dispatched. |
| `dune-webhook-retry-index` | The retry attempt number for this delivery (0 for the first attempt). |
**Security**: To secure your webhook endpoint, validate that incoming requests are from Sim. We include a signature in the `dune-webhook-signature` header that you can use to verify the authenticity of webhook deliveries. Always validate webhook signatures in production.
**Retry Logic**: If your webhook endpoint returns a non-2xx status code or is unreachable, Sim will automatically retry the delivery using an exponential backoff strategy with up to 5 retry attempts over a 24-hour period. Track the retry attempt number using the `dune-webhook-retry-index` header (0 for the first attempt).
Below are examples of the webhook payloads for each subscription type, along with the supported chains.
## Balances
Get notified when a wallet's ERC20 token balance changes. The payload contains details about the asset, the balance change, and the transaction that caused it. This data is similar to the response from our [Balances API](/evm/balances).
```json [expandable] Balance Change Payload theme={null}
{
"balance_changes": [
{
"amount_after": "1279045098892",
"amount_before": "1279044706766",
"amount_delta": "392126",
"asset": {
"decimals": 6,
"low_liquidity": false,
"name": "USD Coin",
"pool_size_usd": 25220031.549589876,
"symbol": "USDC",
"token_address": "0x833589fcd6edb6e08f4c7c32d4f71b54bda02913",
"token_metadata": {
"logo": "https://api.sim.dune.com/beta/token/logo/8453/0x833589fcd6edb6e08f4c7c32d4f71b54bda02913"
}
},
"counterparty_address": "0xf5042e6ffac5a625d4e7848e0b01373d8eb9e222",
"direction": "in",
"price_usd": 0.9991475029469292,
"subscribed_address": "0xf70da97812cb96acdf810712aa562db8dfa3dbef",
"transaction_hash": "0x51a97de72ba1fb37f74046706147eb9469e7e90f2ab3671c6cca99a8111e74f0",
"value_after_usd": 1277954.71671445,
"value_before_usd": 1277954.324922736,
"value_delta_usd": 0.3917917137405675
}
]
}
```
## Activities
Receive a notification when a new activity is associated with a subscribed address. The payload contains an array of activity objects, which is similar to the response from our [Activity API](/evm/activity).
```json [expandable] Activity Payload theme={null}
{
"activities": [
{
"chain_id": 84532,
"block_number": 33620321,
"block_time": "2025-11-13T04:42:10+00:00",
"tx_hash": "0x32c0fbe4af264b5298108cf923c2c6205765e49385fde23f07fe45e3f1fb6309",
"tx_from": "0x014bee8bd1d5438caa3a40abb424ff09a81645ff",
"tx_to": "0x3f39c9b36b0129a561aae2820a47520891cc87a1",
"tx_value": "0",
"type": "send",
"asset_type": "erc20",
"token_address": "0x3f39c9b36b0129a561aae2820a47520891cc87a1",
"to": "0xb28eb9fb315f8156e3aaaa6ac8a24b9c76d76cdb",
"value": "1000000"
},
{
"chain_id": 84532,
"block_number": 33620321,
"block_time": "2025-11-13T04:42:10+00:00",
"tx_hash": "0x32c0fbe4af264b5298108cf923c2c6205765e49385fde23f07fe45e3f1fb6309",
"tx_from": "0x014bee8bd1d5438caa3a40abb424ff09a81645ff",
"tx_to": "0x3f39c9b36b0129a561aae2820a47520891cc87a1",
"tx_value": "0",
"type": "call",
"call_type": "incoming",
"from": "0x014bee8bd1d5438caa3a40abb424ff09a81645ff",
"value": "0",
"data": "0xa9059cbb000000000000000000000000b28eb9fb315f8156e3aaaa6ac8a24b9c76d76cdb00000000000000000000000000000000000000000000000000000000000f4240"
}
]
}
```
## Transactions
Get notified when a subscribed address is the sender or receiver of a transaction. The payload contains an array of transaction objects, which is similar to the response from our [Transactions API](/evm/transactions).
```json [expandable] Transaction Payload theme={null}
{
"transactions": [
{
"chain": "base_sepolia",
"chain_id": 84532,
"address": "0x014bee8bd1d5438caa3a40abb424ff09a81645ff",
"block_time": "2025-11-13T04:42:10+00:00",
"block_number": 33620321,
"index": 28,
"hash": "0x32c0fbe4af264b5298108cf923c2c6205765e49385fde23f07fe45e3f1fb6309",
"block_hash": "0x6a172fbf201d3a3eb6473e80b42795c36184ff48b5aad135feebdd330eb8b843",
"value": "0x0",
"transaction_type": "Sender",
"from": "0x014bee8bd1d5438caa3a40abb424ff09a81645ff",
"to": "0x3f39c9b36b0129a561aae2820a47520891cc87a1",
"nonce": "0x16",
"gas_price": "0xecd58",
"gas_used": "0xe84c",
"effective_gas_price": "0xecd58",
"success": true,
"data": "0xa9059cbb000000000000000000000000b28eb9fb315f8156e3aaaa6ac8a24b9c76d76cdb00000000000000000000000000000000000000000000000000000000000f4240",
"decoded": {
"name": "transfer",
"inputs": [
{
"name": "dst",
"type": "address",
"value": "0xb28eb9fb315f8156e3aaaa6ac8a24b9c76d76cdb"
},
{
"name": "wad",
"type": "uint256",
"value": "1000000"
}
]
},
"logs": [
{
"address": "0x3f39c9b36b0129a561aae2820a47520891cc87a1",
"data": "0x00000000000000000000000000000000000000000000000000000000000f4240",
"topics": [
"0xddf252ad1be2c89b69c2b068fc378daa952ba7f163c4a11628f55a4df523b3ef",
"0x000000000000000000000000014bee8bd1d5438caa3a40abb424ff09a81645ff",
"0x000000000000000000000000b28eb9fb315f8156e3aaaa6ac8a24b9c76d76cdb"
],
"decoded": {
"name": "Transfer",
"inputs": [
{
"name": "_from",
"type": "address",
"value": "0x014bee8bd1d5438caa3a40abb424ff09a81645ff"
},
{
"name": "_to",
"type": "address",
"value": "0xb28eb9fb315f8156e3aaaa6ac8a24b9c76d76cdb"
},
{
"name": "_tokenId",
"type": "uint256",
"value": "1000000"
}
]
}
}
]
}
]
}
```
# Create Webhook
Source: https://docs.sim.dune.com/evm/subscriptions/create-webhook
evm/openapi/subscriptions/webhooks.json post /beta/evm/subscriptions/webhooks
Create a new webhook subscription to receive realtime onchain data.
Creates a new webhook subscription. When creating a webhook, you must specify:
* **name**: A descriptive name for your webhook
* **url**: The endpoint where webhook payloads will be sent
* **type**: The type of events to subscribe to (`transactions`, `activities`, or `balances`)
* **addresses**: An array of wallet addresses to monitor
## Optional Filters
You can narrow down the events you receive by adding optional filters:
* **chain\_ids**: Monitor only specific chains (e.g., `[1, 8453]` for Ethereum and Base)
* **transaction\_type**: For transaction webhooks, filter by `sender` or `receiver`
* **counterparty**: Filter transactions by counterparty address
* **activity\_type**: For activity webhooks, filter by specific types (`send`, `receive`, `swap`, etc.)
* **asset\_type**: Filter by asset type (`native`, `erc20`, `erc721`, `erc1155`)
* **token\_address**: Monitor only a specific token contract
Start with broad filters and narrow them down based on your app's needs. This helps reduce unnecessary webhook deliveries.
## Example Use Cases
### Monitor USDC Balance Changes
```json theme={null}
{
"name": "USDC Balance Monitor",
"url": "https://example.com/webhooks/usdc",
"type": "balances",
"addresses": ["0xd8dA6BF26964aF9D7eEd9e03E53415D37aA96045"],
"chain_ids": [1, 8453],
"asset_type": "erc20",
"token_address": "0xa0b86991c6218b36c1d19d4a2e9eb0ce3606eb48"
}
```
### Track All Incoming Transactions
```json theme={null}
{
"name": "Incoming Transactions",
"url": "https://example.com/webhooks/txns",
"type": "transactions",
"addresses": ["0xd8dA6BF26964aF9D7eEd9e03E53415D37aA96045"],
"transaction_type": "receiver"
}
```
### Monitor Swap Activities
```json theme={null}
{
"name": "Swap Monitor",
"url": "https://example.com/webhooks/swaps",
"type": "activities",
"addresses": ["0xd8dA6BF26964aF9D7eEd9e03E53415D37aA96045"],
"activity_type": "swap"
}
```
# Delete Webhook
Source: https://docs.sim.dune.com/evm/subscriptions/delete-webhook
evm/openapi/subscriptions/webhooks.json delete /beta/evm/subscriptions/webhooks/{webhookId}
Permanently delete a webhook subscription.
Permanently deletes a webhook subscription. This action cannot be undone.
Deleting a webhook is permanent. If you only need to temporarily stop receiving events, consider using the [Update Webhook](/evm/subscriptions/update-webhook) endpoint to set `active: false` instead.
After deletion:
* No new webhook deliveries will be sent
* The webhook ID becomes invalid
* All subscribed addresses are removed
* Historical delivery logs may still be visible in your dev portal
# Get Webhook
Source: https://docs.sim.dune.com/evm/subscriptions/get-webhook
evm/openapi/subscriptions/webhooks.json get /beta/evm/subscriptions/webhooks/{webhookId}
Retrieve detailed information about a specific webhook subscription.
Retrieves the complete configuration and metadata for a specific webhook subscription. Use this endpoint to:
* Check the current status of a webhook
* View the webhook's configuration and filters
* Verify when a webhook was created or last updated
The response includes all webhook properties, including optional filters that may have been set during creation.
# Get Webhook Addresses
Source: https://docs.sim.dune.com/evm/subscriptions/get-webhook-addresses
evm/openapi/subscriptions/webhooks.json get /beta/evm/subscriptions/webhooks/{webhookId}/addresses
Retrieve the list of addresses currently subscribed to a webhook.
Returns a paginated list of all wallet addresses that are currently subscribed to the specified webhook. This is useful for:
* Auditing which addresses are being monitored
* Verifying address subscriptions
* Exporting your subscription list
## Pagination
This endpoint uses cursor-based pagination. Use the `limit` parameter to control page size, and pass the `next_offset` value from the response as the `offset` parameter to retrieve the next page.
If you're managing a large number of addresses (hundreds or thousands), use pagination to efficiently retrieve the complete list.
# List Webhooks
Source: https://docs.sim.dune.com/evm/subscriptions/list-webhooks
evm/openapi/subscriptions/webhooks.json get /beta/evm/subscriptions/webhooks
Retrieve a paginated list of all webhook subscriptions for your team.
Returns a list of all webhook subscriptions associated with your authenticated team. Use this endpoint to view all your active and inactive webhooks, along with their configurations.
## Pagination
This endpoint uses cursor-based pagination. Use the `limit` parameter to control page size, and pass the `next_offset` value from the response as the `offset` parameter to retrieve the next page.
# Replace Webhook Addresses
Source: https://docs.sim.dune.com/evm/subscriptions/replace-webhook-addresses
evm/openapi/subscriptions/webhooks.json put /beta/evm/subscriptions/webhooks/{webhookId}/addresses
Replace the entire address list for a webhook subscription.
Replaces the entire list of subscribed addresses for a webhook. The new list completely overwrites the existing addresses.
Use this endpoint when you want to:
* Replace the entire address list with a new set
* Reset the subscription to monitor a different set of addresses
* Perform a bulk update of all addresses at onc
This endpoint replaces ALL existing addresses.
Any addresses not included in the new list will be removed from the subscription.
If you only need to add or remove specific addresses without replacing the entire list, use the [Update Addresses](/evm/subscriptions/update-webhook-addresses) endpoint instead.
# Update Webhook
Source: https://docs.sim.dune.com/evm/subscriptions/update-webhook
evm/openapi/subscriptions/webhooks.json patch /beta/evm/subscriptions/webhooks/{webhookId}
Modify an existing webhook subscription's configuration.
Partially updates a webhook subscription's configuration. You can modify any of the webhook's properties without having to resend the entire configuration.
Only include the fields you want to update. All other properties will remain unchanged.
To manage subscribed addresses (add/remove), use the [Update Addresses](/evm/subscriptions/update-webhook-addresses) endpoint instead.
## Example Use Cases
### Pause a Webhook
To temporarily stop receiving webhook deliveries without deleting the webhook:
```json theme={null}
{
"active": false
}
```
### Update Destination URL
```json theme={null}
{
"url": "https://new-endpoint.example.com/webhooks"
}
```
### Change Chain Filter
```json theme={null}
{
"chain_ids": [1, 10, 8453]
}
```
### Update Multiple Properties
You can update multiple properties in a single request:
```json theme={null}
{
"name": "Updated USDC Monitor",
"active": true,
"chain_ids": [1, 8453]
}
```
# Update Addresses
Source: https://docs.sim.dune.com/evm/subscriptions/update-webhook-addresses
evm/openapi/subscriptions/webhooks.json patch /beta/evm/subscriptions/webhooks/{webhookId}/addresses
Add or remove addresses from a webhook subscription.
Add or remove individual addresses from a webhook subscription without replacing the entire list. This is useful when you want to incrementally manage your subscribed addresses.
If you need to replace the entire address list at once, use the [Replace Webhook Addresses](/evm/subscriptions/replace-webhook-addresses) endpoint instead.
## Example Use Cases
### Add New Addresses
Add one or more addresses to your existing subscription:
```json theme={null}
{
"add_addresses": [
"0x742d35Cc6634C0532925a3b844Bc9e7595f0bEb",
"0x1234567890123456789012345678901234567890"
]
}
```
### Remove Addresses
Remove addresses that you no longer want to monitor:
```json theme={null}
{
"remove_addresses": [
"0x3f60008Dfd0EfC03F476D9B489D6C5B13B3eBF2C"
]
}
```
### Add and Remove in One Request
You can add and remove addresses in the same request. The removal happens first, followed by the additions.
```json theme={null}
{
"add_addresses": [
"0x742d35Cc6634C0532925a3b844Bc9e7595f0bEb"
],
"remove_addresses": [
"0x3f60008Dfd0EfC03F476D9B489D6C5B13B3eBF2C"
]
}
```
This endpoint only manages addresses. To update other webhook properties like name, URL, or status, use the [Update Webhook](/evm/subscriptions/update-webhook) endpoint.
# Supported Chains
Source: https://docs.sim.dune.com/evm/supported-chains
/evm/openapi/supported-chains.json
Explore chains supported by Sim's EVM API endpoints.
export const SupportedChainsAccordion = () => {
const dataState = useState(null);
const data = dataState[0];
const setData = dataState[1];
const idxDataState = useState(null);
const idxData = idxDataState[0];
const setIdxData = idxDataState[1];
const countsState = useState({});
const counts = countsState[0];
const setCounts = countsState[1];
const loadingState = useState(true);
const isLoading = loadingState[0];
const setIsLoading = loadingState[1];
useEffect(function () {
fetch("https://sim-proxy.dune-d2f.workers.dev/v1/evm/supported-chains", {
method: "GET"
}).then(function (response) {
return response.json();
}).then(function (responseData) {
setData(responseData);
var balancesCount = 0;
var activityCount = 0;
var collectiblesCount = 0;
var transactionsCount = 0;
var tokenInfoCount = 0;
var tokenHoldersCount = 0;
for (var i = 0; i < responseData.chains.length; i++) {
var chain = responseData.chains[i];
if (chain.balances && chain.balances.supported) balancesCount++;
if (chain.activity && chain.activity.supported) activityCount++;
if (chain.collectibles && chain.collectibles.supported) collectiblesCount++;
if (chain.transactions && chain.transactions.supported) transactionsCount++;
if (chain.token_info && chain.token_info.supported) tokenInfoCount++;
if (chain.token_holders && chain.token_holders.supported) tokenHoldersCount++;
}
setCounts({
balances: balancesCount,
activity: activityCount,
collectibles: collectiblesCount,
transactions: transactionsCount,
token_info: tokenInfoCount,
token_holders: tokenHoldersCount
});
fetch("https://api.sim.dune.com/idx/supported-chains", {
method: "GET"
}).then(function (idxResponse) {
return idxResponse.json();
}).then(function (idxResponseData) {
setIdxData(idxResponseData);
var defiPositionsCount = 0;
if (idxResponseData && idxResponseData.chains) {
defiPositionsCount = idxResponseData.chains.length;
}
setCounts({
balances: balancesCount,
activity: activityCount,
collectibles: collectiblesCount,
transactions: transactionsCount,
token_info: tokenInfoCount,
token_holders: tokenHoldersCount,
defi_positions: defiPositionsCount
});
setIsLoading(false);
});
});
}, []);
function renderChainsTable(endpoint) {
var supportedChains = [];
if (endpoint === "defi_positions") {
if (!idxData || !idxData.chains) {
return
{renderChainsTable("defi_positions")}
;
};
export const DefaultChainCount = ({endpoint}) => {
const dataState = useState(null);
const data = dataState[0];
const setData = dataState[1];
useEffect(function () {
fetch("https://api.sim.dune.com/v1/evm/supported-chains", {
method: "GET"
}).then(function (response) {
return response.json();
}).then(function (responseData) {
setData(responseData);
});
}, []);
if (data === null) {
return <>N>;
}
if (!data.chains || !Array.isArray(data.chains)) {
return <>N>;
}
var uniqueDefaultChains = new Set();
for (var i = 0; i < data.chains.length; i++) {
var chain = data.chains[i];
var hasDefaultTag = Array.isArray(chain.tags) && chain.tags.indexOf("default") !== -1;
if (!hasDefaultTag) {
continue;
}
if (endpoint !== undefined) {
if (chain[endpoint] && chain[endpoint].supported === true) {
uniqueDefaultChains.add(chain.name);
}
} else {
uniqueDefaultChains.add(chain.name);
}
}
var count = uniqueDefaultChains.size;
return <>{count}>;
};
The Supported Chains endpoint provides realtime information about which blockchains are supported by Sim's EVM API endpoints.
Chain support varies by API endpoint. Use the dropdown below to check which chains are available for each API:
```bash cURL theme={null}
curl --request GET \
--url https://api.sim.dune.com/v1/evm/supported-chains \
--header 'X-Sim-Api-Key: YOUR_API_KEY'
```
```javascript JavaScript theme={null}
const response = await fetch('https://api.sim.dune.com/v1/evm/supported-chains', {
method: 'GET',
headers: {
'X-Sim-Api-Key': 'YOUR_API_KEY'
}
});
const data = await response.json();
console.log(data);
```
```python Python theme={null}
import requests
url = "https://api.sim.dune.com/v1/evm/supported-chains"
headers = {"X-Sim-Api-Key": "YOUR_API_KEY"}
response = requests.get(url, headers=headers)
data = response.json()
print(data)
```
```json 200 theme={null}
{
"chains": [
{
"name": "ethereum",
"chain_id": 1,
"tags": ["default", "mainnet"],
"balances": {"supported": true},
"transactions": {"supported": true},
"activity": {"supported": true},
"token_info": {"supported": true},
"token_holders": {"supported": true},
"collectibles": {"supported": true}
},
{
"name": "polygon",
"chain_id": 137,
"tags": ["default", "mainnet"],
"balances": {"supported": true},
"transactions": {"supported": true},
"activity": {"supported": true},
"token_info": {"supported": true},
"token_holders": {"supported": true},
"collectibles": {"supported": true}
}
]
}
```
```json 400 theme={null}
{
"error": "Bad Request"
}
```
```json 401 theme={null}
{
"error": "Unauthorized"
}
```
```json 404 theme={null}
{
"error": "Not Found"
}
```
```json 429 theme={null}
{
"error": "Too many requests"
}
```
```json 500 theme={null}
{
"error": "Internal Server Error"
}
```
## Tags
The `tags` property groups chains by category, such as `mainnet`, `testnet`, or `default`.
You can use these tags to filter or select chains in API requests.
Any endpoint that supports the `chain_ids` query parameter accepts a tag in place of explicit IDs, letting you fetch data for an entire group of chains in a single request.
When using `chain_ids`, you can request chains in several ways:
* **By tags**: `?chain_ids=mainnet` returns all chains tagged with `mainnet`. Using `?chain_ids=mainnet,testnet` returns all chains that are tagged with `mainnet` *or* `testnet`.
* **Specific chain IDs**: `?chain_ids=1,137,42161` (Ethereum, Polygon, Arbitrum).
* **Mix tags and numeric IDs**: `?chain_ids=1,8543,testnet`
* **Default behavior**: Omitting `chain_ids` returns only chains tagged `default`.
Some supported chains have **no tag assigned**.
A chain may be untagged due to higher latency, restrictive rate limits, RPC cost, or a temporary incident.
Untagged chains stay out of default requests to keep them fast, but you can still query them with `chain_ids` by passing the chain name (e.g. `?chain_ids=corn,funkichain`).
Open the accordion above and scan the table to see which chains carry tags and which are untagged.
## Compute Units
Chain selection directly determines CU cost for chain-dependent endpoints (like Balances and Collectibles). CU equals the number of distinct chains included after expanding any tags you pass in `chain_ids`.
If you omit `chain_ids`, the endpoint uses its `default` chain set. That is currently {} chains for Balances and {} chains for Collectibles (these values can change over time).
See [Compute Units](/compute-units) for the full rate card and guidance.
## Using the API Endpoint
You can programmatically retrieve the list of supported chains to adapt to newly supported networks.
The response includes an array of supported chains.
Each item in the array includes the chain's `name`, `chain_id`, an array of `tags`, and support for each endpoint.
Each endpoint (balances, transactions, activity, etc.) has a `supported` boolean value
## Examples
Here are two practical examples of how you might use the API endpoint:
### 1. Building a Dynamic Chain Selector
This example shows how to fetch supported chains and create a user-friendly dropdown menu that filters chains based on their capabilities.
It can be useful for wallet UIs or dApp chain selection.
```javascript [expandable] theme={null}
// Fetch supported chains and build a dropdown for users
async function buildChainSelector() {
const response = await fetch('https://api.sim.dune.com/v1/evm/supported-chains', {
headers: { 'X-Sim-Api-Key': 'YOUR_API_KEY' }
});
const data = await response.json();
// Filter chains that support balances
const supportedChains = data.chains.filter(chain => chain.balances.supported);
// Build dropdown options
const chainOptions = supportedChains.map(chain => ({
value: chain.chain_id,
label: `${chain.name} (${chain.chain_id})`,
isMainnet: chain.tags.includes('mainnet')
}));
return chainOptions;
}
```
### 2. Validating Chain Support
This example demonstrates how to validate whether a specific chain supports a particular endpoint before making API calls.
This helps prevent errors and improves user experience by showing appropriate messages.
```javascript [expandable] theme={null}
async function validateChainSupport(chainId, endpointName) {
// Check if a chain supports a specific endpoint before making requests
try {
const response = await fetch('https://api.sim.dune.com/v1/evm/supported-chains', {
headers: { 'X-Sim-Api-Key': 'YOUR_API_KEY' }
});
const data = await response.json();
// Find the chain
const chain = data.chains.find(c => c.chain_id === chainId);
if (!chain) {
return { supported: false, message: `Chain ${chainId} not found` };
}
// Check if the endpoint is supported
if (!chain[endpointName] || !chain[endpointName].supported) {
return {
supported: false,
message: `Endpoint '${endpointName}' not supported on ${chain.name}`
};
}
return {
supported: true,
message: `Chain ${chain.name} supports ${endpointName}`
};
} catch (error) {
return { supported: false, message: `Error validating chain: ${error.message}` };
}
}
// Usage
const result = await validateChainSupport(1, 'balances');
console.log(result.message); // "Chain ethereum supports balances"
```
# Token Holders
Source: https://docs.sim.dune.com/evm/token-holders
evm/openapi/token-holders.json get /v1/evm/token-holders/{chain_id}/{address}
Discover token distribution across ERC20 token holders, ranked by balance descending.
export const SupportedChains = ({endpoint, title}) => {
const dataState = useState(null);
const data = dataState[0];
const setData = dataState[1];
useEffect(function () {
var url = "https://api.sim.dune.com/v1/evm/supported-chains";
if (endpoint === 'defi_positions') {
url = "https://api.sim.dune.com/idx/supported-chains";
}
fetch(url, {
method: "GET"
}).then(function (response) {
return response.json();
}).then(function (responseData) {
setData(responseData);
});
}, [endpoint]);
if (data === null) {
return
Loading chain information...
;
}
if (!data.chains) {
return
No chain data available
;
}
var supportedChains = [];
var totalChains = data.chains.length;
if (endpoint !== undefined && endpoint !== 'defi_positions') {
for (var i = 0; i < data.chains.length; i++) {
var chain = data.chains[i];
if (chain[endpoint] && chain[endpoint].supported) {
supportedChains.push(chain);
}
}
} else {
supportedChains = data.chains;
}
var count = supportedChains.length;
var endpointName = endpoint ? endpoint.charAt(0).toUpperCase() + endpoint.slice(1).replace(/_/g, " ") : "All";
var accordionTitle = title ? title + " (" + count + ")" : "Supported Chains (" + count + ")";
return
name
chain_id
tags
{supportedChains.map(function (chain) {
return
{chain.name}
{chain.chain_id}
{chain.tags ? chain.tags.join(", ") : ""}
;
})}
;
};
The Token Holders API provides information about accounts holding a specific ERC20 token on supported EVM blockchains.
## Pagination
This endpoint uses cursor-based pagination.
You can use the `limit` query parameter to define the maximum page size.
Results might at times be less than the maximum page size.
The `next_offset` value is included in the initial response and can be used to fetch the next page of results by passing it as the `offset` query parameter in the next request.
You can only use the value from `next_offset` to set the `offset` query parameter of the next page of results.
## Compute Unit Cost
The Token Holders endpoint has a fixed CU cost of **2** per request. See the [Compute Units](/compute-units) page for detailed information.
# Token Info
Source: https://docs.sim.dune.com/evm/token-info
evm/openapi/token-info.json get /v1/evm/token-info/{address}
Get detailed metadata and realtime price information for any native asset or ERC20 token including symbol, name, decimals, supply information, USD pricing, and logo URLs.
export const SupportedChains = ({endpoint, title}) => {
const dataState = useState(null);
const data = dataState[0];
const setData = dataState[1];
useEffect(function () {
var url = "https://api.sim.dune.com/v1/evm/supported-chains";
if (endpoint === 'defi_positions') {
url = "https://api.sim.dune.com/idx/supported-chains";
}
fetch(url, {
method: "GET"
}).then(function (response) {
return response.json();
}).then(function (responseData) {
setData(responseData);
});
}, [endpoint]);
if (data === null) {
return
Loading chain information...
;
}
if (!data.chains) {
return
No chain data available
;
}
var supportedChains = [];
var totalChains = data.chains.length;
if (endpoint !== undefined && endpoint !== 'defi_positions') {
for (var i = 0; i < data.chains.length; i++) {
var chain = data.chains[i];
if (chain[endpoint] && chain[endpoint].supported) {
supportedChains.push(chain);
}
}
} else {
supportedChains = data.chains;
}
var count = supportedChains.length;
var endpointName = endpoint ? endpoint.charAt(0).toUpperCase() + endpoint.slice(1).replace(/_/g, " ") : "All";
var accordionTitle = title ? title + " (" + count + ")" : "Supported Chains (" + count + ")";
return
name
chain_id
tags
{supportedChains.map(function (chain) {
return
{chain.name}
{chain.chain_id}
{chain.tags ? chain.tags.join(", ") : ""}
;
})}
;
};
The Tokens API provides metadata and realtime pricing information for native and ERC20 tokens on supported EVM blockchains. The API returns:
* Token metadata (symbol, name, decimals)
* Current USD pricing information
* Supply information
* Logo URLs when available
The `?chain_ids` query parameter is mandatory.
To learn more about this query parameter, see the [Supported Chains](/evm/supported-chains#tags) page.
## Native vs. ERC20 tokens
The `address` path parameter can be set to `native` for chain-native assets or to an ERC20 contract address. Include the required `?chain_ids` query parameter to select the chain. The response shape differs slightly for native assets vs ERC20 tokens.
**Native asset**
Use `native` as the `address` path parameter.
```http Native Request Example theme={null}
GET /v1/evm/token-info/native?chain_ids=1
```
```json Native Response Example [expandable] theme={null}
{
"contract_address": "native",
"tokens": [
{
"chain_id": 1,
"chain": "ethereum",
"price_usd": 3900.777068,
"symbol": "ETH",
"name": "Ethereum",
"decimals": 18,
"logo": "https://api.sim.dune.com/beta/token/logo/1"
}
]
}
```
**ERC20 token**
Use the token's contract address as the `address` path parameter. Additional fields like `pool_size`, `total_supply`, and `fully_diluted_value` may be present.
```http ERC20 Request Example theme={null}
GET /v1/evm/token-info/0xd9aaec86b65d86f6a7b5b1b0c42ffa531710b6ca?chain_ids=8453
```
```json ERC20 Response Example [expandable] theme={null}
{
"contract_address": "0xd9aaec86b65d86f6a7b5b1b0c42ffa531710b6ca",
"tokens": [
{
"chain_id": 8453,
"chain": "base",
"price_usd": 0.998997309877106,
"pool_size": 456370.679451466,
"total_supply": "8980896607582",
"fully_diluted_value": 8971891.55125885,
"symbol": "USDbC",
"name": "USD Base Coin",
"decimals": 6,
"logo": "https://api.sim.dune.com/beta/token/logo/8453/0xd9aaec86b65d86f6a7b5b1b0c42ffa531710b6ca"
}
]
}
```
## Token Prices
Sim looks up prices onchain. We use the most liquid onchain pair to determine a usd price. We return the available liquidity in `pool_size` as part of the response.
## Historical prices
You can request historical point-in-time prices by adding the optional `historical_prices` query parameter. Use whole numbers to specify the number of hours in the past. You can request up to three offsets. For example, `historical_prices=8760` returns the price 8760 hours (approximately 1 year) ago. `historical_prices=720,168,24` returns prices 720 hours (1 month) ago, 168 hours (1 week) ago, and 24 hours ago.
The `historical_prices` query parameter is currently supported only on the EVM Token Info and EVM Balances endpoints.
When set, each token object includes a `historical_prices` array with one entry per offset:
```json theme={null}
{
"tokens": [
{
"chain": "base",
"symbol": "ETH",
"price_usd": 3897.492219,
"historical_prices": [
{ "offset_hours": 8760, "price_usd": 2816.557286 },
{ "offset_hours": 720, "price_usd": 3714.205613 },
{ "offset_hours": 168, "price_usd": 3798.926195 }
]
}
]
}
```
Percent changes are not returned. You can compute your own percentage differences using the current `price_usd` and the values in `historical_prices[].price_usd`.
## Pagination
This endpoint uses cursor-based pagination. You can use the `limit` parameter to define the maximum page size.
Results might at times be less than the maximum page size.
The `next_offset` value is included in the initial response and can be utilized to fetch the next page of results by passing it as the `offset` query parameter in the next request.
You can only use the value from `next_offset` to set the `offset` parameter of the next page of results. Using your own `offset` value will not have any effect.
## Compute Unit Cost
The Token Info endpoint has a fixed CU cost of **2** per request. The `chain_ids` query parameter is required but does not change the CU cost. See the [Compute Units](/compute-units) page for detailed information.
# Transactions
Source: https://docs.sim.dune.com/evm/transactions
evm/openapi/transactions.json get /v1/evm/transactions/{address}
Retrieve granular transaction details including block information, gas data, transaction types, and raw transaction values.
export const SupportedChains = ({endpoint, title}) => {
const dataState = useState(null);
const data = dataState[0];
const setData = dataState[1];
useEffect(function () {
var url = "https://api.sim.dune.com/v1/evm/supported-chains";
if (endpoint === 'defi_positions') {
url = "https://api.sim.dune.com/idx/supported-chains";
}
fetch(url, {
method: "GET"
}).then(function (response) {
return response.json();
}).then(function (responseData) {
setData(responseData);
});
}, [endpoint]);
if (data === null) {
return
Loading chain information...
;
}
if (!data.chains) {
return
No chain data available
;
}
var supportedChains = [];
var totalChains = data.chains.length;
if (endpoint !== undefined && endpoint !== 'defi_positions') {
for (var i = 0; i < data.chains.length; i++) {
var chain = data.chains[i];
if (chain[endpoint] && chain[endpoint].supported) {
supportedChains.push(chain);
}
}
} else {
supportedChains = data.chains;
}
var count = supportedChains.length;
var endpointName = endpoint ? endpoint.charAt(0).toUpperCase() + endpoint.slice(1).replace(/_/g, " ") : "All";
var accordionTitle = title ? title + " (" + count + ")" : "Supported Chains (" + count + ")";
return
name
chain_id
tags
{supportedChains.map(function (chain) {
return
{chain.name}
{chain.chain_id}
{chain.tags ? chain.tags.join(", ") : ""}
;
})}
;
};
The Transactions API allows for quick and accurate lookup of transactions associated with an address.
Transactions are ordered by descending block time, so the most recent transactions appear first.
## Decoded transactions
Enable decoded transaction data and logs by adding the `?decode=true` query parameter to your request.
When decoding is enabled, two types of data may be decoded:
1. **Transaction call data**: The `data` field of each transaction may include an additional `decoded` object at the root level of the transaction, representing the parsed function call.
2. **Event logs**: When a transaction contains EVM logs, each log may include an additional `decoded` object representing the parsed event.
For more details, see the [response information](#response-logs-decoded) below.
Decoding is only available for contracts that exist on [Dune.com](https://dune.com). Search for your contract on Dune to check if it's available for decoding. Transactions without logs, logs without known signatures, or contracts not indexed on Dune **will not** include decoded data.
## Pagination
This endpoint is using cursor based pagination.
You can use the `limit` parameter to define the maximum page size.
Results might at times be less than the maximum page size.
The `next_offset` value is included in the initial response and can be utilized to fetch the next page of results by passing it as the `offset` query parameter in the next request.
You can only use the value from `next_offset` to set the `offset` parameter of the next page of results. Using your own `offset` value will not have any effect.
## Compute Unit Cost
The Transactions endpoint has a fixed CU cost of **1** per request. See the [Compute Units](/compute-units) page for detailed information.
# Sim IDX Quickstart
Source: https://docs.sim.dune.com/idx
Get started and set up your first blockchain data indexer in minutes.
Sim IDX is a framework that radically simplifies the process of indexing blockchain data.
This guide will walk you through installing the CLI, initializing a sample project, and running your first listener test.
## Install CLI
First, ensure you have **Node.js v20.x or later** installed.
You can download it from [Nodejs.org](https://nodejs.org).
```bash theme={null}
# Check your node version
node -v
```
```bash theme={null}
curl -L https://simcli.dune.com | bash
```
You'll see the following output:
```text theme={null}
[INFO] Installing sim CLI v0.0.86
[INFO] Installing sim to /root/.local/bin/sim
[INFO] sim CLI installed successfully!
[INFO] Added sim CLI to PATH in /root/.bashrc
```
After the installer finishes, run `source ~/.bashrc` (or the appropriate profile file) so the `sim` executable is available in your `PATH`.
Verify that the CLI is working:
```bash theme={null}
sim --version
```
You'll see:
```
sim v0.0.86 (eaddf2 2025-06-22T18:01:14.000000000Z)
```
For a full reference of the CLI, see the [CLI Overview](/idx/cli).
## Initialize Sample App
First, create a new folder.
```bash theme={null}
mkdir my-first-idx-app
cd my-first-idx-app
```
Next, initialize your new Sim IDX app.
```bash theme={null}
sim init
```
This command initializes **a pre-configured sample app that indexes every new Uniswap V3 trading pool created across multiple chains including Ethereum, Base, and Unichain**.
It sets up a complete app structure for you, including a listener contract, tests, and a boilerplate API.
`sim init` also initializes a new Git repository and makes the first commit.
Make sure Git is installed and configured. Otherwise the command might fail.
After successfully running init, you'll see:
```text theme={null}
INFO sim::init: Successfully initialized a new Sim IDX app
```
## Authentication
Create a new API key in the [Sim dashboard](https://sim.dune.com/) so you can authenticate in the CLI and test your new sample app.
Give your new API key a unique name and select **Sim IDX CLI** for the key's purpose.
After you've created your key, copy its value, go back to the CLI, and run:
```bash theme={null}
sim authenticate
```
Paste the API key you created and press Enter.
Once you've successfully authenticated, you'll see the following:
```
INFO sim::authenticate: Verifying API Key...
INFO sim::authenticate: API Key verified successfully.
INFO sim::authenticate: API Key successfully saved.
```
## Test Your Listener
Now you can test to make sure your sample app's listener is working correctly:
```bash theme={null}
sim listeners evaluate \
--start-block 22757345 \
--chain-id 1
```
In this case, `sim listeners evaluate` processes only a single block.
See the [CLI Overview](/idx/cli#sim-listeners-evaluate) for details.
After the command finishes, you'll see a summary of indexed events.
If everything succeeds, your listener is working correctly.
## Next Steps
You've now got a working contract listener.
Next, you'll deploy your app so it can index data continuously.
If you'd like to go further, you can refine and extend your listener to capture even more onchain data.
Learn how to deploy your Sim IDX app to production
Dive deeper into writing and testing listener contracts
# API Development
Source: https://docs.sim.dune.com/idx/apis
Sim IDX provides a complete serverless API development environment with built-in database connectivity, automatic scaling, and edge deployment. Whether you're building simple data endpoints or advanced features, the platform handles infrastructure concerns so you can focus on your business logic.
This guide walks you through the complete API development lifecycle on the platform.
## Infrastructure & Scalability
Your API runs on **Cloudflare Workers** with the **Hono** framework.
Anything you can do in Hono will also work here.
Your data is stored, by default in a [**Neon** Postgres database](/idx/db) accessed through Cloudflare **Hyperdrive**.
As an alternative, you can also set up [Kafka sinks](/idx/sinks/kafka) to stream your indexed blockchain data in real-time to external data sinks like Confluent Cloud or Redpanda Cloud, in addition to the default Postgres database.
Requests execute at the edge close to users, and database connections are pooled automatically, so you don't have to manage servers or connection limits.
The setup scales with your traffic, but there are sensible platform limits. If you anticipate sustained very high volume, please [contact us](/support).
## Local Development Setup
Building APIs on Sim IDX follows a streamlined workflow. You develop locally, write endpoints to query your indexed data, and [deploy with a simple git push](/idx/deployment). The boilerplate API in the `apis/` directory gives you a starting point with common patterns for querying your indexed blockchain data and serving it through HTTP endpoints.
Before deploying, you can run and test your API locally.
```bash theme={null}
cd apis
```
Create a file named `.dev.vars` in the `apis/` directory. Add the database connection string, which you can find on the [App Page](/idx/app-page#db-connection) after deploying your app for the first time.
````
```plaintext .dev.vars
DB_CONNECTION_STRING="your_database_connection_string_from_app_page"
```
````
```bash theme={null}
npm install
```
```bash theme={null}
npm run dev
```
```
Your API is now running locally at `http://localhost:8787`.
```
## Understand the API Code
The boilerplate API in `apis/src/index.ts` is a TypeScript application that runs on Cloudflare Workers. It connects to your indexed database and exposes HTTP endpoints to query your data. Let's understand how this works.
### Framework Setup
The API uses the `@duneanalytics/sim-idx` helper library, which wraps **Hono** and **Drizzle** to simplify setup:
```typescript theme={null}
import { App, db, types } from "@duneanalytics/sim-idx";
import { eq, sql } from "drizzle-orm";
import { poolCreated, ownerChanged } from "./db/schema/Listener";
```
**Hono** handles HTTP requests and routing, while **Drizzle** provides a type-safe way to query your PostgreSQL database.
### Environment Configuration
`@duneanalytics/sim-idx` automatically handles credentials in production. For local development, place `DB_CONNECTION_STRING` in `.dev.vars` as shown above if you need to supply your own connection string.
### Application Instance
Create the web application with a single call:
```typescript theme={null}
const app = App.create();
```
### Database Connection Management
Instead of managing your own connection pool, call `db.client(c)` inside a request handler to reuse the shared Drizzle client:
```typescript theme={null}
const rows = await db.client(c)
.select()
.from(poolCreated)
.limit(10);
```
## Add a New Endpoint
Let's build three endpoints to serve our indexed data: `/api/pools` to get recent Uniswap V3 pools, `/api/owner-changed` to get recent owner changed events, and `/api/pools/count` to get the total number of pools.
### Creating the Pools Endpoint
Create an endpoint to fetch the 10 most recent Uniswap V3 pools. This endpoint queries the `pool_created` table from your listener.
```typescript theme={null}
// Endpoint to get the 10 most recent Uniswap V3 pools
app.get("/api/pools", async (c) => {
try {
const rows = await db.client(c)
.select()
.from(poolCreated)
.limit(10);
return Response.json({ data: rows });
} catch (e) {
console.error("Database operation failed:", e);
return Response.json({ error: (e as Error).message }, { status: 500 });
}
});
```
This endpoint uses a simple SQL query to fetch the most recent pools. The `LIMIT 10` clause keeps the response small. In a production environment, consider adding pagination and filtering.
### Adding the Owner Changed Endpoint
Before continuing, make sure you've added support for the `OwnerChanged` event in your listener contract by following the ["Triggering more functions and events"](/idx/listener#trigger-onchain-activity) section of the Listener guide and then running:
```bash theme={null}
sim build
```
Running `sim build` regenerates `apis/src/db/schema/Listener.ts` with a new `ownerChanged` table binding that we import below.
Add an endpoint to fetch the 10 most recent owner changed events. This endpoint queries the `owner_changed` table.
```typescript theme={null}
// Endpoint to get the 10 most recent owner changed events
app.get("/api/owner-changed", async (c) => {
try {
const rows = await db.client(c)
.select()
.from(ownerChanged)
.limit(10);
return Response.json({ data: rows });
} catch (e) {
console.error("Database operation failed:", e);
return Response.json({ error: (e as Error).message }, { status: 500 });
}
});
```
### Creating the Pool Count Endpoint
Finally, add an endpoint to get the total number of pools. This is useful for pagination and analytics.
```typescript theme={null}
// Endpoint to get the total number of pools
app.get("/api/pools/count", async (c) => {
try {
const [{ total }] = await db.client(c)
.select({ total: sql`COUNT(*)` })
.from(poolCreated);
return Response.json({ data: total });
} catch (e) {
console.error("Database operation failed:", e);
return Response.json({ error: (e as Error).message }, { status: 500 });
}
});
```
This endpoint uses an aggregate query to count pools without fetching every row.
### Testing Your Endpoints
After adding all three endpoints, you can test them locally at `http://localhost:8787/api/pools`, `http://localhost:8787/api/owner-changed`, and `http://localhost:8787/api/pools/count`.
## Authenticate API Endpoints
Sim IDX provides built-in authentication middleware that integrates seamlessly with your app and the platform.
When deployed to production, the authentication middleware requires a valid Sim IDX App Endpoints API key to be passed with each request. Sim's infrastructure validates the key and, if successful, allows the request to proceed. Unauthenticated requests return a `401 Unauthorized` error.
During local development, the authentication middleware automatically disables authentication checks when your API is running locally. This occurs when `NODE_ENV` is not `production`. This allows you to test endpoints without managing keys.
### Create a Sim IDX App Endpoints API Key
Your API will need a Sim IDX App Endpoints API key to access your authenticated endpoints. You can generate a new key from the [Sim dashboard](https://sim.dune.com/).
When creating the key, its purpose should be set to **Sim IDX App Endpoints**. Keep this key secure and do not expose it in client-side code.
### Understanding the Authentication Middleware
The authentication middleware is enabled by default in your API. When you create a new Sim IDX app, the boilerplate code in `apis/src/index.ts` already includes the necessary authentication setup:
```typescript apis/src/index.ts theme={null}
import { App, db, types, middlewares } from "@duneanalytics/sim-idx";
import { eq, sql } from "drizzle-orm";
import { poolCreated, ownerChanged } from "./db/schema/Listener";
const app = App.create();
// Authentication middleware is applied to all routes by default
app.use("*", middlewares.authentication);
// Your endpoints...
app.get("/api/pools", async (c) => {
// ...
});
export default app;
```
The `middlewares.authentication` is applied to all routes using the `app.use("*", middlewares.authentication)` line. This ensures that every endpoint in your API requires authentication when deployed.
### Calling Your Authenticated API
Once your API is deployed, you must include your Sim IDX App Endpoints API key in the `Authorization` header with every request.
Here is an example using cURL.
```bash theme={null}
curl --request GET \
--url https:///api/pools \
--header 'Authorization: Bearer YOUR_SIM_IDX_APP_ENDPOINTS_API_KEY'
```
Replace `` with your deployment's base URL and `YOUR_SIM_IDX_APP_ENDPOINTS_API_KEY` with a valid Sim IDX App Endpoints API key.
## Wrangler Configuration
Your API uses a `wrangler.jsonc` file in the `apis/` directory for local tooling and build metadata. This file is already created when you initialize a new project. Sim IDX reads a minimal set of fields from this file during deployment. Other fields in this file are not used by the Sim IDX deployment flow.
Sim IDX deploys only the code that is reachable from your entrypoint during the build. Static files and local state are not packaged. Files on disk such as images, CSV or JSON blobs, or a local Wrangler state directory are not uploaded.
The existing `apis/wrangler.jsonc` contains:
```jsonc theme={null}
{
"name": "sim-apis-sample-app",
"compatibility_date": "2025-05-28", // Update this date to the current date
"main": "src/index.ts",
"compatibility_flags": ["nodejs_compat"]
}
```
If you add additional keys to this file, the Sim IDX deployment will not use them. Some keys may appear harmless in local development, but they will not change how your production Cloudflare worker runs.
### Local vs Deploy
Local development tools can sometimes access files on your machine. The deployed worker does not have a filesystem. Do not read from disk in your request handlers. If you need small reference data then embed it at build time as a TypeScript module import. If you need larger assets then host them behind HTTPS and fetch them at runtime.
| Capability | Local dev (`npm run dev`) | Deployed on Sim IDX | What to do |
| --------------------------------------- | ------------------------- | ------------------- | --------------------------------------------------------------------- |
| Read `./file.json` | May appear to work | Not available | Embed at build time or fetch remotely |
| Serve files from `assets/` or `public/` | May serve locally | Not packaged | Host externally and fetch |
| Extra fields in `wrangler.jsonc` | May work locally | Not used | Keep only `name`, `main`, `compatibility_date`, `compatibility_flags` |
## Deploy Your API
Haven't connected your GitHub repo to Sim yet? Follow the App Deployment guide to link your project and trigger the first build.
Once your repository is connected, shipping updates is as simple as pushing code. Push commits to the `main` branch to roll out a new production deployment. Push to any other branch to spin up a preview deployment with its own URL. This is useful for staging and pull-request reviews.
Sim IDX automatically builds your Cloudflare Worker and updates the deployment status in the dashboard. No CLI command is required.
Before pushing, review your `wrangler.jsonc` and remove fields that are not `name`, `main`, or `compatibility_date`. Also make sure your handlers do not read from the filesystem. If you need data, either embed it at build time or fetch it from a remote source.
# App Page for Live Monitoring
Source: https://docs.sim.dune.com/idx/app-page
Monitor your deployed Sim IDX app with high-level metrics, build health, database access and automatically generated APIs.
The **App Page** is the central place to monitor your IDX app after it has been deployed.
Here you can track ingestion progress, inspect generated endpoints, check build health and grab the database connection string.
If you have not deployed your IDX app yet, follow the [Deployment guide](/idx/deployment) first.
## Overview metrics
At the very top you will see a stats bar that summarises your app's activity: the chains it indexes, the connected GitHub repository and API metrics such as total requests, peak RPS and success rate over the last 24 hours. The numbers update live so you can leave the tab open while you ship new endpoints.
## Current deployment
This card shows the build that is currently serving traffic.
It displays the **Deployment ID** (unique UUID for this deployment), **Environment** (Production points to the `main` branch while Preview builds are generated for branches other than `main`), **Commit** (Git SHA together with the GitHub author), and **Last deployed** (relative timestamp).
When a build is running the status badge moves from **Building → Ingesting → Ready**. Previous builds stay available in the [**Other deployments**](#other-deployments).
During **Ingesting**, real-time indexing is live and historical backfill runs to completion. The backfill re-triggers only when you change your Listener Contract. See the full details in [Build and Ingestion Lifecycle](/idx/deployment-environments#build-and-ingestion-lifecycle).
### DB connection
A Postgres **DB connection** string is issued for every deployment.
It follows the pattern
```text theme={null}
postgres://:@:/
```
Paste it into `psql`, Supabase Studio, DBeaver or any other SQL client to explore your tables directly.
### API base routes
Two base URLs are generated:
1. **Latest**: always points at the newest deployment, be it preview or production.
2. **Production**: permanently mapped to the most recent production build in the `/main` branch.
## Endpoints
Every endpoint that you add to your API appears here with usage statistics and a status badge. Click an endpoint to view detailed usage metrics.
## Events
If your app emits events you will see an **Events** table. For each event you can view:
* Status (*Running*, *Paused* or error).
* Latest processed block.
* Total records stored.
* Disk size consumed in the DB.
Click an event to open a detailed view that shows catch-up progress, the last five processed events and full logs.
## Other deployments
The **Other deployments** panel lists every build that ran for this app. For each row you can:
* View the deployment hash, status, environment and commit.
* Open build logs to debug failures.
Clicking a deployment switches the entire App Page to that build, letting you inspect its endpoints, events and metrics in isolation.
# App Folder Structure
Source: https://docs.sim.dune.com/idx/app-structure
Understand the folder structure of a Sim IDX app.
```text theme={null}
my-idx-app/
├── sim.toml # App configuration
├── abis/ # JSON ABIs for the contracts you want to index
├── apis/ # TypeScript/Edge runtime APIs (Node.js project)
│ ├── drizzle.config.ts # Drizzle ORM configuration
│ └── src/ # API source code
│ ├── index.ts # Main API entry point
│ └── db/ # Database schema and utilities
│ └── schema/ # Auto-generated database schema
│ └── Listener.ts # Schema generated from listener events
└── listeners/ # Foundry project for indexing logic
├── src/
│ └── Main.sol # Triggers contract and main listener logic
├── test/
│ └── Main.t.sol # Unit tests for your listener
└── lib/
├── sim-idx-sol/ # Core Sim IDX framework (DSL, context, helpers)
└── sim-idx-generated/ # Code generated from the ABIs you add
```
Running `sim init` creates a new Sim IDX app with the folder structure shown above.
The following sections explain each folder's purpose and contents in detail.
## App Folder Structure
#### sim.toml
The `sim.toml` file is your app's main configuration file. It contains your app's `name` and a `[listeners]` table for configuring code generation.
```toml theme={null}
[app]
name = "my-test"
```
The `name` field is used internally by Sim IDX for resource naming and deployment.
```toml theme={null}
[listeners]
codegen_naming_convention = "plain"
```
The `codegen_naming_convention` field in the `[listeners]` table controls how function and type names are generated from your ABIs. This manages potential name conflicts when you index multiple contracts. It supports two values:
* **`"plain"` (Default):** Generates clean names without any prefixes (e.g., `onSwapFunction`). This is the most common setting, especially when you split logic for different ABIs into separate listener contracts.
* **`"abi_prefix"`:** Prefixes generated names with the ABI's name (e.g., `ABI1$onSwapFunction`). Use this option to prevent compilation errors when a single listener contract must handle functions with the same name from two different ABIs.
```toml theme={null}
# Example sink configuration for development environment
[[env.dev.sinks]]
type = "kafka"
name = "dev_kafka_cluster"
brokers = ["your-kafka-broker:9092"]
username = "your_username"
password = "your_password"
sasl_mechanism = "PLAIN"
event_to_topic = { "PoolCreated" = "uniswap_pool_created_dev" }
```
You can also configure external data sinks in your `sim.toml` file to stream your indexed data to external systems like Kafka. This is done using environment-specific sink configurations:
The `[[env..sinks]]` table allows you to define multiple sinks for different environments (e.g., `dev`, `prod`). Each sink configuration specifies how to connect to your external data system and which events should be sent to which topics. For detailed configuration options and setup instructions, see the [Kafka Sinks](/idx/sinks/kafka) documentation.
#### abis/
The `abis/` folder contains JSON ABI files of smart contracts you want to index. The sample app includes `abis/UniswapV3Factory.json` for the Uniswap V3 Factory contract.
When you add a new ABI with the [`sim abi add`](/idx/cli#sim-abi-add-\) CLI command, it automatically generates Solidity bindings in `listeners/lib/sim-idx-generated/`.
#### apis/
The `apis/` folder is a complete Node.js project that provides TypeScript API endpoints running on the Cloudflare Workers Edge runtime.
The `src/index.ts` file defines your HTTP routes, while `src/db/schema/Listener.ts` is produced by `sim build` and exposes your listener-generated tables through Drizzle ORM for type-safe queries.
Build fast, type-safe endpoints backed by your indexed data.
#### listeners/
The `listeners/` folder is a Foundry project that contains everything related to on-chain indexing. The `Triggers` contract must be defined in `src/Main.sol`, but handler logic can be implemented in one or more listener contracts, which can have any name and be defined across multiple `.sol` files in the `src/` directory. **Unit tests live under the `test/` directory. Foundry will discover any file ending in `.t.sol`, so you can add as many unit-test files as you need (e.g., `Main.t.sol`, `SwapHandlers.t.sol`, etc.).**
During `sim build`, the framework inserts core helpers into `lib/sim-idx-sol/` and writes ABI-specific bindings into `lib/sim-idx-generated/`. These generated files should not be edited directly.
Learn how to create triggers and write handler logic in Solidity.
## Development Workflow
Here's how these folders work together:
1. **Add Contract ABI** → `abis/YourContract.json`
2. **Generate Bindings** → `sim abi add` creates Solidity bindings
3. **Extend Listener** → Implement handlers in `listeners/src/`
4. **Test Logic** → Write tests in `listeners/test/` (e.g., any `*.t.sol` files)
5. **Build APIs** → Use generated schema in `apis/src/` to query your data
6. **Deploy** → Push your changes to a branch (or `main`) and follow the steps in the [deployment guide](/idx/deployment) to promote them to a live environment
# Build with AI for Sim IDX
Source: https://docs.sim.dune.com/idx/build-with-ai
Build Sim IDX apps faster using LLMs and AI assistants.
We provide several resources to help you use LLMs and AI coding assistants to build Sim IDX apps much faster. Using AI, you can automate boilerplate, enforce best practices, and focus on the unique logic of your app.
## Cursor Rules for Sim IDX
To supercharge your Sim IDX development, you can use our official Cursor Rules. By defining rules, you can teach the LLM that you use in Cursor about Sim IDX's specific architecture, coding patterns, and app structure. This makes sure that any generated code, from Solidity listeners to TypeScript APIs, is consistent and follows best practices.
To add a rule, create a file with the specified name in the correct directory, and copy and paste the content for that rule into the file. Cursor will automatically detect and apply the rule.
### Root Rule for Sim IDX Development
This rule provides high-level guidance on the overall project structure, Solidity listeners, and core `sim` CLI commands. It should be applied to your entire project.
````markdown .cursor/idx.mdc [expandable] theme={null}
---
description: "Core principles, structure, and workflows for developing on the Sim IDX framework. Provides high-level guidance on listeners, APIs, and the CLI."
globs:
alwaysApply: true
---
# Sim IDX Project Rules
You are an expert full-stack blockchain developer specializing in the Sim IDX framework. Your primary goal is to assist in building and maintaining Sim IDX applications, which consist of Solidity listeners for indexing on-chain data and TypeScript APIs for serving that data.
Refer to the complete Sim IDX documentation for detailed information: `https://docs.sim.dune.com/llms-full.txt`
## 1. Sim IDX Framework Overview
- **Core Concept**: Sim IDX is a framework for indexing blockchain data. It uses on-chain Solidity contracts (**Listeners**) to react to events and function calls, and a serverless TypeScript application (**API**) to serve the indexed data from a PostgreSQL database.
- **Data Flow**: On-chain activity -> Triggers Listener Handler -> Listener Emits Event -> Sim IDX writes to DB -> API queries DB -> Client consumes API.
## 2. Project Structure
- **`sim.toml`**: The main configuration file for your app. Defines the app name and code generation settings.
- **`abis/`**: Contains the JSON ABI files for the smart contracts you want to index. Use `sim abi add abis/` to register them.
- **`listeners/`**: A Foundry project for the on-chain indexing logic.
- `src/Main.sol`: Must contain the `Triggers` contract. Listener logic can be here or in other `.sol` files in `src/`.
- `test/`: Contains unit tests for your listeners (`*.t.sol` files).
- `lib/sim-idx-generated/`: Contains auto-generated Solidity bindings from your ABIs. **Do not edit these files manually.**
- **`apis/`**: A Hono + Drizzle project for your TypeScript APIs, running on Cloudflare Workers.
- `src/index.ts`: The main entry point for your API routes (Hono framework).
- `src/db/schema/Listener.ts`: Auto-generated Drizzle ORM schema from your listener events. Regenerated by `sim build`.
## 3. Core Development Workflow
1. **Add ABI**: Place a new contract ABI in `abis/` and run `sim abi add abis/YourContract.json`.
2. **Write Listener**: In `listeners/src/`, create or extend a listener contract. Inherit from the generated abstract contracts (e.g., `ContractName$OnEventName`) to implement handlers. These can be found in `lib/sim-idx-generated/`.
3. **Define Events**: In your listener, declare events. These events define the schema of your database tables. The event name is converted to `snake_case` for the table name. If your event has more than about 10 properties, use a struct to group the properties and define the event with an unnamed struct. Otherwise, you can define the event with individual parameters.
4. **Optionally Add Indexes**: In your listener, optionally add indexes to the event structs using the `@custom:index` annotation to improve the performance of the database query if necessary.
5. **Register Triggers**: In `listeners/src/Main.sol`, update the `Triggers` contract to register your new handlers using `addTrigger()`.
6. **Test Listener**: Write unit tests in `listeners/test/` and run with `sim test`. Validate against historical data with `sim listeners evaluate`.
7. **Build Project**: Run `sim build`. This compiles your Solidity code and generates/updates the Drizzle schema in `apis/src/db/schema/Listener.ts`.
8. **Write API**: In `apis/src/`, create or update API endpoints in `index.ts` to query the new tables using the Drizzle ORM.
9. **Evaluate**: Run `sim listeners evaluate` to evaluate the listener against historical data.
10. **Deploy**: Push your code to a GitHub branch. Pushing to `main` deploys to production. Pushing to any other branch creates a preview deployment.
## 4. Solidity Listener Best Practices
### Contract Structure
- Always import `import "sim-idx-sol/Simidx.sol";` and `import "sim-idx-generated/Generated.sol";`.
- The `Triggers` contract in `Main.sol` must extend `BaseTriggers` and implement the `triggers()` function.
- For code organization, implement listener logic in separate files/contracts and instantiate them in `Triggers`.
- Import any listeners in other files you need in `Main.sol` like so:
```solidity
// listeners/src/Main.sol
import "./MyListener.sol";
contract Triggers is BaseTriggers {
function triggers() external virtual override {
MyListener listener = new MyListener();
addTrigger(chainContract(...), listener.triggerOnMyEvent());
}
}
```
### Advanced Triggering
- **By Address (Default)**: `chainContract(Chains.Ethereum, 0x...)`
- **By ABI**: `chainAbi(Chains.Ethereum, ContractName$Abi())` to trigger on any contract matching an ABI.
- **Globally**: `chainGlobal(Chains.Ethereum)` to trigger on every block, call, or log on a chain.
### Context and Inputs
- Handler functions receive context objects (`EventContext`, `FunctionContext`) and typed input/output structs. To find the correct context objects, look in `lib/sim-idx-generated/`.
- Access block/transaction data via global helpers and context objects. Key values include `blockNumber()`, `block.timestamp`, `block.chainid`, and `ctx.txn.hash`. Note that `blockNumber()` is a function call.
- Access event/function parameters via the `inputs` struct (e.g., `inputs.from`, `inputs.value`).
### Common Pitfalls & Solutions
- **Name Conflicts**: If two ABIs have a function/event with the same name, either:
1. (Recommended) Split logic into two separate listener contracts.
2. Set `codegen_naming_convention = "abi_prefix"` in `sim.toml` to use prefixed handler names (e.g., `ABI1$onSwapFunction`).
- **Stack Too Deep Errors**: If an event has >16 parameters, use a `struct` to group them and emit the event with the struct as a single, **unnamed** parameter. Sim IDX will automatically flatten the struct into columns.
```solidity
struct MyEventData { /* 20 fields... */ }
event MyEvent(MyEventData); // Correct: unnamed parameter
// event MyEvent(MyEventData data); // Incorrect
```
## 5. Key CLI Commands
- `sim init [--template=]`: Initialize a new app.
- `sim authenticate`: Save your Sim API key.
- `sim abi add `: Add an ABI and generate bindings.
- `sim build`: Compile contracts and generate API schema.
- `sim test`: Run Foundry unit tests from `listeners/test/`.
- `sim listeners evaluate --chain-id --start-block [--listeners=]`: Dry-run listener against historical blocks.
````
### API Development Rule
This rule provides detailed guidelines for building TypeScript APIs in the `apis/` directory using Hono and Drizzle.
````markdown apis/.cursor/apis.mdc [expandable] theme={null}
---
description: "Detailed guidelines and patterns for building TypeScript APIs with Hono and Drizzle on the Sim IDX platform. Covers setup, queries, auth, and best practices."
globs:
- "*.ts"
- "*.tsx"
alwaysApply: false
---
# Sim IDX API Development Rules
You are an expert API developer specializing in building serverless APIs with Hono, Drizzle, and TypeScript on the Sim IDX platform. Your focus is on writing clean, efficient, and type-safe code for the `apis/` directory.
## 1. Framework & Setup
- **Stack**: Your API runs on **Cloudflare Workers** using the **Hono** web framework and **Drizzle ORM** for database access.
- **App Initialization**: The app instance is created once with `const app = App.create();`.
- **Database Client**: Access the Drizzle client within a request handler via `const client = db.client(c)`. Never manage your own database connections.
- **Local Development**:
- Run `npm install` to get dependencies.
- Create `apis/.dev.vars` and add your `DB_CONNECTION_STRING` from the app page on sim.dune.com.
- Start the server with `npm run dev`, available at `http://localhost:8787`.
## 2. API Endpoint Best Practices
- **RESTful Naming**: Use RESTful conventions (e.g., `/api/pools`, `/api/pools/:id`).
- **Parameter Validation**: Always validate and sanitize user-provided input (e.g., query params, request body) before using it in a database query.
```typescript
// GOOD EXAMPLE: Complete, safe endpoint
app.get("/api/pools/:poolAddress", async (c) => {
try {
const { poolAddress } = c.req.param();
// Basic validation
if (!poolAddress.startsWith('0x')) {
return Response.json({ error: "Invalid pool address format" }, { status: 400 });
}
const client = db.client(c);
const result = await client
.select({
pool: poolCreated.pool,
token0: poolCreated.token0,
token1: poolCreated.token1,
fee: poolCreated.fee
})
.from(poolCreated)
.where(eq(poolCreated.pool, poolAddress))
.limit(1);
if (result.length === 0) {
return Response.json({ error: "Pool not found" }, { status: 404 });
}
return Response.json({ data: result[0] });
} catch (e) {
console.error("Database operation failed:", e);
return Response.json({ error: "Internal Server Error" }, { status: 500 });
}
});
```
## 3. Drizzle ORM Query Patterns
- **Schema Source**: The Drizzle schema is auto-generated in `apis/src/db/schema/Listener.ts` when you run `sim build`. Always import table objects from this file.
- **Explicit Columns**: Avoid `select()` without arguments. Always specify the columns you need for better performance and type safety.
- **Prefer ORM**: Use Drizzle's expressive methods. Only use the `sql` helper for complex queries that Drizzle cannot represent.
- **Pagination**: Implement pagination for all list endpoints. Use `.limit()` and `.offset()` and enforce a reasonable maximum limit (e.g., 100).
```typescript
// Get a count
const [{ total }] = await client.select({ total: sql`COUNT(*)` }).from(poolCreated);
// Complex filtering and ordering
const page = 1;
const limit = 50;
const results = await client
.select()
.from(usdcTransfer)
.where(and(
eq(usdcTransfer.from, '0x...'),
gte(usdcTransfer.value, '1000000')
))
.orderBy(desc(usdcTransfer.blockNumber))
.limit(limit)
.offset((page - 1) * limit);
```
## 4. Authentication
- **Middleware**: Sim IDX provides built-in authentication. Enable it for all routes by adding `app.use("*", middlewares.authentication);` after `App.create()`.
- **Production Behavior**: In production, this middleware will reject any request without a valid Sim IDX App Endpoints API key with a `401 Unauthorized` error.
- **Local Behavior**: The middleware is automatically disabled during local development.
- **Calling Authenticated API**: Clients must include the key in the `Authorization` header.
```bash
curl --url https:///api/pools \
--header 'Authorization: Bearer YOUR_SIM_IDX_APP_ENDPOINTS_API_KEY'
```
````
## Develop with AI Agents
We highly recommend using AI agents to accelerate your Sim IDX development. Cursor's **Background Agents** are particularly useful for this.
Background Agents are asynchronous assistants that can work on your codebase in a remote environment. You can assign them tasks like writing new listeners, building out API endpoints, or fixing bugs, and they will work in the background, pushing changes to a separate branch for your review. This lets you offload complex tasks and focus on other parts of your app.
To get started with Background Agents:
1. Press `⌘E` to open the control panel.
2. Write a detailed prompt for your agent (e.g., "Create a new Solidity listener for the USDC Transfer event and a corresponding TypeScript API endpoint to query transfers by address").
3. Select the agent from the list to monitor its progress or provide follow-up instructions.
## Add Docs to Cursor
To integrate our documentation directly into Cursor:
1. Go to **Cursor Settings -> Indexing & Docs -> Add Doc**.
2. Enter `docs.sim.dune.com/idx` in the URL field.
3. Provide a name (e.g., "@simdocs").
4. Hit confirm. The documentation will sync automatically.
5. Reference Sim IDX documentation by typing `@simdocs` (or your chosen name) in your Cursor chat window.
## AI Search
To ask questions about our documentation, click the **Ask AI** button in the header of the site. This opens a chat interface, powered by Mintlify, that understands natural language queries. Ask questions about endpoints, authentication, or specific data points, and it will answer you with the most relevant, accurate information.
## Use with LLMs
### Complete Documentation for LLMs
For LLM applications such as custom agents, RAG systems, or any scenario requiring our complete documentation, we provide an optimized text file at [`https://docs.sim.dune.com/llms-full.txt`](https://docs.sim.dune.com/llms-full.txt).
### Per-Page Access
You can get the Markdown version of any documentation page by appending `.md` to its URL. For example, `/guides/replace-a-sample-api` becomes [`https://docs.sim.dune.com/guides/replace-a-sample-api.md`](https://docs.sim.dune.com/guides/replace-a-sample-api.md).
Additionally, in the top-right corner of each page, you will find several options to access the page's content in LLM-friendly formats:
* **Copy Page:** Copies the fully rendered content of the current page.
* **View Markdown:** Provides a URL with the raw Markdown source. This is ideal for direct input into LLMs.
* **Open with ChatGPT:** Instantly loads the page's content into a new session with ChatGPT. Ask questions, summarize, or generate code based on the page's content.
You can also type `⌘C` or `Ctrl+C` to copy any page's Markdown content.
Try it now.
# Changelog
Source: https://docs.sim.dune.com/idx/changelog
Product updates and announcements
The Sim IDX framework has been updated with a new core import and a standardized function for accessing the block number in listener contracts.
**What's new:**
* **Core Import:** All listeners should now include `import "sim-idx-sol/Simidx.sol";`. This file provides essential framework helpers required for core functionality.
* **`blockNumber()` Function:** This function is now available to get the current block number. Use this instead of `block.number` for standardized access across all supported blockchains.
**Impact:**
To use the `blockNumber()` function, listeners must include the `sim-idx-sol/Simidx.sol` import. Attempting to call the function without the import will result in a compilation error. Going forward, all listener contracts should adopt this pattern to access core framework features.
```diff Example Listener theme={null}
// SPDX-License-Identifier: UNLICENSED
pragma solidity ^0.8.13;
+ import "sim-idx-sol/Simidx.sol";
import "sim-idx-generated/Generated.sol";
contract MyListener is MyContract$OnMyEvent {
event MyEvent(uint64 chainId, uint256 blockNum);
function onMyEvent(
EventContext memory /*ctx*/,
MyContract$MyEventParams memory /*inputs*/
) external override {
emit MyEvent(
uint64(block.chainid),
- block.number
+ blockNumber()
);
}
}
```
**New Feature: Custom Block Range Support**
You can now specify custom block ranges for your triggers, allowing you to target specific blocks or time periods for each trigger.
**What's new:**
* Chain helper functions now support `.withStartBlock()`, `.withEndBlock()`, and `.withBlockRange()` methods
* Block range support for contract, ABI, and global targets
**Examples:**
**Range from Block Onwards**
```solidity theme={null}
addTrigger(chainContract(Chains.Ethereum.withStartBlock(10000000), 0x1F98431c8aD98523631AE4a59f267346ea31F984), listener.triggerOnPoolCreatedEvent());
```
This creates a trigger that listens to events starting from block 10,000,000 onwards with no end block. The `withStartBlock()` method creates a `BlockRange` struct with `BlockRangeKind.RangeFrom`, meaning it captures all blocks from the specified start block to the latest available block.
**Inclusive Block Range**
```solidity theme={null}
addTrigger(chainContract(Chains.Ethereum.withStartBlock(10000000).withEndBlock(10000001), 0x1F98431c8aD98523631AE4a59f267346ea31F984), listener.triggerOnPoolCreatedEvent());
```
This creates a trigger that listens to events only within blocks 10,000,000 to 10,000,001 (both inclusive). The `withEndBlock()` method modifies the `BlockRange` to use `BlockRangeKind.RangeInclusive`, creating a bounded range that stops processing after the end block.
**Using BlockRange Struct Directly**
```solidity theme={null}
BlockRange memory range = BlockRangeLib.withStartBlock(100000).withEndBlock(10000001);
addTrigger(chainContract(Chains.Ethereum.withBlockRange(range), 0x1F98431c8aD98523631AE4a59f267346ea31F984), listener.triggerOnPoolCreatedEvent());
```
This demonstrates creating a `BlockRange` struct directly using the `BlockRangeLib` library functions before applying it to the chain. The `BlockRange` struct is available through the `sim-idx-sol` import. This approach gives you more flexibility to reuse ranges across multiple triggers or build complex range logic.
**CallFrame Properties Are Now Functions**
Every field on `ctx.txn.call`’s `CallFrame` structure has been updated to use function calls instead of direct property access.
**What changed:**
| Old (≤ v0.0.82) | New (v0.0.83+) |
| ------------------------ | -------------------------- |
| `ctx.txn.call.callee` | `ctx.txn.call.callee()` |
| `ctx.txn.call.caller` | `ctx.txn.call.caller()` |
| `ctx.txn.call.callData` | `ctx.txn.call.callData()` |
| `ctx.txn.call.callDepth` | `ctx.txn.call.callDepth()` |
| `ctx.txn.call.value` | `ctx.txn.call.value()` |
| `ctx.txn.call.callType` | `ctx.txn.call.callType()` |
| *(new)* | `ctx.txn.call.delegator()` |
| *(new)* | `ctx.txn.call.delegatee()` |
`ctx.txn.call.verificationSource` is unchanged (still a property).
**Impact:**
If you were directly reading these fields, your code will no longer compile. Add `()` everywhere you touch `ctx.txn.call.*`.
```diff Example (UniswapV3Factory Listener) theme={null}
emit PoolCreated(
- uint64(block.chainid), ctx.txn.call.callee, outputs.pool, inputs.tokenA, inputs.tokenB, inputs.fee
+ uint64(block.chainid), ctx.txn.call.callee(), outputs.pool, inputs.tokenA, inputs.tokenB, inputs.fee
);
```
**New Feature: Database Indexing Support**
You can now define database indexes directly within your listener contracts. This gives you more control over your app's query performance.
**What's new:**
* Define indexes directly above your `event` declarations using a `/// @custom:index` comment in your Solidity code.
* Support for multiple index types, including `BTREE`, `HASH`, `BRIN`, and `GIN`.
* The `sim build` command now validates your index definitions to catch errors early.
**Benefits:**
* **Improved Query Performance**: Significantly speed up data retrieval by indexing columns that are frequently used in your API queries.
* **Declarative and Convenient**: Manage database performance directly from your Solidity code without writing separate migration scripts.
* **Fine-Grained Control**: Apply the right index types to the right columns for optimal performance.
For more details on how to define indexes, see the [Listener Features](/idx/listener/features#db-indexes) documentation.
**Breaking Change: Generated Struct Names Now Include Contract Names**
With CLI version v0.0.79 and upwards, there will be a breaking change that impacts users who import and use generated structs from the ABI.
**Why this change was needed:**
The same struct name can be used across different contracts (example: `GPv2Trade.Data` and `GPv2Interaction.Data` within the same ABI) with different definitions. Using just the struct name for generated structs prevented proper triggering on protocols like CoW Swap.
**What changed:**
We now include the contract name as part of the struct name in the generated Solidity file associated with the ABI. Instead of using `$AbiName$StructName` for the names, we now use `$AbiName$ContractName$StructName`.
**Impact:**
If you have imported a generated struct, you'll need to update the name to include the contract name the next time you run codegen. This doesn't impact the default inputs/outputs/context structs, so most users won't encounter this issue.
**Who is affected:**
You'll only run into this issue if you:
* Update to use CLI v0.0.79 or higher
* Add a new ABI or manually run a new codegen
* AND you've been using generated structs that aren't the ones provided in the trigger inputs/outputs object (i.e., you're using a nested struct from the inputs/outputs for some variable or part of the event)
**New Feature: Multiple Listener Contracts Support**
The Sim CLI now supports defining multiple listener contracts within a single IDX application, enabling better code organization and structure.
**What's new:**
* You can now define listeners in separate files instead of having everything in `Main.sol`
* Listeners can be organized across multiple contracts for better code maintainability
* The `Main.sol` file still needs to contain the `Triggers` contract, but individual listeners can be defined anywhere
* Enhanced `sim listeners evaluate` command to target specific listeners for focused testing
**Benefits:**
* **Better Code Organization**: Split large applications with many listeners into manageable, separate files
* **Improved Maintainability**: Organize related listeners together (e.g., all DEX-specific listeners in one file)
* **Focused Testing**: Evaluate specific listeners without noise from other listeners in your application
**Migration:**
* Existing single-file applications continue to work without changes
* `Main.sol` must still exist and contain your `Triggers` contract
* Listener contracts can be moved to separate files as needed
This feature is particularly valuable for complex applications like DEX trade indexers that may have 15+ listeners and benefit from better file organization.
**New Feature: Pre-Execution Triggers**
The Sim CLI now supports pre-execution triggers, allowing you to execute code *before* a function runs instead of the default behavior of executing after.
**What's new:**
* Pre-triggers use corresponding `Pre-` abstract contracts (e.g., `preCreatePoolFunction`)
* Handlers receive a `PreFunctionContext` with access to function inputs only (outputs haven't been generated yet)
* Enables reactive logic that needs to run before the target function executes
**Use cases:**
* Emit events or perform actions based on upcoming function calls
* Pre-process or validate function inputs before execution
* Set up state or conditions that the main function execution will depend on
For detailed implementation examples and usage patterns, see the [Function Triggers documentation](/idx/listener#function-triggers).
# CLI Overview
Source: https://docs.sim.dune.com/idx/cli
The Sim IDX CLI is your primary tool for interacting with the Sim IDX framework.
You can use the CLI to initialize new projects, manage contract ABIs, and test your listeners.
This page provides an overview of all available commands, their functions, and potential error messages you might encounter.
## Install or Upgrade the CLI
Installing the CLI or Upgrading to the latest version is as simple as rerunning the installer script.
The installer will download the most recent release and replace your existing `sim` binary.
```bash theme={null}
curl -L https://simcli.dune.com | bash
```
## Available Commands
#### `sim init`
Initializes a new Sim IDX application in the current directory.
This command creates the standard project structure.
It includes a `sim.toml` configuration file, a sample listener, and a boilerplate API.
The command initializes a new Git repository, and makes the first commit containing all generated files.
```bash theme={null}
sim init
```
If the current directory is not empty, the command will fail to prevent overwriting existing files.
Make sure you run `mkdir new-project` and create a new directory *before* running the init command.
You can optionally scaffold a project from one of the official templates using the `--template` flag.
For example, to start from the [contract-decoder](https://github.com/duneanalytics/sim-idx-example-contract-decoder) template:
```bash theme={null}
sim init --template=contract-decoder
```
If you omit `--template`, the command uses the default [**sample** template](https://github.com/duneanalytics/sim-idx-example-sample-app).
#### `sim build`
Builds your Foundry project by running `forge build` under the hood. This compiles every Solidity contract in your project—including the listener contracts inside `listeners/`—along with any imported libraries.
```bash theme={null}
sim build
```
If there are compilation errors in your Solidity code, the build will fail.
The output will provide details from the Solidity compiler to help you debug.
#### `sim test`
Runs the Solidity tests for your listener contracts.
The tests are located in `listeners/test/`.
This command first compiles your contracts and then executes the tests using Foundry.
```bash theme={null}
sim test
```
If any of the tests fail, the command will exit with an error.
The output will show which tests failed and provide assertion details.
#### `sim authenticate`
Saves your Sim IDX API key locally, allowing the CLI to authenticate with the platform.
You can find and create API keys in the [Sim dashboard](https://sim.dune.com/).
```bash theme={null}
sim authenticate
```
You will be asked to paste your API key and press **Enter**.
For detailed, step-by-step instructions on obtaining your API key, see the [Quickstart guide](/idx#authentication).
#### `sim help`
Displays help information and available commands for the Sim IDX CLI.
This command shows usage instructions, available commands, and options.
```bash theme={null}
sim help
```
You can also use `sim --help` or `sim -h` for the same functionality.
#### `sim --version`
Displays the current version of the Sim IDX CLI.
```bash theme={null}
sim v0.0.86 (eaddf2 2025-06-22T18:01:14.000000000Z)
```
When a CLI command displays an error log, the current CLI version appears at the bottom of the output.
#### `sim abi`
Provides a set of commands for managing contract ABIs and generating corresponding Solidity interfaces for use in your listener.
#### `sim abi add `
Registers a contract ABI with your project and generates all the Solidity interfaces, structs, and helper functions your listener needs.
```bash theme={null}
sim abi add abis/YourContract.json
```
Follow these steps *before* running the command:
1. Obtain the contract's ABI JSON from Etherscan or another blockchain explorer.
2. Inside your project, create a new file in `abis/` (for example, `abis/YourContract.json`).
3. Paste the ABI JSON into that file and save it.
4. Run `sim abi add abis/YourContract.json` pointing to the file you just created.
The command fails if the file path you provide does not exist.
#### `sim abi codegen`
Manually regenerates the Solidity interfaces from all ABI files currently in the `abis/` directory. This is useful if the generated files need to be refreshed.
```bash theme={null}
sim abi codegen
```
In most cases, you don't need to run this command manually because it runs automatically after you execute `sim abi add`. Use it only when you want to force-regenerate the interfaces.
#### `sim listeners`
A namespace for commands that interact with **listener contracts** during local development.
Similar to `sim abi`, you must append a sub-command after `listeners`.
```bash theme={null}
sim listeners
```
#### `sim listeners evaluate`
Runs your listener(s) locally against historical main-chain data so you can verify that triggers fire and events are emitted **before** you deploy the app.
```bash theme={null}
sim listeners evaluate \
--start-block \
--chain-id \
--end-block \
--listeners
```
`evaluate` **does not** persist any data. It is purely a local dry-run to ensure your handler logic behaves as expected.
| Flag | Required | Description |
| --------------- | ------------- | -------------------------------------------------------------------------------------------------------------------------------------------------------------------------------------------------------------------------------------------------------------------------------------------------------------------------------- |
| `--start-block` | Yes | First block to process. Note that data availability for historical blocks can vary by chain. See the [Supported Chains](/idx/supported-chains) page for details. |
| `--chain-id` | Conditional\* | Chain ID to test against. If omitted, Sim tries to infer it from your `addTrigger` definitions. Required when your listener has triggers on multiple chains. |
| `--end-block` | No | Last block to process. Provide this if you want to replay more than one block and observe state changes over a range. |
| `--listeners` | No | Specific listener contract to evaluate. Accepts the name of any listener contract defined in `/listeners/src`. The contract must also be instantiated and registered via `addTrigger(...)` inside `Main.sol`. If omitted, all registered listeners are evaluated. The command will fail if you specify an unknown contract name. |
The command compiles your listener, executes the triggers across the block range, and prints a summary such as:
```text theme={null}
INFO deploy: {
"events": [
{
"name": "PoolCreated",
"fields": {
"pool": "70307790d81aba6a65de99c18865416e1eefc13e",
"caller": "1f98431c8ad98523631ae4a59f267346ea31f984",
"fee": "10000",
"token1": "c02aaa39b223fe8d0a0e5c4f27ead9083c756cc2",
"chainId": "1",
"token0": "593e989f08e8d3ebea0ca5a17c7990d634812bc5"
},
"metadata": {
"block_number": 22757345,
"chain_id": 1
}
}
],
"errors": []
}
```
# Postgres DB
Source: https://docs.sim.dune.com/idx/db
After deploying your Sim IDX app, the framework automatically provisions a dedicated PostgreSQL database to store your indexed on-chain data.
The deployment output provides you with a read-only connection string to access this database directly.
You can use this during development to verify your schema, inspect live data, and create queries while building your API.
The database connection string provided after deployment is intended for development and debugging.
Your deployed [APIs](/idx/apis) will connect to a separate, production-ready database instance with the same schema.
## Connect to Your Database
Use the [database connection string](/idx/app-page#db-connection) provided in your app's deployment to connect with any standard PostgreSQL client.
```
postgres://username:password@host/database?sslmode=require
```
For example, using `psql`:
```bash theme={null}
# Connect using the full connection string
psql 'your_connection_string_here'
```
You can also use clients like DBeaver, Postico, or Beekeeper Studio for a more visual way to explore your data and schema.
## Query the Views, not the Tables
When exploring your database, always query the views (lowercase `snake_case`), not the auto-generated tables with random suffixes.
To list your available views:
```bash theme={null}
\dv+
```
Then run queries against a view:
```sql theme={null}
SELECT * FROM 'view_name' LIMIT 10;
```
## Understand the Schema
The structure of your database is directly determined by the `event` definitions in your `Main.sol` contract.
* **Views**: Each `event` in your listener creates a corresponding queryable view in the database. The view name is the lowercase `snake_case` version of the event name.
* **Columns**: The parameters of the event become the columns of the view, and each column name is converted to lowercase `snake_case`.
* **Tables**: The underlying tables that store the data have random character suffixes (e.g., `pool_created_X3rbm4nC`) and should not be queried directly.
An event defined as `event PoolCreated(address pool, address token0, address token1)` will result in a queryable view named `pool_created` with the columns `pool`, `token0`, and `token1`.
When you inspect your database, you will see both the clean views you should query and the internal tables with random suffixes. **Always query the views (lowercase `snake_case` names).**
## Inspect Indexes
If you have [defined indexes in your listener](/idx/listener/features#db-indexes), you can verify their existence directly from your database client.
To confirm your indexes were created successfully, you can list them using `psql`.
To list all indexes in the database, use the `\di` command. This shows the index name, type, and the table it belongs to.
To see the indexes for a specific table, use the `\d "view_name"` command. This describes the view and lists the indexes on its underlying table.
```bash theme={null}
# List all indexes in the database
\di
# Describe the view and see its specific indexes
\d 'position_owner_changes'
```
## Common Database Operations
Here are some common `psql` commands you can use to inspect your database:
| Operation | `psql` Command | Description |
| -------------------- | ------------------------------------- | ---------------------------------------------------------------------------------------------------------- |
| **List Views** | `\dv` | Shows all queryable views in the public schema. |
| **Describe View** | `\d 'view_name'` | Displays the columns, types, and structure for a specific view, including indexes on the underlying table. |
| **List Indexes** | `\di` | Shows all indexes in the database. |
| **View Sample Data** | `SELECT * FROM 'view_name' LIMIT 10;` | Retrieves the first 10 rows from a view. |
| **Count Rows** | `SELECT COUNT(*) FROM 'view_name';` | Counts the total number of records indexed in a view. |
## Limitations
Currently, Sim IDX only supports creating new rows in the database, not updates to existing rows. This means that once data is indexed and stored, it cannot be modified through the framework. We are exploring options to support updates in future versions.
# Push & Deploy Your Sim IDX App
Source: https://docs.sim.dune.com/idx/deployment
Push your local Sim IDX project to GitHub, import it into the Sim dashboard and ship the first build.
Deploying publishes your app on Sim's managed infrastructure so it can continuously index data and serve production-ready APIs. This guide shows how to connect a local project to GitHub, import it into the Sim dashboard and trigger the first build.
Before you continue, complete the [Quickstart](/idx) to install the Sim CLI and initialise an app.
## Create GitHub repo
Open GitHub and [create a new repository](https://github.com/new) named after the folder that contains your project.
In the Quickstart we used `my-first-idx-app`.
## Push app to GitHub
When you ran `sim init`, besides initializing your app, the CLI created a Git repository and committed the first version of your code.
Point the repo at GitHub and push the commit.
Copy the code snippet from GitHub for pushing a code snippet from the command line.
It should look like the following:
```bash theme={null}
# inside your project folder
git remote add origin https://github.com/your-username/my-first-idx-app.git
git branch -M main
git push -u origin main
```
## Import repo
If you don't have access to IDX tab in the Sim dashboard yet, click Request Access to get enabled.
Open the Sim dashboard at [sim.dune.com](https://sim.dune.com), select IDX in the sidebar and click Import Repo.
The first time you do this you will have to install the Dune Sim GitHub App.
## Install GitHub App
Choose the GitHub account, select allow all or only the repositories you need and click Install.
After installation you return to the import screen and pick your repo.
## Configure & deploy
Review the settings for the App name, the optional description, then press Deploy.
The dashboard will show the deployment with status Building.
## Monitor deployment progress
Return to the [Sim dashboard](https://sim.dune.com/), click on your app in the IDX tab and watch the new deployment move from **Building → Ingesting → Ready**.
Once the status shows **Ingesting**, your APIs and database are live and serving data.
## Next steps
Your first build is now running. Head over to the [App Page](/idx/app-page) to learn where to find the database connection string, generated API endpoints and deployment status.
Once you have your first deployment live, you can start iterating on your [Listener Contract](/idx/listener) to capture additional onchain events and shape your database schema.
Explore deployment details & endpoints
Extend or modify your onchain data indexing logic
# Build and Ingestion Lifecycle
Source: https://docs.sim.dune.com/idx/deployment-environments
Sim IDX manages your deployment environments and data ingestion through an automated build and ingestion lifecycle.
Every Sim IDX app operates across isolated environments based on your Git branching strategy, with each deployment following a predictable lifecycle that governs when your code is compiled, when data is indexed, and what changes trigger historical backfill.
## Deployment Lifecycle
Every deployment progresses through three statuses: **Building → Ingesting → Ready**. This lifecycle governs when your code is compiled, when data is indexed, and what changes re-trigger historical backfill.
### Building
After you push a commit, Sim IDX builds your app (equivalent to running `sim build`). If there is a problem, the build fails with clear logs to help you resolve it. Fix the issue locally, commit, and push again to start a new build.
### Ingesting
When the build succeeds, the deployment begins ingesting. Two things happen in parallel:
* Real‑time indexing from the chain tip begins immediately.
* Historical backfill starts for the data defined by your Listener Contract. The status percentage reflects the backfill progress until it reaches 100%.
Your APIs and database are usable as soon as the deployment enters Ingesting. Response completeness improves as the backfill advances.
Backfill is re-triggered only when you change your Listener Contract (including generated bindings that alter what the listener indexes). API-only or other non-listener code changes will create a new deployment but will not re-run historical backfill. The new deployment continues from the latest indexed state. To force a new backfill, modify your listener, commit, and push.
### Ready
Backfill has completed (100%). Your app continues to index new onchain activity in real time.
## Incremental Deployments
Sim IDX optimizes your development workflow through incremental deployments, which avoid unnecessary reprocessing when you make changes that don't affect data ingestion.
**First Deployment per Branch**: When you make the first commit to any branch (including `main`), Sim IDX triggers a complete build and ingestion process. Your code is compiled, a new database is provisioned, historical backfill begins from scratch, and new API endpoints are created.
**Subsequent Deployments**: For additional commits to the same branch, the deployment behavior depends on what you've changed.
**Non-Listener Changes** result in incremental deployments. This includes changes to your `sim.toml` configuration, updates to API route logic, and modifications to non-listener application code. These changes result in incremental deployments where your code is rebuilt and redeployed, the same database instance is reused, API base URLs remain unchanged, no historical backfill occurs, and real-time indexing continues uninterrupted.
**Listener Changes** trigger a complete redeployment. Any modification to your listener contract requires a full build and ingestion cycle because they alter what data is indexed and how it's processed. This includes adding or modifying ABIs, changes to generated code that affect indexing logic, adding new listener files, creating new triggers in your main listener file, and any code changes within existing listener functions.
## Deployment Environments
Sim IDX operates with two types of environments based on your Git branching strategy:
### Production Environment
When you push commits to the `main` branch, Sim IDX creates production deployments. Each production deployment receives:
* A dedicated PostgreSQL database
* A unique base URL for your APIs
* Full build and ingestion lifecycle processing
If you're using database URLs or API endpoints during development, make sure you update them after every production push.
### Preview Environments
When you push commits to any branch other than `main`, Sim IDX automatically creates isolated preview environments. Each preview deployment gets:
* Its own isolated database
* A unique API URL separate from production
* Independent build and ingestion lifecycle
## PR Flow
For a more structured development process, you can use PRs on GitHub to trigger preview deployments.
This allows for code review and collaborative testing before merging changes into the `main` branch.
To start, create a new branch in your local repo and push it to GitHub.
Then, open a pull request from your new branch to the `main` branch.
Once the pull request is created, Sim IDX automatically builds a new preview deployment.
You can find this build in the "Other Deployments" section of your App Page in the Sim dashboard.
The deployment is linked to the pull request, allowing you and your team to easily access the PR on GitHub to review changes and test the isolated deployment.
After the pull request is approved and merged, a new production deployment will be created from the `main` branch.
# Decode Any Smart Contract
Source: https://docs.sim.dune.com/idx/guides/decode-any-contract
Set up a new Sim IDX app using the contract-decoder template to decode all events and functions from any smart contract.
This guide shows you how to use the [**contract-decoder**](/idx/resources/templates) template to set up a Sim IDX app that decodes an entire smart contract. As an example, we will configure the app to listen to and persist every event emitted by the Moonbirds ERC721 NFT contract on Ethereum, but you can follow the same process for any contract.
The [`contract-decoder`](https://github.com/duneanalytics/sim-idx-example-contract-decoder) template provides a shortcut to make this happen. Instead of manually defining each event you want to capture, it generates a special listener that automatically handles all events from a given contract ABI.
## 1. Initialize the App from the Template
First, create a new directory for your project and initialize a Sim IDX app using the `--template=contract-decoder` flag.
```bash theme={null}
# Create and enter a new directory for your app
mkdir moonbirds-decoded
cd moonbirds-decoded
# Initialize the app with the contract-decoder template
sim init --template=contract-decoder
```
This command scaffolds a new project with a sample Uniswap V3 Factory ABI. In the next steps, we will replace it with the Moonbirds contract ABI.
To make development even faster, you can add our official **Cursor Rules** to your project.
These rules teach Cursor about Sim IDX's architecture, helping it generate correct and consistent code.
Learn more in our [Build with AI guide](/idx/build-with-ai).
## 2. Remove the Sample ABI
The template includes a default ABI at `abis/UniswapV3Factory.json`. Since we're replacing it, the first step is to delete this file.
```bash theme={null}
rm abis/UniswapV3Factory.json
```
Removing the JSON file is not enough. The project still contains the Solidity bindings that were generated from it. To remove them, run `sim abi codegen`. This command re-scans the `abis/` directory and regenerates the bindings, effectively removing the ones for the now-deleted Uniswap ABI.
```bash theme={null}
sim abi codegen
```
## 3. Add the Moonbirds Contract ABI
Now, you need the ABI for the contract you want to decode. You can typically find a contract's ABI on a blockchain explorer like Etherscan. For this guide, we'll use the Moonbirds contract on Ethereum.
1. Navigate to the [Moonbirds contract on Etherscan](https://etherscan.io/address/0x23581767a106ae21c074b2276D25e5C3e136a68b#code).
2. Scroll down to the "Contract ABI" section and copy the entire JSON blob.
3. Create a new file in your project at `abis/Moonbirds.json` and paste the ABI into it.
```bash theme={null}
# Create the new ABI file
touch abis/Moonbirds.json
# Then paste the JSON into the file using your editor.
```
With the ABI file in place, run [`sim abi add`](/idx/cli#sim-abi-add-\) to register it with your project and generate the necessary Solidity bindings.
```bash theme={null}
sim abi add abis/Moonbirds.json
```
The CLI will parse the new ABI and generate a `Moonbirds.sol` file in `listeners/lib/sim-idx-generated/`. This file contains all the interfaces and helper contracts needed to interact with the Moonbirds contract in your listener.
## 4. Configure the Listener to Decode All Events
Open `listeners/src/Main.sol`. This is the core file where you define your indexing logic. We need to make two small changes to trigger on the generated Moonbirds bindings.
The `Moonbirds.sol` file generated in the previous step includes a special abstract contract called `Moonbirds$EmitAllEvents`. By inheriting from this contract, your listener automatically gains the ability to:
1. React to every event defined in the Moonbirds ABI.
2. Define and emit corresponding events that Sim IDX will use to create database tables.
3. Expose a helper function, `allTriggers()`, to register all event listeners at once.
The event names are automatically converted to `snake_case` for your PostgreSQL table names. For example, an on-chain event named `RoleGranted` will have its data stored in a table named `role_granted`.
Update `listeners/src/Main.sol` with the following code:
```solidity Main.sol theme={null}
// SPDX-License-Identifier: UNLICENSED
pragma solidity ^0.8.13;
import "sim-idx-sol/Simidx.sol";
import "sim-idx-generated/Generated.sol";
contract Triggers is BaseTriggers {
function triggers() external virtual override {
Listener listener = new Listener();
// The allTriggers() helper registers every event from the ABI.
addTriggers(
// Moonbirds contract on Ethereum Mainnet (Chain ID 1)
chainContract(Chains.Ethereum, 0x23581767a106ae21c074b2276D25e5C3e136a68b),
listener.allTriggers()
);
}
}
// Inherit from Moonbirds$EmitAllEvents to automatically handle all events.
contract Listener is Moonbirds$EmitAllEvents {}
```
This is all the Solidity code required. The `Listener` contract inherits the decoding logic, and the `Triggers` contract points to the on-chain Moonbirds address, registering all its events for indexing.
## 5. Evaluate the Listener Against Live Data
Before deploying, you can test your listener against historical blockchain data using [`sim listeners evaluate`](/idx/cli#sim-listeners-evaluate). This command runs a local dry-run to confirm your triggers fire correctly and decode events as expected.
Find a block number on Etherscan where a Moonbirds transaction occurred and use it for the `--start-block` flag.
```bash theme={null}
sim listeners evaluate \
--chain-id=1 \
--start-block=22830504 \
--listeners=Listener
```
If the setup is correct, the output will be a JSON object containing a list of decoded Moonbirds events in the `events` array and an empty `errors` array.
## 6. Update the API to Query New Data
When you ran `sim init`, a sample API was created in `apis/src/index.ts`. This API is configured to query data from the original Uniswap contract and will fail now that we've replaced the ABI. We need to update it to query one of the new tables created for the Moonbirds events.
When you run `sim build`, Drizzle schemas for all your new event tables are automatically generated and placed in `apis/src/db/schema/Listener.ts`. You can inspect this file to see which tables are available to query.
Let's update `apis/src/index.ts` to fetch the 10 most recent records from the `approval_for_all` table, which corresponds to the `ApprovalForAll` event.
```typescript theme={null}
import { eq } from "drizzle-orm";
import { approvalForAll } from "./db/schema/Listener"; // Import a schema from the new contract
import {types, db, App} from "@duneanalytics/sim-idx";
const app = App.create();
app.get("/*", async (c) => {
try {
const client = db.client(c);
// Query one of the new tables generated from the Moonbirds ABI
const result = await client.select().from(approvalForAll).limit(10);
return Response.json({
result: result,
});
} catch (e) {
console.error("Database operation failed:", e);
return Response.json({ error: (e as Error).message }, { status: 500 });
}
});
export default app;
```
## 7. Build the Project
With the listener and API updated, run `sim build` to compile your contracts and API code.
```bash theme={null}
sim build
```
The command should complete successfully. Unlike other templates, the `contract-decoder` template does not include listener tests that need to be updated, simplifying the development workflow.
## Next steps
Your app is now configured to decode the entire Moonbirds contract. The final step is to deploy it to Sim's managed infrastructure so it can begin indexing data and serving your API.
Push the project to GitHub and ship the first build.
# Replace Sample ABI with Any Contract
Source: https://docs.sim.dune.com/idx/guides/swap-sample-abi
Replace the sample Uniswap V3 Factory ABI with any contract's ABI in your Sim IDX app.
This guide shows you how to swap out the Uniswap V3 Factory ABI bundled with the [**sample**](https://github.com/duneanalytics/sim-idx-example-sample-app) Sim IDX app and replace it with the ABI of any contract you would like to index. As an example, we'll use the USDC contract, but you can follow the same process for any contract. The sample app is what gets created by default when you run `sim init` without any additional [templates](/idx/resources/templates). The workflow mirrors the process you will follow in a real project: locate the ABI, register it with the CLI, extend your listener, and validate the new triggers against historical data.
## 1. Remove the Uniswap V3 Factory ABI from the project
Inside the sample repository you will find a file at `abis/UniswapV3Factory.json`. Because you are replacing this ABI entirely, delete the file (or move it out of `abis/`). Leaving it in place would cause the CLI to generate bindings for both Factory **and** USDC, which is not what you want for this walkthrough.
```bash theme={null}
rm abis/UniswapV3Factory.json
# Regenerate bindings
sim abi codegen
```
Running [`sim abi codegen`](/idx/cli#sim-abi-codegen) removes the now-missing Factory bindings from `listeners/lib/sim-idx-generated/`.
## 2. Locate the ABI for your target contract
Start by obtaining the ABI for the contract you want to observe. The most common approach is to open the contract page on a blockchain explorer such as Etherscan, Basescan or Polygonscan and click the **Contract** tab. From there select **Contract ABI** and copy the full JSON blob to your clipboard.
For the purposes of this guide we'll trigger on the [Ethereum USDC contract](https://etherscan.io/token/0xa0b86991c6218b36c1d19d4a2e9eb0ce3606eb48#code).
## 3. Add the new ABI JSON file
Create a fresh file under `abis/` and paste the JSON you copied earlier. The filename should match the contract you are tracking, e.g. `abis/USDC.json`.
```bash theme={null}
touch abis/USDC.json
# then paste the JSON using your editor or:
cat > abis/USDC.json # Ctrl-D to save
```
You can just as easily create the file through your editor's GUI. Both approaches work the same.
## 4. Generate Solidity bindings with `sim abi add`
Run the command below in the root of your project to register the ABI and generate strongly-typed Solidity bindings. The CLI parses the JSON, creates the corresponding structs, abstract contracts and helper functions, and writes them into `listeners/lib/sim-idx-generated/`.
```bash theme={null}
sim abi add abis/USDC.json
```
After the command completes you will see the updated files in `listeners/lib/sim-idx-generated/`. The generated Solidity bindings expose multiple *abstract contracts* that fire whenever a specific USDC function is called or event is emitted onchain. You will extend one of these contracts in the next step.
## 5. Update the listener contract to inherit the new functionality
Create a new file at `listeners/src/USDCListener.sol`.
Next, create a new contract so that it inherits from the abstract contracts generated for your ABI. For example, to react to the `Transfer` event of USDC the inheritance line might look like this:
```solidity USDCListener.sol theme={null}
// SPDX-License-Identifier: UNLICENSED
pragma solidity ^0.8.13;
import "sim-idx-sol/Simidx.sol";
import "sim-idx-generated/Generated.sol";
contract USDCListener is USDC$OnTransferEvent {
event USDCTransfer(
uint64 chainId,
address from,
address to,
uint256 value
);
function onTransferEvent(
EventContext memory /* ctx */,
USDC$TransferEventParams memory inputs
) external override {
emit USDCTransfer(
uint64(block.chainid),
inputs.from,
inputs.to,
inputs.value
);
}
}
```
Add or modify event definitions to capture the onchain data you want persisted and implement each handler function required by the abstract contract. The Sim IDX framework will create the associated database tables automatically on deployment.
## 6. Register triggers for the new contract
In the `Main.sol` file, you now need to import your new `USDCListener` and update the `Triggers` contract to use it.
In the `Triggers` contract, replace the existing `addTrigger` call so that it points to the USDC contract address on Ethereum and references the helper selector exposed by the listener:
```solidity Main.sol theme={null}
// SPDX-License-Identifier: UNLICENSED
pragma solidity ^0.8.13;
import "sim-idx-sol/Simidx.sol";
import "sim-idx-generated/Generated.sol";
import "./USDCListener.sol";
contract Triggers is BaseTriggers {
function triggers() external virtual override {
USDCListener listener = new USDCListener();
addTrigger(
chainContract(Chains.Ethereum, 0xA0b86991c6218b36c1d19D4a2e9Eb0cE3606eB48),
listener.triggerOnTransferEvent()
);
}
}
```
Want to listen on multiple networks (e.g. Base)? Simply add additional `addTrigger` calls with the appropriate chain name from the `Chains` enum (for example, `Chains.Base`) and contract address. You can find the list of supported chains at [sim.dune.com/chains](https://sim.dune.com/chains).
## 7. Evaluate the listener against historical blocks
Before deploying, replay historical chain data to confirm that the new triggers activate and that the listener emits the expected events. [`sim listeners evaluate`](/idx/cli#sim-listeners-evaluate) compiles your listener, fetches onchain transactions for the specified block range and prints a structured summary of events and errors.
```bash theme={null}
sim listeners evaluate \
--chain-id 1 \
--start-block \
--listeners=USDCListener
# --end-block # optional, evaluates a single block if omitted
```
Replace the placeholders with blocks that are known to interact with USDC. You can usually find them on the same explorer page where you copied the ABI. If the summary shows your custom events in `events` and `errors` is empty, the evaluation succeeded.
To learn more about the `sim listeners evaluate` command and its options, visit the [CLI reference page](/idx/cli#sim-listeners-evaluate).
## 8. Rebuild and update the API endpoint
Next, rebuild the project so that Drizzle schemas are regenerated from the new events:
```bash theme={null}
sim build
```
`sim build` places the generated Drizzle schema for your listener under `apis/src/db/schema/Listener.ts`. The existing `apis/src/index.ts` still imports `poolCreated` (an event from the previous Uniswap V3 ABI included in the sample) which no longer exists.
Update `apis/src/index.ts` so that it queries the new `usdcTransfer` table generated from your `USDCTransfer` event:
```typescript index.ts theme={null}
import { eq } from "drizzle-orm";
import { usdcTransfer } from "./db/schema/Listener"; // adjust path if needed
import { types, db, App } from "@duneanalytics/sim-idx";
const app = App.create();
app.get("/*", async (c) => {
try {
const result = await db.client(c).select().from(usdcTransfer).limit(10);
return Response.json({
result,
});
} catch (e) {
console.error("Database operation failed:", e);
return Response.json({ error: (e as Error).message }, { status: 500 });
}
});
export default app;
```
After saving, run `sim build` once again to verify the API is building correctly with the new Drizzle schema.
## Next steps
With your listener, tests, and API all pointing at USDC data, you're ready to deploy your updated app to Sim's managed infrastructure.
Push the project to GitHub and ship your new build
# Uniswap X Swaps
Source: https://docs.sim.dune.com/idx/guides/uniswap-x-swaps
Learn how to use Sim IDX to turn Uniswap X's gas-optimized architecture into rich, queryable data.
Uniswap X is an intent-based, auction-driven routing protocol that delivers better prices, gas-free swaps, and built-in MEV protection by letting swappers sign orders that competing fillers execute onchain.
The same efficiency, though, leaves most offchain indexers effectively blind.
The data is emitted.
It's just not in a format their offchain parsers can easily recognize.
It's no problem for Sim IDX.
This guide breaks down exactly how Sim IDX's unique onchain architecture turns this challenge into a straightforward indexing task.
**What you'll learn in this guide**
* How the **Quoter pattern** lets an onchain listener pull fully-decoded swap data straight from Uniswap X reactors. This is something conventional offchain indexers can't do.
* Why a **single Sim IDX listener** can index *every* Uniswap X swap, regardless of reactor type or order variant.
* The fee-handling and onchain interaction techniques that make your indexer both **accurate and future-proof**.
## Why is Uniswap X Hard to Index?
The core difficulty in indexing Uniswap X stems from its order-based architecture.
Reactors settle signed orders and verify execution, but they don't emit explicit logs of the final token amounts.
Instead, the critical details live inside encoded calldata that only the reactors themselves can decode.
This complexity is compounded by:
1. **Multiple Reactor Types**: Uniswap X relies on several reactor contracts, each tailored to a different kind of order with its own decoding logic. An indexer must replicate the nuances of every variant, which is a significant engineering challenge.
2. **Opaque Logs**: onchain events expose only an order hash and the filler address, leaving out the tokens traded, the final amounts, and even the recipient of the swap proceeds.
3. **Decoded State is Private/Internal**: All the logic required to understand an order's final state is contained within the reactor contracts themselves. Traditional indexers, which operate offchain, cannot easily access or execute this onchain logic.
An attempt to index this with a traditional indexing tool would require painstakingly re-implementing every reactor's decoding logic offchain and keeping it in sync with any protocol upgrades.
## The Sim IDX Solution
Sim IDX overcomes these challenges by fundamentally changing the relationship between the indexer and the protocol.
Where traditional indexers are passive, offchain observers, a **Sim IDX listener is a smart contract that lives onchain**.
The listener is a smart contract, so it can do more than just read events.
It can interact with other onchain contracts.
The listener can call their functions, pass them arguments, and read their return data, just like any other contract would.
This capability lets us use an elegant technique we call the **Quoter Pattern**.
Instead of painstakingly re-implementing Uniswap X's sophisticated decoding logic, we simply ask the Reactor to run its own logic for us.
We treat the protocol itself as an on-demand decoding oracle.
The following sections highlight the most unique parts of this implementation. To see the code in its entirety, we encourage you to explore the full repository.
Explore the complete, unabridged source code for this Uniswap X indexer.
## Index by ABI, Not by Address
The first challenge in indexing Uniswap X is its scale. The protocol uses multiple Reactor contracts across several chains, and new ones can be deployed at any time. Maintaining a hardcoded list of addresses is not a scalable solution.
Sim IDX solves this with ABI-based triggers. Instead of targeting specific addresses, you can instruct your listener to trigger on *any contract* that matches a given ABI signature. This makes your indexer automatically forward-compatible.
We achieve this with the `ChainIdAbi` helper in our `Triggers` contract. The code below sets up our listener to trigger on the `execute` function family for *any* contract on Ethereum, Unichain, and Base that implements the `IReactor` interface.
```solidity listeners/src/Main.sol theme={null}
import "sim-idx-sol/Simidx.sol";
contract Triggers is BaseTriggers {
function triggers() external virtual override {
Listener listener = new Listener();
addTrigger(ChainIdAbi(1, IReactor$Abi()), listener.triggerPreExecuteFunction());
addTrigger(ChainIdAbi(1, IReactor$Abi()), listener.triggerPreExecuteBatchFunction());
addTrigger(ChainIdAbi(1, IReactor$Abi()), listener.triggerPreExecuteBatchWithCallbackFunction());
addTrigger(ChainIdAbi(1, IReactor$Abi()), listener.triggerPreExecuteWithCallbackFunction());
addTrigger(ChainIdAbi(130, IReactor$Abi()), listener.triggerPreExecuteFunction());
addTrigger(ChainIdAbi(130, IReactor$Abi()), listener.triggerPreExecuteBatchFunction());
addTrigger(ChainIdAbi(130, IReactor$Abi()), listener.triggerPreExecuteBatchWithCallbackFunction());
addTrigger(ChainIdAbi(130, IReactor$Abi()), listener.triggerPreExecuteWithCallbackFunction());
addTrigger(ChainIdAbi(8453, IReactor$Abi()), listener.triggerPreExecuteFunction());
addTrigger(ChainIdAbi(8453, IReactor$Abi()), listener.triggerPreExecuteBatchFunction());
addTrigger(ChainIdAbi(8453, IReactor$Abi()), listener.triggerPreExecuteBatchWithCallbackFunction());
addTrigger(ChainIdAbi(8453, IReactor$Abi()), listener.triggerPreExecuteWithCallbackFunction());
}
}
```
This single pattern ensures our listener will capture swaps from all current and future Uniswap X reactors without needing any code changes.
To learn more about `ChainAbi`, see the [Listener Features guide](/idx/listener/features).
## Decode Opaque Data with the Quoter Pattern
Once triggered, our listener receives the opaque `order` bytes. Replicating the decoding logic for every reactor type offchain would be a massive, brittle engineering effort.
With Sim IDX, we don't have to. Because our listener is an onchain contract, we can use the "Quoter Pattern" to have the Reactor contract decode its own data for us.
This pattern is implemented in the `OrderQuoter.sol` contract, which our main `Listener` inherits from. It revolves around two primary functions:
1. The `quote` function, called by our listener's handler, simulates a fill by calling the Reactor's `executeWithCallback` inside a `try/catch` block. It knows this call will revert and is designed to catch the revert reason.
```solidity listeners/src/OrderQuoter.sol theme={null}
/// @notice Quote the given order, returning the ResolvedOrder object which defines
/// the current input and output token amounts required to satisfy it
/// Also bubbles up any reverts that would occur during the processing of the order
/// @param order abi-encoded order, including `reactor` as the first encoded struct member
/// @param sig The order signature
/// @return result The ResolvedOrder
function quote(bytes memory order, bytes memory sig) external returns (ResolvedOrder memory result) {
try IReactor(getReactor(order)).executeWithCallback(SignedOrder(order, sig), bytes("")) {}
catch (bytes memory reason) {
result = parseRevertReason(reason);
}
}
```
2. The `reactorCallback` function is the endpoint the Reactor calls on our contract. It receives the fully decoded `ResolvedOrder`, encodes it, and immediately places it into a `revert` message.
```solidity listeners/src/OrderQuoter.sol theme={null}
/// @notice Reactor callback function
/// @dev reverts with the resolved order as reason
/// @param resolvedOrders The resolved orders
function reactorCallback(ResolvedOrder[] memory resolvedOrders, bytes memory) external pure {
if (resolvedOrders.length != 1) {
revert OrdersLengthIncorrect();
}
bytes memory order = abi.encode(resolvedOrders[0]);
/// @solidity memory-safe-assembly
assembly {
revert(add(32, order), mload(order))
}
}
```
This interaction that calls a contract to make it call you back with data you capture from a deliberate revert is the heart of the solution. It's a powerful technique only possible because Sim IDX listeners operate onchain.
## Build the Perfect Event Onchain
After decoding the raw order, we need to refine it into a complete and useful record. The listener acts as an onchain data assembly line, composing other onchain logic for accuracy and making live calls to enrich the data.
First, to ensure financial accuracy, we must account for protocol fees. We do this by porting Uniswap's own onchain fee logic into a `FeeInjector` library. Our handler calls this library to inject any applicable fees into the `ResolvedOrder`, ensuring the final amounts are perfect.
```solidity listeners/src/Main.sol theme={null}
function preExecuteFunction(PreFunctionContext memory ctx, ...) external override {
// 1. Get the decoded order using the Quoter Pattern.
ResolvedOrder memory order = this.quote(inputs.order.order, inputs.order.sig);
// 2. Inject protocol fees for accuracy.
FeeInjector._injectFees(order, IReactor(order.info.reactor).feeController());
// 3. Emit the final, perfected event.
emitTradesFromOrder(order, ctx.txn.call.caller());
}
```
Next, we enrich the data. Instead of just storing token addresses, we can get human-readable symbols and names. The listener makes a live `call` to each token contract to retrieve its metadata.
```solidity listeners/src/Main.sol theme={null}
function emitUniswapXTrade(
address makingToken,
address takingToken,
address maker,
address taker,
uint256 makingAmount,
uint256 takingAmount,
address platformContract
) internal {
(string memory makingTokenSymbol, string memory makingTokenName, uint256 makingTokenDecimals) =
makingToken == address(0) ? ("ETH", "Ether", 18) : getMetadata(makingToken);
(string memory takingTokenSymbol, string memory takingTokenName, uint256 takingTokenDecimals) =
takingToken == address(0) ? ("ETH", "Ether", 18) : getMetadata(takingToken);
emit Swap(
SwapData(
uint64(block.chainid),
txnHash,
blockNumber(),
uint64(block.timestamp),
makingToken,
makingAmount,
makingTokenSymbol,
makingTokenName,
uint64(makingTokenDecimals),
takingToken,
takingAmount,
takingTokenSymbol,
takingTokenName,
uint64(takingTokenDecimals),
tx.origin,
maker,
taker,
platformContract
)
);
}
function emitTradesFromOrder(ResolvedOrder memory order, address taker) internal {
(InputToken memory input, OutputToken memory output) = getIoTokensFromOrder(order);
emitUniswapXTrade(
input.token, output.token, output.recipient, taker, input.amount, output.amount, address(order.info.reactor)
);
}
```
This onchain assembly process that consists of decoding, correcting for fees, and enriching with live metadata creates a complete data record before it's written to the database.
## Define Your API Directly in Solidity
The final step in the Sim IDX workflow demonstrates its most powerful abstraction: your onchain `event` definition *is* your API schema.
In our `Listener` contract, we define a `SwapData` struct and a `Swap` event. This struct contains all the decoded, fee-corrected, and enriched data points we assembled in the previous steps.
```solidity listeners/src/Main.sol theme={null}
struct SwapData {
uint64 chainId;
bytes32 txnHash;
uint64 blockNumber;
uint64 blockTimestamp;
address makerToken;
uint256 makerAmt;
string makerTokenSymbol;
string makerTokenName;
uint64 makerTokenDecimals;
address takerToken;
uint256 takerAmt;
string takerTokenSymbol;
string takerTokenName;
uint64 takerTokenDecimals;
address txnOriginator;
address maker;
address taker;
address reactor;
}
event Swap(SwapData);
function emitTradesFromOrder(ResolvedOrder memory order, address taker) internal {
(InputToken memory input, OutputToken memory output) = getIoTokensFromOrder(order);
emitUniswapXTrade(
input.token, output.token, output.recipient, taker, input.amount, output.amount, address(order.info.reactor)
);
}
```
When this `Swap` event is emitted, Sim IDX automatically creates a `swap` table in your database with columns matching the fields in `SwapData`. It then generates a type-safe Drizzle schema for you to use in your API.
The result is that your API code becomes trivially simple. You can query your `swap` table without writing any complex data transformation pipelines or ORM configurations.
```typescript apis/src/index.ts theme={null}
import { swap } from "./db/schema/Listener";
import { db, App } from "@duneanalytics/sim-idx";
const app = App.create()
// This endpoint returns the 5 most recent swaps.
app.get("/*", async (c) => {
try {
const result = await db.client(c).select().from(swap).limit(5);
return Response.json({ result });
} catch (e) {
console.error("Database operation failed:", e);
return Response.json({ error: (e as Error).message }, { status: 500 });
}
});
export default app;
```
From a complex, gas-optimized protocol to a simple, queryable API, the entire process is orchestrated through onchain logic. Your work as a developer is focused on Solidity.
## Conclusion
You have successfully designed an indexer for one of DeFi's most complex protocols. This guide demonstrates the power of Sim IDX's architecture. By enabling your listener to act as an onchain contract, you can solve sophisticated indexing problems with surprisingly simple and robust code.
This "Quoter" pattern can be adapted to any protocol where data is resolved through onchain logic rather than emitted in simple events.
Learn how to deploy your Sim IDX app to production.
Learn about more listener features like global triggers, abi triggers, interfaces, and db indexes.
# Listener Contract Basics
Source: https://docs.sim.dune.com/idx/listener
The core of a Sim IDX app is the **listener**, a Solidity contract that defines what onchain data to index. By writing simple handlers for specific contract function calls or events, you instruct the Sim IDX framework on which data to capture and store in your database.
This guide covers the structure of a listener contract, how to add indexing for new functions, and how to test your logic.
## Understand the Listener Contract
A listener is a special contract Sim IDX executes onchain. It has handler functions which are called when certain conditions are triggered onchain (e.g., when another contract calls a function, or a contract with a matching ABI emits an event). The Listener contract itself emits events which Sim IDX stores in your app's database.
### Mental Model
1. A transaction is executed onchain.
2. Sim IDX checks whether it matches any trigger you defined during deployment.
3. When there's a match, Sim IDX invokes the corresponding handler in your listener contract.
4. The handler emits one or more events that capture the facts you care about.
5. Sim IDX stores each event as a new row in the appropriate table of your app database.
### File Anatomy
Before diving into listener development, make sure you understand the overall [app folder structure](/idx/app-structure) and how the `listeners/` folder fits into your Sim IDX app.
The indexing logic is primarily located in `listeners/src/`.
| Contract | Purpose | Location |
| ----------- | ----------------------------------------------------------------------------------------------------------------------------------------------------- | ------------------------ |
| `Triggers` | Registers all triggers via `addTrigger`. Must be named `Triggers` and defined in `Main.sol`. | `listeners/src/Main.sol` |
| Listener(s) | One or more contracts that implement handler logic and emit events. They can have any name and be defined in any `.sol` file within `listeners/src/`. | `listeners/src/` |
Let's break the `Main.sol` file from the sample app down step-by-step.
### Imports
```solidity theme={null}
import "sim-idx-sol/Simidx.sol";
import "sim-idx-generated/Generated.sol";
import "./UniswapV3FactoryListener.sol";
```
These two imports pull in everything provided by the **Sim IDX framework**.
`Simidx.sol` provides core helpers, while `Generated.sol` contains the Solidity code created from your ABIs.
The `./UniswapV3FactoryListener.sol` import brings in the listener contract from a separate file.
### Triggers Contract
This contract tells Sim IDX when to run your code using a **trigger**, which specifies a target contract and the handler to call.
The `Triggers` contract must be named `Triggers` and must be located in `listeners/src/Main.sol`.
You can also use helpers like `chainAbi` and `chainGlobal`.
For other trigger types, see the [Listener Features](/idx/listener/features) page.
```solidity Main.sol theme={null}
contract Triggers is BaseTriggers {
function triggers() external virtual override {
UniswapV3FactoryListener listener = new UniswapV3FactoryListener();
addTrigger(
chainContract(Chains.Ethereum, 0x1F98431c8aD98523631AE4a59f267346ea31F984),
listener.triggerOnCreatePoolFunction()
);
addTrigger(
chainContract(Chains.Unichain, 0x1F98400000000000000000000000000000000003),
listener.triggerOnCreatePoolFunction()
);
addTrigger(
chainContract(Chains.Base, 0x33128a8fC17869897dcE68Ed026d694621f6FDfD),
listener.triggerOnCreatePoolFunction()
);
}
}
```
* **`BaseTriggers`**: An abstract contract from `Simidx.sol` that provides the `addTrigger` helper.
* **`triggers()`**: The required function where you register all your triggers.
* **`new UniswapV3FactoryListener()`**: The listener contract is instantiated from its own contract type.
* **`chainContract(...)`**: This helper function uses the `Chains` enum for readability. The sample app registers the same trigger for Ethereum, Base, and Unichain, demonstrating how to monitor a contract across multiple networks.
### Listener Contract
This is where you implement your business logic.
The sample app places this logic in `listeners/src/UniswapV3FactoryListener.sol`.
```solidity UniswapV3FactoryListener.sol theme={null}
// SPDX-License-Identifier: UNLICENSED
pragma solidity ^0.8.13;
import "sim-idx-sol/Simidx.sol";
import "sim-idx-generated/Generated.sol";
/// Index calls to the UniswapV3Factory.createPool function on Ethereum
/// To hook on more function calls, specify that this listener should implement that interface and follow the compiler errors.
contract UniswapV3FactoryListener is UniswapV3Factory$OnCreatePoolFunction {
/// Emitted events are indexed.
/// To change the data which is indexed, modify the event or add more events.
event PoolCreated(uint64 chainId, address caller, address pool, address token0, address token1, uint24 fee);
/// The handler called whenever the UniswapV3Factory.createPool function is called.
/// Within here you write your indexing specific logic (e.g., call out to other contracts to get more information).
/// The only requirement for handlers is that they have the correct signature, but usually you will use generated interfaces to help write them.
function onCreatePoolFunction(
FunctionContext memory ctx,
UniswapV3Factory$CreatePoolFunctionInputs memory inputs,
UniswapV3Factory$CreatePoolFunctionOutputs memory outputs
) external override {
emit PoolCreated(
uint64(block.chainid), ctx.txn.call.callee(), outputs.pool, inputs.tokenA, inputs.tokenB, inputs.fee
);
}
}
```
* **Inheritance**: The listener extends an abstract contract (`UniswapV3Factory$OnCreatePoolFunction`) that is automatically generated from your ABI. This provides the required handler function signature and typed structs for `inputs` and `outputs`.
* **Events**: Emitting an event like `PoolCreated` defines the shape of your database.
The sample app uses the descriptive name `UniswapV3FactoryListener`.
You should use descriptive names for your contracts.
For larger projects, you can even split logic into multiple listener contracts, each in its own `.sol` file within the `src/` directory.
### Access Transaction Data with Handler Contexts
In the example above, you'll notice the `onCreatePoolFunction` handler receives a `FunctionContext memory ctx` parameter. Every handler in Sim IDX receives a **context object**, which provides rich metadata about the top-level transaction and the specific call that triggered your code. For example, you can get the address of the contract that was called (`callee`) and pass it to your event:
```solidity theme={null}
function onCreatePoolFunction(
FunctionContext memory ctx,
// ...
) external override {
emit PoolCreated(
uint64(block.chainid),
ctx.txn.call.callee(), // Get the contract address from the context
// ...
);
}
```
The context object is your primary tool for accessing details like the transaction hash, the immediate caller of a function, chain ID, and other execution details.
For a complete guide to all available properties and common usage patterns, see the full Handler Contexts reference.
## Define and Emit Events
Events are the bridge between your listener's logic and your database. When your listener emits an event, Sim IDX creates a database record.
### From Events to DB
The framework automatically maps your event to a database view. The event name is converted to `snake_case` to become the view name, and each event parameter becomes a column.
For example, the `PoolCreated` event from the sample app results in a queryable `pool_created` view:
| chain\_id | caller | pool | token0 | token1 | fee |
| --------- | ------------------------------------------ | ------------------------------------------ | ------------------------------------------ | ------------------------------------------ | ----- |
| 1 | 0x1f98431c8ad98523631ae4a59f267346ea31f984 | 0xf2c1e03841e06127db207fda0c3819ed9f788903 | 0x4a074a606ccc467c513933fa0b48cf37033cac1f | 0xc02aaa39b223fe8d0a0e5c4f27ead9083c756cc2 | 10000 |
### Extending an Event
To capture more data, you simply add parameters to your event definition and update the `emit` statement in your handler. Let's modify the sample app to also record the block number.
**1. Extend the Event Definition**
Add the new `blockNumber` parameter to your `PoolCreated` event in `Main.sol`.
```solidity theme={null}
event PoolCreated(
uint64 chainId,
address caller,
address pool,
address token0,
address token1,
uint24 fee,
uint256 blockNumber // new field
);
```
**2. Emit the New Data**
Pass the new value when you emit the event in your `onCreatePoolFunction` handler.
```solidity theme={null}
function onCreatePoolFunction(...) external override {
emit PoolCreated(
uint64(block.chainid),
ctx.txn.call.callee(),
outputs.pool,
inputs.tokenA,
inputs.tokenB,
inputs.fee,
blockNumber() // pass the new value
);
}
```
After deploying these changes, your `pool_created` table will automatically include the new `block_number` column.
Prefer `blockNumber()` over Solidity's `block.number` to standardize access across all supported blockchains.
## Trigger Onchain Activity
Sim IDX can trigger on contract events as well as function calls, both before and after they execute. This allows you to capture a wide range of onchain activity.
To add a new trigger to your listener, you'll follow a simple, five-step process:
1. **Discover the Trigger**: Find the abstract contract for your target function or event in the generated files.
2. **Extend the Listener**: Add the abstract contract to your listener's inheritance list.
3. **Define a New Event**: Create a Solidity event to define your database schema.
4. **Implement the Handler**: Write the function required by the abstract contract to process the data and emit your event.
5. **Register the Trigger**: Call `addTrigger` in your `Triggers` contract to activate the trigger.
Let's walk through an example of adding a new event trigger to the sample app's `UniswapV3FactoryListener` contract.
We will extend the `Listener` to also index the `OwnerChanged` event from the Uniswap V3 Factory.
### 1. Discover the Trigger
Look inside `listeners/lib/sim-idx-generated/UniswapV3Factory.sol`. You will find an abstract contract for the `OwnerChanged` event.
```solidity theme={null}
abstract contract UniswapV3Factory$OnOwnerChangedEvent {
function onOwnerChangedEvent(EventContext memory ctx, UniswapV3Factory$OwnerChangedEventParams memory inputs) virtual external;
function triggerOnOwnerChangedEvent() view external returns (Trigger memory);
}
```
### 2. Extend the Listener
Add `UniswapV3Factory$OnOwnerChangedEvent` to the inheritance list of the `UniswapV3FactoryListener` contract in `UniswapV3FactoryListener.sol`.
```solidity UniswapV3FactoryListener.sol theme={null}
contract UniswapV3FactoryListener is
UniswapV3Factory$OnCreatePoolFunction, // existing
UniswapV3Factory$OnOwnerChangedEvent // new
{
// ... existing events and handlers
}
```
### 3. Define a New Event
Inside the `UniswapV3FactoryListener` contract, add a new event to define the schema for the `owner_changed` table.
```solidity theme={null}
event OwnerChanged(
uint64 chainId,
address oldOwner,
address newOwner
);
```
### 4. Implement the Handler
Implement the `onOwnerChangedEvent` function required by the abstract contract, also inside `UniswapV3FactoryListener`.
```solidity theme={null}
function onOwnerChangedEvent(
EventContext memory /*ctx*/,
UniswapV3Factory$OwnerChangedEventParams memory inputs
) external override {
emit OwnerChanged(
uint64(block.chainid),
inputs.oldOwner,
inputs.newOwner
);
}
```
### 5. Register the Trigger
Finally, add a new trigger for this handler in your `Triggers` contract within `Main.sol`. You will need to instantiate the listener first.
```solidity Main.sol theme={null}
// In Triggers.triggers()
UniswapV3FactoryListener listener = new UniswapV3FactoryListener();
addTrigger(
chainContract(Chains.Ethereum, 0x1F98431c8aD98523631AE4a59f267346ea31F984),
listener.triggerOnCreatePoolFunction() // existing trigger
);
addTrigger(
chainContract(Chains.Ethereum, 0x1F98431c8aD98523631AE4a59f267346ea31F984),
listener.triggerOnOwnerChangedEvent() // new trigger
);
```
## Function Triggers
The framework supports both post-execution and pre-execution function triggers.
**Post-Execution:** This is what the sample app uses with `onCreatePoolFunction`. The handler is called *after* the contract's function completes, so it has access to both `inputs` and `outputs`.
**Pre-Execution:** To react to a function *before* it executes, you use the corresponding `Pre-` abstract contract (e.g., `preCreatePoolFunction`). The handler receives a `PreFunctionContext` and only has access to the function's `inputs`, as outputs have not yet been generated. This logic can live in its own file.
```solidity UniswapV3FactoryPreExecutionListener.sol theme={null}
// SPDX-License-Identifier: UNLICENSED
pragma solidity ^0.8.13;
import "sim-idx-sol/Simidx.sol";
import "sim-idx-generated/Generated.sol";
contract UniswapV3FactoryPreExecutionListener is UniswapV3Factory$PreCreatePoolFunction {
// Fires *before* createPool executes
event PoolWillBeCreated(
uint64 chainId,
address token0,
address token1,
uint24 fee
);
function preCreatePoolFunction(
PreFunctionContext memory /*ctx*/,
UniswapV3Factory$CreatePoolFunctionInputs memory inputs
)
external
override
{
emit PoolWillBeCreated(
uint64(block.chainid),
inputs.tokenA,
inputs.tokenB,
inputs.fee
);
}
}
```
You would then import and register this new listener in your `Triggers` contract inside `Main.sol`.
```solidity Main.sol theme={null}
// SPDX-License-Identifier: UNLICENSED
pragma solidity ^0.8.13;
import "sim-idx-sol/Simidx.sol";
import "./UniswapV3FactoryPreExecutionListener.sol";
contract Triggers is BaseTriggers {
function triggers() external override {
UniswapV3FactoryPreExecutionListener listener = new UniswapV3FactoryPreExecutionListener();
address factory = 0x1F98431c8aD98523631AE4a59f267346ea31F984; // Uniswap V3 Factory (Ethereum)
addTrigger(chainContract(Chains.Ethereum, factory), listener.triggerPreCreatePoolFunction());
}
}
```
## Test Your Listener
Sim IDX gives you two ways to make sure your listener behaves as expected while you build.
### Unit Tests with Foundry
The `listeners` folder is a Foundry project. `sim test` is a thin wrapper around `forge test`. It will compile your contracts, execute all Forge unit tests inside `listeners/test/`, and surface any failures.
### Historical Replay
Use `sim listeners evaluate` to see how your listener reacts to real onchain data *before* pushing your updates. This command compiles your listener and executes the transactions in any block range you specify.
```bash theme={null}
sim listeners evaluate \
--chain-id 1 \
--start-block 12369662 \
--end-block 12369670 \
--listeners=UniswapV3FactoryListener
```
When evaluating historical data, be aware that data availability can vary by chain. For example, Arbitrum One does not support indexing blocks prior to its Nitro upgrade. For more information on chain-specific limitations, visit the [Supported Chains page](/idx/supported-chains).
## Next Steps
You've now seen how to create triggers, emit events, and validate your listener. Here are a few great ways to level-up your Sim IDX app.
Explore more listener features like triggering by ABI, global triggers, interfaces, and DB indexes.
Push your app to a staging or production environment and watch it process live onchain activity.
Build fast, type-safe endpoints that surface the data your listener captures.
# Handler Contexts
Source: https://docs.sim.dune.com/idx/listener/contexts
Learn how to access onchain metadata with FunctionContext, EventContext, and other context objects in your Listeners.
Every handler in a Sim IDX listener receives a `context` object (`ctx`) that provides metadata about the onchain transaction and the specific call that triggered your code.
This guide covers the structure of all available context objects, the most common properties you'll use, and a detailed reference for all available data.
## `FunctionContext` vs. `EventContext`
While structurally identical, the context you receive depends on the type of trigger you are handling. The primary difference is visible in the handler's function signature, which includes other typed parameters alongside the context.
```solidity Function Trigger theme={null} theme={null}
function UniswapV3Pool$onSwapFunction(
// For function triggers
FunctionContext memory ctx,
// Typed function arguments
UniswapV3Pool$SwapFunctionInputs memory inputs,
// Typed function return values
UniswapV3Pool$SwapFunctionOutputs memory outputs
) external;
```
```solidity Event Trigger theme={null} theme={null}
function UniswapV2Pair$onSwapEvent(
// For event triggers
EventContext memory ctx,
// Typed event parameters
UniswapV2Pair$SwapEventParams memory params
) external;
```
Both handlers use `ctx.txn` in the same way to access transaction and call metadata. The framework provides the additional `inputs`/`outputs` or `params` structs to give you typed access to the specific data from that function or event.
For more details on the underlying definitions, you can inspect the core `Context.sol` file directly in the `listeners/lib/sim-idx-sol/src/Context.sol` path of your project.
## Core Metadata
Nearly every context object exposes `txn: TransactionContext`, which represents metadata for the top-level transaction under which your handler runs. Inside `txn`, the `call: CallFrame` describes the current execution frame (who is executing, who called, calldata, value, and call semantics). These two types power most real-world usage such as correlating by transaction hash, identifying the executing pool/contract, and attributing actions to the effective caller.
### `TransactionContext`
Represents the top-level transaction metadata available to handlers. It is accessed as `ctx.txn` from both `FunctionContext` and `EventContext`, and from other contexts covered below.
| Property | Type | Description |
| :------------------- | :---------------------- | :-------------------------------------------------------------------------------------------------------- |
| `hash()` | `bytes32` | The unique hash of the top-level transaction. |
| `isSuccessful()` | `bool` | Returns `true` if the top-level transaction succeeded without reverting. |
| `chainId` | `uint256` | The chain ID where the transaction was executed. Equivalent to `block.chainid`. |
| `transactionIndex()` | `uint64` | Index of the top-level transaction within its block. Useful for deterministic ordering with `logIndex()`. |
| `call` | [CallFrame](#callframe) | Detailed metadata about the current execution frame. |
### `CallFrame`
Describes the current execution frame within the transaction. This is accessed via `ctx.txn.call` from all context types that expose a [TransactionContext](#transactioncontext).
| Property | Type | Description |
| :------------------- | :--------------------------- | :--------------------------------------------------------------------------------- |
| `callee()` | `address` | The address of the contract whose code is currently executing. |
| `caller()` | `address` | The address that invoked the current call (EOA or another contract). |
| `value()` | `uint256` | The amount of wei sent with the current call. |
| `callData()` | `bytes` | The raw calldata for the current call frame. |
| `callDepth()` | `uint256` | The depth of the current call in the execution stack. |
| `callType()` | `CallType` | The opcode used for the call: `CALL`, `DELEGATECALL`, `STATICCALL`, `CREATE`, etc. |
| `delegator()` | `address` | In a `DELEGATECALL`, the proxy contract address. |
| `delegatee()` | `address` | In a `DELEGATECALL`, the implementation contract address. |
| `verificationSource` | `ContractVerificationSource` | How the contract was verified: `Unspecified`, `ABI`, or `Bytecode`. |
## `FunctionContext`
Passed to post-execution [function triggers](/idx/listener#function-triggers), `FunctionContext` provides metadata about the transaction and the specific function call that was just executed.
It contains a single property, `txn`, which is a [TransactionContext](#transactioncontext).
| Property | Type | Description |
| :--------------------------- | :---------------------------------------- | :------------------------------------------------------------------------------------------------------------------------------------------------------ |
| `txn` | [TransactionContext](#transactioncontext) | Metadata about the top-level transaction and current call frame. |
| `globalIndex()` | `uint120` | Globally monotonic 120-bit index that totally orders execution; encodes blockNumber, reorgIncarnation, txnIndex, shadowPc (see GlobalIndexLib helpers). |
| `sim` | [SimFunctions](#simfunctions) | Helper utilities (e.g., `getDeployer(address)`), available as `ctx.sim`. |
| `isInputDecodingSuccessful` | `bool` | True if function inputs decoded into typed `inputs`. |
| `isOutputDecodingSuccessful` | `bool` | True if function return data decoded into typed `outputs`. |
## `EventContext`
Passed to [event triggers](/idx/listener#trigger-onchain-activity), `EventContext` provides metadata about the transaction and the call that emitted the event.
Its structure is identical to `FunctionContext` and provides access to the same [TransactionContext](#transactioncontext) and [CallFrame](#callframe) properties detailed above.
| Property | Type | Description |
| :--------------------- | :---------------------------------------- | :------------------------------------------------------------------------------------------------------------------------------------------------------ |
| `txn` | [TransactionContext](#transactioncontext) | Metadata about the top-level transaction and current call frame. |
| `globalIndex()` | `uint120` | Globally monotonic 120-bit index that totally orders execution; encodes blockNumber, reorgIncarnation, txnIndex, shadowPc (see GlobalIndexLib helpers). |
| `isDecodingSuccessful` | `bool` | Whether the event log decoded successfully into typed `params`. |
| `logIndex()` | `uint64` | Index of the current log within the block. Combine with `transactionIndex()` for canonical ordering. |
| `sim` | [SimFunctions](#simfunctions) | Helper utilities (e.g., `getDeployer(address)`), available as `ctx.sim`. |
## `PreFunctionContext`
Passed to pre-execution [function triggers](/idx/listener#function-triggers), `PreFunctionContext` provides metadata *before* the target function is executed.
Its structure is identical to `FunctionContext` and provides access to the same [TransactionContext](#transactioncontext) and [CallFrame](#callframe) properties.
| Property | Type | Description |
| :-------------------------- | :---------------------------------------- | :---------------------------------------------------------------------------------------------------------------------------------------------- |
| `txn` | [TransactionContext](#transactioncontext) | Metadata about the top-level transaction and current call frame. |
| `globalIndex()` | `uint120` | Globally monotonic 120-bit index for pre-exec ordering; encodes blockNumber, reorgIncarnation, txnIndex, shadowPc (see GlobalIndexLib helpers). |
| `isInputDecodingSuccessful` | `bool` | Whether the target function’s inputs decoded at pre-exec time. |
| `sim` | [SimFunctions](#simfunctions) | Helper utilities (e.g., `getDeployer(address)`), available as `ctx.sim`. |
## `RawCallContext`
Used by `Raw$OnCall` [global triggers](/idx/listener/features#trigger-globally), this context provides metadata for every function call on a chain.
| Property | Type | Description |
| :-------------- | :---------------------------------------- | :--------------------------------------------------------------------------------------------------------------------------------------------- |
| `txn` | [TransactionContext](#transactioncontext) | Metadata about the top-level transaction. |
| `callData()` | `bytes` | The raw calldata for the current call. |
| `returnData()` | `bytes` | The raw return data from the call. |
| `globalIndex()` | `uint120` | Globally monotonic 120-bit index for the current call; encodes blockNumber, reorgIncarnation, txnIndex, shadowPc (see GlobalIndexLib helpers). |
| `sim` | [SimFunctions](#simfunctions) | Helper utilities (e.g., `getDeployer(address)`), available as `ctx.sim`. |
## `RawPreCallContext`
Used by `Raw$OnPreCall` [global triggers](/idx/listener/features#trigger-globally), this context provides metadata for every upcoming function call on a chain before it executes.
| Property | Type | Description |
| :-------------- | :---------------------------- | :---------------------------------------------------------------------------------------------------------------------------------------------- |
| `callData()` | `bytes` | The raw calldata for the upcoming call. |
| `globalIndex()` | `uint120` | Globally monotonic 120-bit index for the upcoming call; encodes blockNumber, reorgIncarnation, txnIndex, shadowPc (see GlobalIndexLib helpers). |
| `sim` | [SimFunctions](#simfunctions) | Helper utilities (e.g., `getDeployer(address)`), available as `ctx.sim`. |
## `RawLogContext`
Used by `Raw$OnLog` [global triggers](/idx/listener/features#trigger-globally), this context provides data for every event log emitted on a chain.
| Property | Type | Description |
| :-------------- | :---------------------------------------- | :-------------------------------------------------------------------------------------------------------------------------------------------- |
| `txn` | [TransactionContext](#transactioncontext) | Metadata about the top-level transaction. |
| `topics()` | `bytes32[]` | The indexed topics of the event log. |
| `data()` | `bytes` | The un-indexed data of the event log. |
| `globalIndex()` | `uint120` | Globally monotonic 120-bit index for the current log; encodes blockNumber, reorgIncarnation, txnIndex, shadowPc (see GlobalIndexLib helpers). |
| `logIndex()` | `uint64` | Index of the current log within the block. |
| `sim` | [SimFunctions](#simfunctions) | Helper utilities (e.g., `getDeployer(address)`), available as `ctx.sim`. |
## `RawBlockContext`
Used by `Raw$OnBlock` [global triggers](/idx/listener/features#trigger-globally), this context provides a hook that runs once for every new block.
| Property | Type | Description |
| :------------ | :-------- | :------------------------------- |
| `blockNumber` | `uint256` | The number of the current block. |
## `SimFunctions`
The [SimFunctions](#simfunctions) object is available via `ctx.sim` on `FunctionContext`, `EventContext`, `PreFunctionContext`, `RawCallContext`, `RawPreCallContext`, and `RawLogContext`.
| Function | Signature | Returns | Description |
| :------------ | :------------------------- | :-------- | :-------------------------------------------------------------------------------------------------------------------------------------- |
| `getDeployer` | `function(address target)` | `address` | Returns the deployer of the given contract `target`. Useful for attribution, filtering, and safety heuristics on newly deployed tokens. |
# Listener Errors
Source: https://docs.sim.dune.com/idx/listener/errors
Sim IDX listeners may occasionally hit Solidity compilation errors during development. This page explains the most common issues and shows how to resolve them.
## Handle Name Conflicts
When working with multiple ABIs, you may encounter functions or events with the same name, which can cause compilation errors. Sim IDX provides two solutions.
### 1. Multiple Listeners
The recommended approach is to split your logic into separate, dedicated listener contracts for each ABI. This keeps your code clean and modular.
```solidity theme={null}
// In Triggers.triggers()
Listener1 listener1 = new Listener1();
Listener2 listener2 = new Listener2();
addTrigger(..., listener1.triggerOnSwapFunction());
addTrigger(..., listener2.triggerOnSwapFunction());
// Separate listener contracts
contract Listener1 is ABI1$OnSwapFunction { /* ... */ }
contract Listener2 is ABI2$OnSwapFunction { /* ... */ }
```
### 2. Prefixed Naming for Shared State
If you need to share state between handlers for conflicting functions within a single contract, you can configure `sim.toml` to prefix the generated names.
```toml sim.toml theme={null}
[listeners]
codegen_naming_convention = "abi_prefix"
```
This changes the generated function names, allowing you to implement them both in the same contract:
```solidity Example Listener with Shared State theme={null}
contract CombinedListener is ABI1$OnSwapFunction, ABI2$OnSwapFunction {
// Store every recipient that swaps via DEX #1
address[] public swapRecipients;
// Emit an alert for large swaps coming through DEX #2
event LargeSwap(address indexed dex, address indexed recipient, uint256 amountOut);
// Handler for ABI1 (e.g., Uniswap V2 style router)
function ABI1$onSwapFunction(
FunctionContext memory /*ctx*/,
ABI1$SwapFunctionInputs memory inputs
)
external
override
{
// Track who received tokens in this swap
swapRecipients.push(inputs.to);
}
// Handler for ABI2 (e.g., SushiSwap router)
function ABI2$onSwapFunction(
FunctionContext memory /*ctx*/,
ABI2$SwapFunctionInputs memory inputs
)
external
override
{
// Fire an event if the swap paid out at least 1 ETH worth of tokens
if (inputs.amountOut >= 1 ether) {
emit LargeSwap(msg.sender, inputs.to, inputs.amountOut);
}
}
}
contract Triggers is BaseTriggers {
function triggers() external override {
CombinedListener listener = new CombinedListener();
// DEX #1 (ABI1) on Ethereum
addTrigger(
chainContract(Chains.Ethereum, 0xAbCDEFabcdefABCdefABcdefaBCDEFabcdefAB),
listener.ABI1$triggerOnSwapFunction()
);
// DEX #2 (ABI2) on Ethereum
addTrigger(
chainContract(Chains.Ethereum, 0x1234561234561234561234561234561234561234),
listener.ABI2$triggerOnSwapFunction()
);
}
}
```
To learn more about the `codegen_naming_convention` property and other `sim.toml` configuration options, visit the [App Structure](/idx/app-structure#sim-toml) page.
## Stack Too Deep Errors
You may encounter a `Stack too deep` compilation error if your event contains more than 16 parameters, or if your handler function declares too many local variables. This is due to a fundamental limit in the Solidity EVM.
The solution is to use a pattern called **Struct Flattening**. You group your event parameters into a `struct` and then define your event to take this struct as a single, **unnamed** parameter. Sim IDX recognizes this specific pattern and will automatically "flatten" the struct's members into individual columns in your database. This gives you the best of both worlds: code that compiles and a clean, relational database schema.
Implement struct flattening in your listener contract code (in `listeners/src/`), not in the generated files. Files in `listeners/lib/sim-idx-generated/` are auto-generated and should never be modified directly, as they will be overwritten when you run `sim build`.
Create a struct containing all the fields you want in your database table.
```solidity theme={null}
struct EmitSwapData {
uint64 chainId;
bytes32 txnHash;
uint64 blockNumber;
uint64 blockTimestamp;
bytes32 poolId;
address fromToken;
uint256 fromTokenAmt;
string fromTokenSymbol;
string fromTokenName;
uint64 fromTokenDecimals;
address toToken;
uint256 toTokenAmt;
string toTokenSymbol;
string toTokenName;
uint64 toTokenDecimals;
address txnOriginator;
address recipient;
address poolManager;
}
```
This struct can be defined in any Solidity file within `listeners/src/`, but it must be properly imported in any file where you plan to use it for events or handler functions.
Change your event to accept the struct as a single, **unnamed** parameter. This is the crucial step that enables struct flattening.
```solidity theme={null}
// Incorrect: event Swap(EmitSwapData emitData);
// Correct:
event Swap(EmitSwapData);
```
In your handler, create an instance of the struct, populate its fields, and emit it.
```solidity theme={null}
function onSwapFunction(...) external override {
// ...
EmitSwapData memory emitData;
emitData.chainId = uint64(block.chainid);
emitData.txnHash = ctx.txn.hash;
emitData.blockNumber = blockNumber();
// ... populate all other fields
emit Swap(emitData);
}
```
By following this pattern, you can define events with any number of parameters while keeping your code compliant with the EVM's limitations.
# Listener Features
Source: https://docs.sim.dune.com/idx/listener/features
After learning about listeners in the [Listener Basics](/idx/listener) guide, you can use more advanced features to build sophisticated indexers.
This page explores core Sim IDX concepts that give you more flexibility in how you trigger listeners and structure your onchain data.
We will cover advanced triggering, calling other contracts via interfaces, and adding indexes to your generated database.
## Trigger on an ABI
The `chainAbi` helper allows you to trigger your listener on any contract that matches a specific ABI signature. This is incredibly powerful for monitoring activity across all instances of a particular standard, like ERC-721 or Uniswap V3 pools, without needing to list every contract address explicitly.
**ABI Matching is Permissive**: The matching behavior is permissive - if a contract implements the functions and events in the specified ABI, it counts as a match even if it also implements other functionality. This means contracts don't need to match the ABI exactly; they just need to include the required functions and events.
The example below shows how to trigger the `onBurnEvent` handler for any contract on Ethereum that matches the `UniswapV3Pool` ABI. The `UniswapV3Pool$Abi()` is a helper struct that is automatically generated from that ABI file.
```solidity Main.sol theme={null}
import "./UniswapPoolListener.sol";
contract Triggers is BaseTriggers {
function triggers() external virtual override {
UniswapPoolListener listener = new UniswapPoolListener();
// Trigger on any contract on Ethereum matching the UniswapV3Pool ABI
addTrigger(chainAbi(Chains.Ethereum, UniswapV3Pool$Abi()), listener.triggerOnBurnEvent());
}
}
```
```solidity UniswapPoolListener.sol theme={null}
contract UniswapPoolListener is UniswapV3Pool$OnBurnEvent {
event PoolBurn(address indexed poolAddress, address owner, int24 tickLower, int24 tickUpper, uint128 amount);
function onBurnEvent(EventContext memory ctx, UniswapV3Pool$BurnEventParams memory inputs) external override {
// Only emit an event if the burn amount is greater than zero
if (inputs.amount > 0) {
emit PoolBurn(
ctx.txn.call.callee(), // The address of the pool that emitted the event
inputs.owner,
inputs.tickLower,
inputs.tickUpper,
inputs.amount
);
}
}
}
```
## Trigger Globally
The `chainGlobal` helper creates triggers that are not tied to any specific contract or ABI. This can be used to set up block-level handlers with `onBlock` for tasks that need to run once per block, such as creating periodic data snapshots, calculating time-weighted averages, or performing end-of-block settlements.
The framework provides a built-in abstract contract, `Raw$OnBlock`, for this purpose.
First, implement the `onBlock` handler and register the trigger in the `Triggers` contract.
Next, add `Raw$OnBlock` to your listener's inheritance list.
```solidity Main.sol theme={null}
import "./MyBlockListener.sol";
contract Triggers is BaseTriggers {
function triggers() external virtual override {
MyBlockListener listener = new MyBlockListener();
addTrigger(chainGlobal(Chains.Ethereum), listener.triggerOnBlock());
}
}
```
```solidity MyBlockListener.sol theme={null}
contract MyBlockListener is Raw$OnBlock {
event BlockProcessed(uint256 blockNumber, uint256 timestamp);
function onBlock(RawBlockContext memory /*ctx*/) external override {
emit BlockProcessed(blockNumber(), block.timestamp);
}
}
```
The framework also provides abstract contracts for `Raw$OnCall` and `Raw$OnLog`, allowing you to create global triggers for every function call or every event log on a chain.
## Register Multiple Triggers
`addTriggers` (plural) lets you register several handler functions for the same contract, ABI, or global target in one call. It accepts an array of trigger functions.
`addTriggers` lives in the same `Triggers` contract as `addTrigger`. It is purely a convenience helper and behaviour is identical. If you are new to triggers, start with the [Listener Basics](/idx/listener) guide where `addTrigger` is introduced.
```solidity listeners/src/Main.sol theme={null}
import "./MyPoolListener.sol";
contract Triggers is BaseTriggers {
function triggers() external override {
MyPoolListener listener = new MyPoolListener();
// Collect every handler we care about for this pool
Trigger[] memory poolTriggers = [
listener.UniswapV3Pool$triggerOnSwapEvent(),
listener.UniswapV3Pool$triggerOnMintEvent(),
listener.UniswapV3Pool$triggerOnBurnEvent()
];
// Register all three triggers for the same contract in one call
addTriggers(
chainContract(Chains.Ethereum, 0x1F98431c8aD98523631AE4a59f267346ea31F984),
poolTriggers
);
}
}
```
Use `addTriggers` when your listener exposes multiple handlers that share a target.
## Use Interfaces
Often, your handler is triggered by one contract, but you need to fetch additional data from another contract to enrich your event. For example, a `Swap` event on a pool tells you a swap occurred, but you need to call the pool contract directly to get its current `slot0` state. Solidity interfaces allow your listener to do this.
### 1. Define the Interface
It's best practice to create an `interfaces` directory (e.g., `listeners/src/interfaces/`) and define the interface in a new `.sol` file.
```solidity listeners/src/interfaces/IUniswapV3Pool.sol theme={null}
// SPDX-License-Identifier: UNLICENSED
pragma solidity ^0.8.13;
interface IUniswapV3Pool {
function slot0()
external
view
returns (
uint160 sqrtPriceX96,
int24 tick,
uint16 observationIndex,
uint16 observationCardinality,
uint16 observationCardinalityNext,
uint8 feeProtocol,
bool unlocked
);
// ... other functions
}
```
### 2. Import and Use the Interface
In your listener, import the interface. You can then cast a contract's address to the interface type to call its functions.
```solidity theme={null}
import {IUniswapV3Pool} from "./interfaces/IUniswapV3Pool.sol";
contract Listener is UniswapV3Pool$OnSwapEvent {
// ...
function onSwapEvent(EventContext memory ctx, ...) external override {
// Cast the address of the contract that triggered the event
// to the IUniswapV3Pool interface to call its functions.
(uint160 sqrtPriceX96, , , , , , ) = IUniswapV3Pool(ctx.txn.call.callee()).slot0();
}
}
```
For guidance on resolving compilation issues such as name conflicts or `Stack too deep` errors, refer to the [Listener Errors](/idx/listener/errors) guide.
## DB Indexes
Database indexes are a common way to improve database performance. Sim IDX lets you define indexes directly on the [event definition](/idx/listener#define-and-emit-events) of your listener contract, giving you fine-grained control of your database's performance.
To learn more about database indexes, visit the PostgreSQL documentation.
### Index Definition Syntax
To add a database index, use a special comment with the `@custom:index` annotation directly *above* the `event` definition in your Solidity listener.
```text theme={null}
/// @custom:index (, , ...);
```
The syntax components:
* ``: A unique name for your index.
* ``: The type of index to create (e.g., `BTREE`, `HASH`).
* `()`: A comma-separated list of one or more columns to include in the index. These names must **exactly match** the field names in your event or struct definition, including case.
When events use unnamed structs to avoid [Solidity's "Stack too deep" errors](/idx/listener/errors#stack-too-deep-errors), column names in your index annotations must match the **struct field names**, not event parameter names.
```solidity theme={null}
struct SwapData {
uint64 chainId;
bytes32 txnHash;
uint64 blockNumber;
uint64 blockTimestamp;
bytes32 poolId;
address fromToken;
uint256 fromTokenAmt;
string fromTokenSymbol;
string fromTokenName;
uint64 fromTokenDecimals;
address toToken;
uint256 toTokenAmt;
string toTokenSymbol;
string toTokenName;
uint64 toTokenDecimals;
address txnOriginator;
address recipient;
address poolManager;
}
/// @custom:index swap_pool_time_idx BTREE (poolId, blockNumber, blockTimestamp);
event Swap(SwapData);
```
Notice how the index column names (`poolId`, `blockNumber`, `blockTimestamp`, etc.) correspond exactly to the field names in the `SwapData` struct, even though the event takes an unnamed parameter.
For simple events with fewer parameters that don't hit Solidity's stack limits, you can use named parameters directly. Column names must match the event parameter names.
```solidity theme={null}
/// @custom:index position_owner_idx HASH (to_address, token_id);
event PositionOwnerChanges(
bytes32 txn_hash,
uint256 block_number,
uint256 block_timestamp,
address from_address,
address to_address,
uint256 token_id,
address pool
);
```
### Multiple Indexes Per Event
You can define multiple indexes for a single event by adding multiple `@custom:index` lines. This is useful when you want to query the same table in different ways.
```solidity theme={null}
struct LiquidityEventData {
bytes32 txnHash;
uint64 blockNumber;
uint64 blockTimestamp;
address pool;
address owner;
int24 tickLower;
int24 tickUpper;
uint128 liquidity;
uint256 amount0;
uint256 amount1;
}
/// @custom:index lp_events_by_pool BTREE (pool, blockNumber);
/// @custom:index lp_events_by_owner BRIN (owner, blockTimestamp);
/// @custom:index lp_events_by_tick_range HASH (pool, tickLower, tickUpper);
event LiquidityEvent(LiquidityEventData);
```
When events use unnamed structs to solve [Solidity's stack errors](/idx/listener/errors#stack-too-deep-errors), Sim IDX automatically flattens the struct fields into individual database columns. Your index annotations reference these **struct field names**.
### Supported Index Types
Sim IDX supports several PostgreSQL index types. `BTREE` is the default and most common type, suitable for a wide range of queries.
| Type | Use Case |
| ------- | ------------------------------------------------------------------------------------------------------------------------------------------------------------- |
| `BTREE` | The default and most versatile index type. Good for equality and range queries on sortable data (`=`, `>`, `<`, `BETWEEN`, `IN`). |
| `HASH` | Useful only for simple equality comparisons (`=`). |
| `BRIN` | Best for very large tables where columns have a natural correlation with their physical storage order (e.g., timestamps). |
| `GIN` | An inverted index useful for composite types like `array` or `jsonb`. It can efficiently check for the presence of specific values within the composite type. |
To learn more about index types and their specific use cases, visit the
PostgreSQL documentation.
### Syntax Validation
The `sim build` command automatically validates your index definitions. If it detects an error in the syntax, it will fail the build and provide a descriptive error message.
For example, if you misspell a column name:
`Error: Cannot find column(s): 'block_numbr' in event PositionOwnerChanges`
## Block Ranges
You can specify custom block ranges for your triggers to target specific blocks or time periods. This is particularly useful for historical data analysis, testing specific time periods, or limiting triggers to certain blockchain events.
Chain helper functions support `.withStartBlock()`, `.withEndBlock()`, and `.withBlockRange()` methods:
```solidity theme={null}
// Listen to events starting from a specific block onwards
addTrigger(
chainContract(Chains.Ethereum.withStartBlock(10000000), 0x1F98431c8aD98523631AE4a59f267346ea31F984),
listener.triggerOnPoolCreatedEvent()
);
// Listen to events within a specific block range (inclusive)
addTrigger(
chainContract(Chains.Base.withStartBlock(5000000).withEndBlock(5000100), 0x1F98431c8aD98523631AE4a59f267346ea31F984),
listener.triggerOnPoolCreatedEvent()
);
// Block range support works with ABI triggers as well
addTrigger(
chainAbi(Chains.Ethereum.withStartBlock(18000000), UniswapV3Pool$Abi()),
listener.triggerOnBurnEvent()
);
// And with global triggers
addTrigger(
chainGlobal(Chains.Ethereum.withBlockRange(19000000, 19001000)),
listener.triggerOnBlock()
);
```
### Arbitrum One Pre-Nitro Limitation
Sim IDX does not support blocks on Arbitrum One created before the Nitro upgrade. Any triggers configured with a start block earlier than the Nitro boundary (block **22,207,818**, which occurred on 2022-08-31) will not be able to process pre-Nitro blocks.
When setting a block range for Arbitrum One, ensure your start block is `22207818` or greater:
```solidity theme={null}
// Correct: Start indexing after the Nitro upgrade
addTrigger(
chainContract(Chains.Arbitrum.withStartBlock(22207818), 0x...),
listener.triggerOnPoolCreatedEvent()
);
```
# App Templates
Source: https://docs.sim.dune.com/idx/resources/templates
Sim IDX templates let you bootstrap fully-featured indexing apps in minutes.
Each template ships with a production-ready listener contract, events, and REST API logic so you can focus on your custom business logic instead of boilerplate.
## Contract Decoder
Quickly decode and index data emitted by any smart contract.
The template scaffolds a listener that listens to function calls and events (pre-configured for the Uniswap V3 Factory) and surfaces the decoded results via an API.
```bash theme={null}
sim init --template=contract-decoder
```
Complete walkthrough showing how to configure the contract-decoder template to decode any smart contract, using the Moonbirds NFT contract as an example.
View the complete template source code and example implementation on GitHub.
## Uniswap V3 In-Range LPs
Index Uniswap V3 liquidity provision events and query which positions are in-range at any block. The template exposes an `/lp-snapshot` endpoint that returns all active LP positions for a given pool.
```bash theme={null}
sim init --template=univ3-lp
```
# External Kafka Sinks
Source: https://docs.sim.dune.com/idx/sinks/kafka
Sim IDX can stream the data from your listener's events in real-time to an external data sink. This allows you to integrate your indexed blockchain data directly into your own infrastructure for real-time analytics, monitoring, or complex event processing.
This feature currently supports [Apache Kafka](https://kafka.apache.org/) as a sink type, enabling you to send your data to managed services like Confluent Cloud and Redpanda Cloud, or to your own self-hosted Kafka cluster.
Configuring a sink sends data to your Kafka topic **instead of** the default [Postgres database](/idx/db).
## `sim.toml` Configuration
To enable streaming to an external sink, you must define it within your `sim.toml` file under a new `[[env..sinks]]` table. You can define multiple sinks for different environments. For example, you might have one sink for `dev` and another for `prod`.
The configuration maps [specific events](/idx/listener#define-and-emit-events) from your listener to specific topics in your Kafka cluster.
Here is an example configuration for a development environment named `dev`:
```toml sim.toml theme={null}
[app]
name = "my-uniswap-indexer"
# Define a development environment named "dev"
[[env.dev.sinks]]
type = "kafka"
name = "dev_kafka_cluster"
brokers = ["pkc-00000.us-central1.gcp.confluent.cloud:9092"]
username = "YOUR_KAFKA_API_KEY"
password = "YOUR_KAFKA_API_SECRET"
sasl_mechanism = "PLAIN"
event_to_topic = { "PoolCreated" = "uniswap_pool_created_dev" }
```
### Sink Parameters
| Parameter | Required | Description |
| :----------------- | :------- | :----------------------------------------------------------------------------------------------------------------------------------------------------------------------------------------------- |
| `type` | Yes | The type of sink. Currently, the only supported value is `"kafka"`. |
| `name` | Yes | A unique name for this sink configuration within the environment. |
| `brokers` | Yes | An array of broker addresses for your Kafka cluster. |
| `username` | Yes | The username for authenticating with your Kafka cluster. |
| `password` | Yes | The password for authenticating with your Kafka cluster. |
| `sasl_mechanism` | Yes | The SASL mechanism to use. Supported values are `"PLAIN"`, `"SCRAM_SHA_256"`, and `"SCRAM_SHA_512"`. |
| `event_to_topic` | Yes | A map where the key is the name of the event emitted by your listener and the value is the destination Kafka topic name. For example, `"PoolCreated"` might map to `"uniswap_pool_created_dev"`. |
| `compression_type` | No | The compression codec to use for compressing messages. Supported values are `"GZIP"`, `"SNAPPY"`, `"LZ4"`, and `"ZSTD"`. |
## Store Credentials in `.env`
To avoid commiting your `username` and `password`, you can reference environment variables in your `sim.toml` file.
Place credentials in a `.env` file and use `${VAR_NAME}` placeholders in `sim.toml`.
```bash .env theme={null}
KAFKA_PROD_PASSWORD=MyPassword
KAFKA_PROD_USERNAME=MyUsername
```
```toml sim.toml theme={null}
[[env.prod.sinks]]
type = "kafka"
name = "prod"
password = "${KAFKA_PROD_PASSWORD}" # Read from .env file
username = "${KAFKA_PROD_USERNAME}"
```
During deployment, Sim IDX loads these variables from your environment and substitutes them into `sim.toml`.
## Deploy with a Sink Environment
After you have configured your sink in `sim.toml`, you must explicitly deploy your application using the CLI with the `sim deploy` command and specify which environment to use. This is different from the [automatic deployment](/idx/deployment) that occurs when you push changes to your repository.
To use Kafka sinks, you must use the `--environment` flag with the `sim deploy` command. The name you provide to the `--environment` flag must exactly match the environment name defined in your `sim.toml` file. For example, if you defined `[[env.dev.sinks]]`, you would use `dev` as the environment name.
```bash theme={null}
sim deploy --environment dev
```
**The `--environment` flag is required to activate your sink configuration.**
If you run `sim deploy` without the `--environment` flag, your sink configuration will be ignored. The deployment will succeed, but it will only write data to the default Neon Postgres database, and no data will be sent to your Kafka topics.
### Deployment Output and Tracking
When you successfully deploy with a sink environment, the command will output deployment details including a unique **Deployment ID**. Here's an example of what the output looks like:
```bash theme={null}
sim deploy --environment dev
2025-09-18T16:13:26.816281Z INFO build_probe: deploy::listeners: Building all contracts
2025-09-18T16:13:35.322414Z INFO build_probe: deploy::listeners: Calculating triggers
2025-09-18T16:13:35.624276Z INFO build_probe:create_probes_from_listeners: deploy::listeners: Building listeners
2025-09-18T16:13:35.707338Z INFO deploy::api: Building APIs...
2025-09-18T16:13:54.344313Z INFO deploy: Submitting listener
2025-09-18T16:14:14.317367Z INFO sim::deploy: Deployed:
Deployment {
deployment_id: "ff27355a-a1a9-4b43-9a01-75a6060f3dfa",
api_url: Some(
"https://a4d175722c-457c96ab-1.idx.sim.io",
),
connection_string: Some(
"postgres://firstly-as-E6uSqoeXzc:ddiH%29w%28tUUKCDilY@ep-yellow-haze-a4wva18x.us-east-1.aws.neon.tech/agreeable-care-HxcJ3J2yLJ?sslmode=require&options=-c%20search_path%3D%22who-here-UBOQMdSdNP%22%2Cpublic",
),
// ... additional deployment details
}
```
Keep track of your deployment ID, API URL, and connection string from the output above. You can also find this information in the [developer portal](/idx/app-page).
## Delete a Sink Environment Deployment
To stop data streaming to your Kafka topics, you need to delete the specific deployment that was created with the sink environment. This is the only way to stop the writing to the sink from the Sim side.
Use the `sim deploy delete` command with the deployment ID:
```bash theme={null}
sim deploy delete --deployment-id
```
To retrieve your deployment ID, you should have gotten that after running the `sim deploy` command. If necessary, you can also retrieve the deployment ID by visiting the [developer portal](/idx/app-page) where it's displayed in the Current Deployment section.
The deployment will be deleted almost immediately upon successful execution, which will stop all existing writes to your Kafka topics.
**Additional Kafka Cleanup:** After deleting the deployment, you may also need to clean up resources on the Kafka side (topics, ACLs, etc.) depending on your setup and requirements. This cleanup should be done directly in your Kafka provider's console or CLI.
### Redeploy Without Sinks
After deleting a deployment that was using sinks, you can redeploy without sinks by using the standard Git deployment method. Push changes to your repository, which will create a deployment that writes only to the default Postgres database.
For more information on standard deployments, see the [Deployment guide](/idx/deployment).
## Set up Redpanda Cloud
First, create a new serverless cluster from the **Clusters** dashboard. Click **Create cluster**, select the `Serverless` type, provide a **Cluster name**, choose your cloud provider and region, and then click **Create**.
Once the cluster is running, you can get the connection URL. On the cluster's **Overview** page, select the **Kafka API** tab and copy the **Bootstrap server URL**. This value is used for the `brokers` field in your `sim.toml` file.
Next, create the topic where your listener events will be sent. From the cluster's navigation menu, select **Topics** and click **Create topic**. Enter a **Topic Name**, which is the name you will use in your `sim.toml` file. For example, you might name it `my_topic`.
Finally, create a user and grant it permissions to access your topic. Navigate to the **Security** section and create a new user, providing a **Username** and saving the generated **Password**. Then, go to the **ACLs** tab to create an ACL for that user. Configure it to `Allow` all operations for your `Prefixed` topic name. The **Username** and **Password** you created correspond to the `username` and `password` fields in `sim.toml`.
## Set up Confluent Cloud
While the `sim.toml` configuration is standardized, setting up credentials and permissions can vary between different managed Kafka providers.
When configuring your `sim.toml` file for a Confluent Cloud cluster, you must use the following settings:
* `sasl_mechanism`: Set this to `"PLAIN"`.
* `username`: Use the **API Key** generated from the Confluent Cloud dashboard.
* `password`: Use the **API Secret** associated with that key.
First, create a new cloud environment to house your cluster. In the Confluent Cloud dashboard, navigate to **Environments** and click **Add cloud environment**. Provide an **Environment name** such as `new_cluster`, select the `Essentials` Stream Governance package, and click **Create**.
Next, launch a new Kafka cluster within your environment. On the "Create cluster" page, select the `Standard` cluster type, give it a **Cluster name** such as `cluster_0`, choose a cloud provider and region, then click **Launch cluster**.
Now you will need to create a topic where your listener events will be sent. From your cluster's navigation menu, select **Topics**, then click **Create topic**. Enter a **Topic name**, which is the name you will use in your `sim.toml` file, and click **Create with defaults**. For example, you might name it `topic_0`.
To allow Sim IDX to connect, generate an API key and grant it the necessary permissions. From the cluster's navigation menu, select **API Keys**, then click **Create key**. Choose to create a new **Service account** and give it a descriptive name like `my_account`. You must then add an Access Control List (ACL) to grant `WRITE` and `CREATE` permissions for your `PREFIXED` topic (`topic_0`).
After creation, Confluent will display your API Key and Secret. Copy and save these credentials securely, as the Secret will not be shown again. The **Key** corresponds to the `username` field and the **Secret** corresponds to the `password` field in your `sim.toml` file.
Finally, retrieve the broker address for your cluster. Navigate to **Cluster settings** and, under the **Endpoints** section, copy the **Bootstrap server** address. This value is used for the `brokers` field in your `sim.toml` file.
# Supported Chains
Source: https://docs.sim.dune.com/idx/supported-chains
Complete reference for blockchain networks supported by IDX, including chain enums, IDs, and usage in triggers and evaluation
export const EVMSupportedChains = () => {
const dataState = useState(null);
const data = dataState[0];
const setData = dataState[1];
const toEnumFormat = chainName => {
return chainName.toLowerCase().split(/[\s_-]+/).map(word => word.charAt(0).toUpperCase() + word.slice(1)).join('');
};
const toDisplayName = enumName => {
return enumName.replace(/([A-Z])/g, ' $1').trim();
};
const getIconUrlForChain = chainName => {
if (!chainName || typeof chainName !== 'string') {
return undefined;
}
const baseUrl = 'https://raw.githubusercontent.com/0xa3k5/web3icons/refs/heads/main/raw-svgs/networks/branded';
const originalLower = chainName.toLowerCase().trim();
const tokenized = originalLower.replace(/[()]/g, ' ').replace(/[_\-]+/g, ' ').replace(/\s+/g, ' ').trim();
const chainMappings = {
'arbitrum': 'arbitrum-one',
'shape': 'ethereum'
};
if (chainMappings[originalLower]) {
return `${baseUrl}/${chainMappings[originalLower]}.svg`;
}
if (tokenized.includes('sepolia')) {
if (tokenized.includes('base')) {
return `${baseUrl}/base.svg`;
}
return `${baseUrl}/ethereum.svg`;
}
let iconName = tokenized.replace(/\b(mainnet|testnet|devnet)\b/g, '').replace(/\s+/g, ' ').trim().replace(/\s+/g, '-');
iconName = iconName.replace(/\bsepolia\b/g, '').replace(/\bmainnet\b/g, '').replace(/\btestnet\b/g, '').replace(/\bdevnet\b/g, '').replace(/[_\s]+/g, '-').replace(/-+/g, '-').replace(/^-|-$/g, '');
if (!iconName) {
iconName = 'ethereum';
}
return `${baseUrl}/${iconName}.svg`;
};
useEffect(function () {
fetch("https://api.sim.dune.com/idx/supported-chains", {
method: "GET"
}).then(function (response) {
return response.json();
}).then(function (responseData) {
setData(responseData);
});
}, []);
if (data === null) {
return
Note: Pre-Nitro blocks (< 22,207,818) are not supported. See Block Range Support for details.
>}
;
})}
;
};
IDX is a multi-chain indexing platform that lets you to build apps across multiple blockchain networks simultaneously.
You can choose to build on a single blockchain, or build real-time apps that span across any combination of the supported networks below.
IDX support for additional chains is continuously expanding. If you need support for a specific chain that's not listed here, please reach out to our team through the [support channels](/support).
## Available Chains
We currently support the following blockchain networks. Each card shows the chain's display name, the corresponding enum value for use in your code (`Chains.EnumName`), and the chain ID for direct reference:
For more information on setting up triggers and working with different chains, see the [IDX Framework documentation](/idx/listener).
## Using chainContract in Triggers
To listen to events on any supported chain, use the `chainContract` function with the corresponding chain enum. This function takes a chain enum and contract address to create triggers for specific smart contracts:
```solidity theme={null}
// Example: Listen to events on Ethereum mainnet
addTrigger(
chainContract(Chains.Ethereum, 0x1F98431c8aD98523631AE4a59f267346ea31F984),
listener.triggerOnPoolCreatedEvent()
);
// Example: Listen to events on Base
addTrigger(
chainContract(Chains.Base, 0x1F98431c8aD98523631AE4a59f267346ea31F984),
listener.triggerOnPoolCreatedEvent()
);
// Example: Multi-chain app listening to the same contract on different chains
addTrigger(
chainContract(Chains.Arbitrum, 0x1F98431c8aD98523631AE4a59f267346ea31F984),
listener.triggerOnPoolCreatedEvent()
);
addTrigger(
chainContract(Chains.Optimism, 0x1F98431c8aD98523631AE4a59f267346ea31F984),
listener.triggerOnPoolCreatedEvent()
);
```
If you want to register other types of triggers, like triggering on ABI or triggering globally, visit the [Listener Features page](/idx/listener/features) to learn more.
### Block Range Support
IDX supports custom block ranges for targeting specific blocks or time periods across all supported chains. You can use `.withStartBlock()`, `.withEndBlock()`, and `.withBlockRange()` methods with any chain helper function.
For detailed documentation on block range configuration, examples, and chain-specific limitations, see the [Block Range Support section](/idx/listener/features#block-range-support) in the Listener Features guide.
## Testing with Chain-Specific Evaluation
When developing and testing your IDX app, you can use the `sim listeners evaluate` command with the `--chain-id` parameter to test your listeners on specific chains:
```bash theme={null}
# Test listeners on Ethereum mainnet only
sim listeners evaluate --chain-id 1
# Test listeners on Base only
sim listeners evaluate --chain-id 8453
# Test listeners on Arbitrum only
sim listeners evaluate --chain-id 42161
```
If you omit the `--chain-id` parameter, the evaluation will run across all chains that your triggers are configured for:
```bash theme={null}
# Test listeners on all configured chains
sim listeners evaluate
```
To learn more about the `sim listeners evaluate` command, visit the [CLI documentation](/idx/cli#sim-listeners-evaluate) page to learn more.
# Developer Quickstart
Source: https://docs.sim.dune.com/index
Take your first steps with the Sim APIs
Sim APIs power wallets and onchain apps with fast, reliable access to real-time blockchain activity and ownership data.
Access data from 60+ chains with a single request.
This guide will help you make your first API call to retrieve multichain token balances for an address.
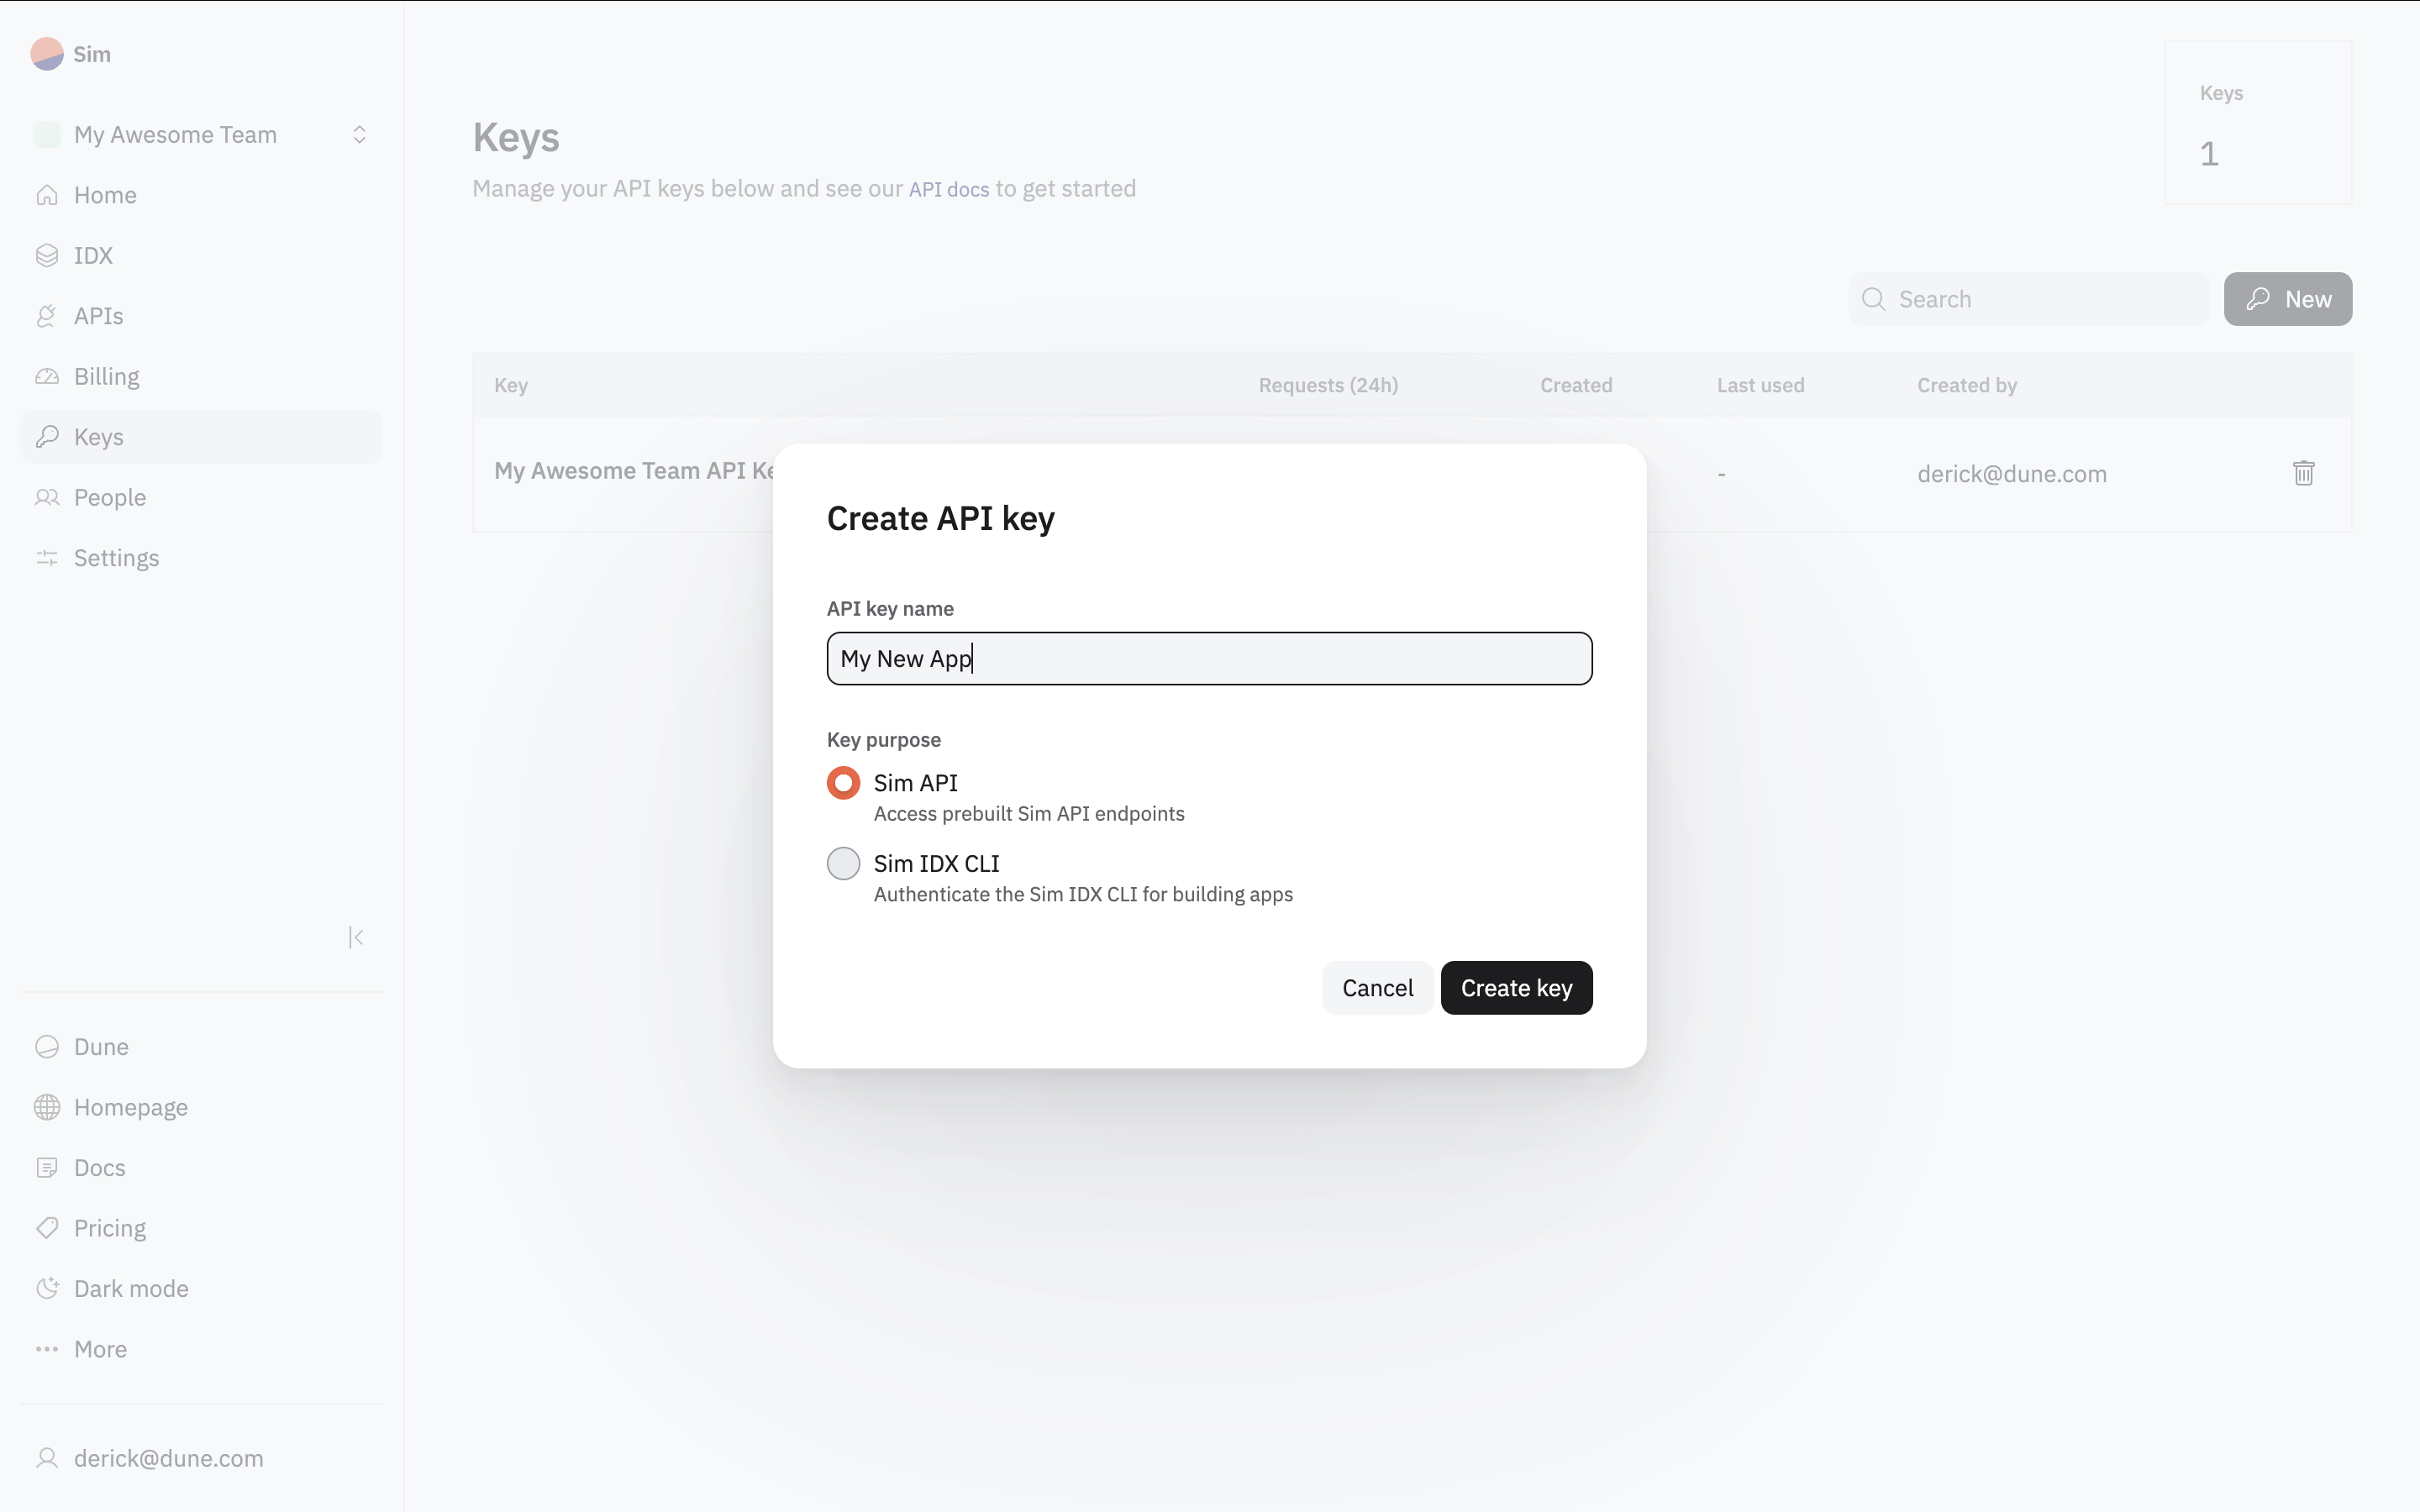
## Authentication
Sim APIs use API keys to authenticate requests.
You can create and manage your API keys in your [Sim Dashboard](https://sim.dune.com/).
Select **Sim API** for the key's purpose when creating your new API key.
To authenticate, include your API key in the `X-Sim-Api-Key` header for every request.
```bash theme={null}
curl --request GET \
--header "X-Sim-Api-Key: YOUR_API_KEY"
```
All API requests must be made over HTTPS.
Calls made over plain HTTP will fail.
API requests without authentication will also fail.
Your API keys carry many privileges, so be sure to keep them secure.
Do not share your secret API keys in public places like GitHub, client-side code, and so on.
## Your First Request
Let's make your first request. We'll retrieve token balances for `0xd8da6bf26964af9d7eed9e03e53415d37aa96045` (Vitalik's wallet) across multiple EVM chains using the [Balances API](/evm/balances).
Here's how to make the API call:
```bash cURL theme={null}
curl -X GET "https://api.sim.dune.com/v1/evm/balances/0xd8da6bf26964af9d7eed9e03e53415d37aa96045" \
-H "X-Sim-Api-Key: YOUR_API_KEY"
```
```javascript JavaScript theme={null}
const options = {method: 'GET', headers: {'X-Sim-Api-Key': 'YOUR_API_KEY'}};
fetch('https://api.sim.dune.com/v1/evm/balances/0xd8da6bf26964af9d7eed9e03e53415d37aa96045', options)
.then(response => response.json())
.then(response => console.log(response))
.catch(err => console.error(err));
```
```python Python theme={null}
import requests
url = "https://api.sim.dune.com/v1/evm/balances/0xd8da6bf26964af9d7eed9e03e53415d37aa96045"
headers = {"X-Sim-Api-Key": "YOUR_API_KEY"}
response = requests.request("GET", url, headers=headers)
print(response.text)
```
Replace `YOUR_API_KEY` with your actual API key from the Sim Dashboard.
The API will return a JSON response containing an array of `balances`.
Each object in the array represents a token balance for the specified address on one of the chains, including various details.
```json Response (JSON) [expandable] theme={null}
{
"balances": [
{
"address": "native",
"amount": "605371497350928252303",
"chain": "ethereum",
"decimals": 18,
"price_usd": 3042.816964922323,
"symbol": "ETH",
"value_usd": 1842034.6622198338
}
],
"next_offset": "dKMBWDLqM7vlyn5OMEXsLWp0nI4AAAABA5JLazNO7x4poVGqUwsgxgqvvIg",
"request_time": "2023-11-07T05:31:56Z",
"response_time": "2023-11-07T05:31:56Z",
"wallet_address": "0xd8da6bf26964af9d7eed9e03e53415d37aa96045"
}
```
With a single API request you get normalized, realtime data with enriched metadata and pricing.
## Next Steps
After making your first API call to Sim APIs, you'll either see the JSON response shown above (success!) or you might encounter an error. If you received an error, check out our [Error Handling Guide](/error-handling) for troubleshooting tips and best practices.
If your call was successful, you've seen how easily you can retrieve comprehensive, multichain data. But this is just the beginning of what's possible.
Are you ready to learn more?
Here are a few paths you can explore:
See all available EVM API endpoints. Learn how to fetch transaction histories, token metadata, and more detailed onchain activity.
Follow our practical guides to build fully-functional features like token portfolio displays, real-time activity feeds, and more for your onchain apps.
Speed up your development using Sim APIs with our LLM-friendly resources.
# Cloudflare Proxy
Source: https://docs.sim.dune.com/proxy
Learn how to set up a Cloudflare Worker to securely proxy your Sim API requests, protecting your API key from client-side exposure.
Protect your Sim API key when making requests from client-side apps by using a Cloudflare Worker as a proxy.
This worker receives requests from you app, securely adds your `SIM_API_KEY` on the server, and then forwards the requests to the Sim API endpoints.
We provide a one-click-deploy Cloudflare Worker to simplify this setup.
Find detailed instructions in our GitHub repo:
One-click deployment and comprehensive setup instructions for the Cloudflare Worker proxy.
# Support
Source: https://docs.sim.dune.com/support
Get help with Sim APIs through our support channels
Email our team directly for technical support and questions
Join our developer community for discussions and peer support
Connect with other developers in the #sim channel of our Discord server
## Email Support
For technical support, bug reports, or questions that aren't answered in the documentation, email our team directly.
Send an email to [simsupport@dune.com](mailto:simsupport@dune.com) for technical help
## Developer Community
### Telegram
Join our active developer community for quick answers and code examples.
Connect with other Sim developers
### Discord
Connect with the broader Dune community in the **#sim channel**.
Ask questions and share projects in #sim channel
## API Status
Check real-time status and uptime history for all Sim API endpoints.
Monitor Sim APIs operational status
## Rate Limits & Scaling
Your plan includes a monthly **Compute Unit (CU)** allowance. If you exceed your quota, requests may return errors unless your plan allows overage.
Track usage and manage your plan in the dashboard, and see our CU explainer for details:
View usage, quotas, and upgrade options
Learn how CUs are calculated and billed
# Balances
Source: https://docs.sim.dune.com/svm/balances
svm/openapi/balances.json get /beta/svm/balances/{address}
Get token balances for a given SVM address
The Token Balances API provides accurate and fast real time balances of the native, SPL and SPL-2022 tokens of accounts on supported SVM blockchains.
We currently support Solana and Eclipse.
# Pagination
This endpoint is using cursor based pagination. You can use the `limit` parameter to define the maximum page size.
Results might at times be less than the maximum page size.
The `next_offset` value is passed back by the initial response and can be used to fetch the next page of results, by passing it as the `offset` query parameter in the next request.
You can only use the value from `next_offset` to set the `offset` parameter of the next page of results. Using your own `offset` value will not have any effect.
## Compute Unit Cost
The SVM Balances endpoint’s CU cost equals the number of chains you include via the `chains` query parameter. If you omit `chains`, the endpoint uses its default chain set, which is currently Solana only (**1 CU**). We currently support two SVM chains (Solana and Eclipse). See the [Compute Units](/compute-units) page for detailed information.
# SVM Overview
Source: https://docs.sim.dune.com/svm/overview
Get accurate and fast realtime balances of native, SPL and SPL-2022 tokens on Solana and Eclipse blockchains, with token metadata and USD valuations.
Quick and accurate lookup of transactions associated with a Solana address, ordered by descending block time, with complete raw transaction data.
# Transactions
Source: https://docs.sim.dune.com/svm/transactions
svm/openapi/transactions.json get /beta/svm/transactions/{address}
Get transactions for a given SVM address
The Transactions Endpoint allows for quick and accurate lookup of transactions associated with an address.
**We currently only support Solana**.
# Response Structure
The API returns a JSON object with the following top-level fields:
| Field | Description | Type |
| ------------ | --------------------------------------------- | ----------- |
| next\_offset | Pagination token for the next page of results | string/null |
| transactions | Array of transaction objects | array |
# Transaction Object Fields
Each item in the `transactions` array contains the following fields:
| Field | Description | Type |
| ---------------- | --------------------------------------------------------------- | ------ |
| address | Wallet address | string |
| block\_slot | Block's sequential index | number |
| block\_time | Timestamp of block creation (in microseconds) | number |
| chain | Name of the blockchain | string |
| raw\_transaction | Raw transaction data from the RPC node at the time of ingestion | object |
See [getTransaction RPC Method](https://solana.com/docs/rpc/http/gettransaction) for more details about `raw_transaction`.
# Ordering
The data is ordered by descending block time, so that new transactions will always be delivered first.
# Pagination
This endpoint is using cursor based pagination. You can use the `limit` parameter to define the maximum page size.
Results might at times be less than the maximum page size.
The `next_offset` value is included in the response and can be utilized to fetch the next page of results by passing it as the `offset` query parameter in the next request.
You can only use the value from `next_offset` to set the `offset` parameter of the next page of results. Using your own `offset` value will not have any effect.
## Compute Unit Cost
The SVM Transactions endpoint has a fixed CU cost of **1** per request. See the [Compute Units](/compute-units) page for detailed information.
# Token Filtering
Source: https://docs.sim.dune.com/token-filtering
Learn how Sim APIs provide liquidity data to help you filter tokens based on your specific needs.
When working with blockchain data, you'll encounter numerous tokens with varying levels of liquidity and utility.
Sim APIs provide comprehensive token metadata and liquidity data to help you implement custom filtering logic that fits your specific requirements.
## Our Approach to Token Data
We don't offer direct spam filtering because definitions of spam are varying and subjective.
Instead, we provide the best objective measure that we're aware of—liquidity data—to allow developers to filter downstream based on their specific requirements.
By grounding filtering decisions in measurable, onchain liquidity, rather than subjective labels, our method offers several advantages:
* **Objective**: We provide liquidity metrics rather than subjective spam classifications
* **Realtime**: Liquidity is checked at query time, not based on outdated lists
* **Flexible**: All filtering data is provided, allowing you to implement custom logic that fits your use case
* **Transparent**: You have full visibility into the data used for filtering decisions
* **Adaptable**: Your filtering criteria can evolve with your application's needs
**We do not detect or flag honeypots, scam tokens, or other malicious contracts**.
Our APIs will return price and liquidity data for any token that has trading activity.
The presence of price data does not indicate that a token is safe to trade or that transactions will be successful.
## Supported APIs
Get wallet token balances with comprehensive filtering metadata
Track wallet activity with detailed token information
Filtering tokens does not change chain selection and therefore does not change Compute Units. To reduce CU on chain-dependent endpoints, limit `chain_ids` (EVM) or `chains` (SVM) to only the networks you need. See [Supported Chains](/evm/supported-chains) and [Compute Units](/compute-units).
For each token in our responses, we include comprehensive metadata that gives you the information needed to make informed filtering decisions:
1. **Token basics**: `symbol`, `name`, and `decimals` properties
2. **Price data**: Current USD pricing information using `price_usd`
3. **Liquidity information**: Real-time liquidity pool data with `pool_size`
4. **Pool size**: The total value locked in the token's highest liquidity pool using `low_liquidity`
## How Sim Calculates Liquidity Data
Sim's approach to assessing liquidity is sophisticated and real-time:
* For each token, we dynamically track the highest liquidity route to USDC
* We calculate the USD value of the liquidity along that route for each token upon each query
* This provides you with current, accurate liquidity information rather than static or outdated data
When `pool_size` is very small and `low_liquidity` is true, you should disregard `price_usd` and `value_usd` fields. While the price is technically correct based on the best liquidity pool we can find, it becomes effectively meaningless when there's insufficient liquidity. You can't actually exchange the token for anything else of value at that price.
## Using Token Data for Custom Filtering
Let's explore practical implementations for different filtering scenarios.
The following examples demonstrate how to use this data to create robust filtering logic that meets your app's needs.
### Exclude tokens with less than 100 USD liquidity
Use the optional `exclude_spam_tokens` query parameter on the EVM Balances API to automatically filter out tokens with less than 100 USD of liquidity. Include `exclude_spam_tokens=true` to have those tokens excluded from the response entirely.
```bash theme={null}
curl -s -X GET 'https://api.sim.dune.com/v1/evm/balances/0xd8dA6BF26964aF9D7eEd9e03E53415D37aA96045?exclude_spam_tokens=true' \
-H 'X-Sim-Api-Key: YOUR_API_KEY'
```
This is distinct from the `low_liquidity` field in responses, which is `true` when liquidity is below 10,000.
### Liquidity Threshold Filtering
Filter tokens based on minimum liquidity requirements using the `pool_size` field. This is one of the most effective ways to filter out low-quality tokens.
```javascript theme={null}
// Filter tokens with at least $10,000 in liquidity
const filterByLiquidity = (tokens, minLiquidity = 10000) => {
return tokens.filter(token => {
return token.pool_size && token.pool_size >= minLiquidity;
});
};
// Usage
const filteredTokens = filterByLiquidity(tokenData, 10000);
```
This approach ensures you only show tokens that have sufficient trading volume and market depth, reducing the likelihood of displaying illiquid or potentially problematic tokens.
### Allowlisting Specific Tokens
Include certain tokens regardless of their liquidity metrics by maintaining a list of approved token addresses and chain IDs.
A secure method for allowlisting is to use a combination of the token's unique contract `address` and its `chain_id`.
This guarantees you are identifying the exact token on the correct network.
```javascript theme={null}
// Allowlist of trusted tokens. Each entry is an object containing
// the specific chainId and the token's contract address.
const ALLOWLIST = [
// USDC on Ethereum
{ chainId: 1, address: '0xa0b86991c6218b36c1d19d4a2e9eb0ce3606eb48' },
// Wrapped BTC on Ethereum
{ chainId: 1, address: '0x2260fac5e5542a773aa44fbcfedf7c193bc2c599' },
// DEGEN on Base
{ chainId: 8453, address: '0x4ed4e862860bed51a9570b96d89af5e1b0efefed' },
// Native ETH on Ethereum Mainnet
{ chainId: 1, address: 'native' },
// Native ETH on Base
{ chainId: 8453, address: 'native' },
];
const filterWithAllowlist = (tokens, minLiquidity = 10000) => {
return tokens.filter(token => {
// Check if the current token matches any in our allowlist.
const isAllowlisted = ALLOWLIST.some(allowlistItem => {
// Note: The Balances API uses `address`, while the Activity API uses `token_address`.
// We handle both possibilities here. We also convert to lowercase for a reliable match.
const tokenAddress = (token.address || token.token_address || '').toLowerCase();
return token.chain_id === allowlistItem.chainId && tokenAddress === allowlistItem.address;
});
// 1. If the token is on the allowlist, always include it.
if (isAllowlisted) {
return true;
}
// 2. For all other tokens, apply a standard liquidity filter.
return token.pool_size && token.pool_size >= minLiquidity;
});
};
```
### Denylisting Specific Tokens
Exclude certain tokens even if they meet your liquidity criteria by maintaining a blocklist of problematic symbols, or any other criteria you choose.
```javascript theme={null}
// Denylist of problematic token symbols
const DENYLISTED_SYMBOLS = [
'SCAM',
'RUG',
];
const filterWithDenylist = (tokens) => {
return tokens.filter(token => {
// Exclude denylisted tokens
if (token.symbol && DENYLISTED_SYMBOLS.includes(token.symbol.toUpperCase())) {
return false;
}
// Apply other filtering criteria
return token.pool_size && token.pool_size >= 1000;
});
};
```
Denylisting helps you maintain control over which tokens appear in your application, even if they have sufficient liquidity.
### Custom Criteria Combinations
Create sophisticated filtering logic by combining multiple criteria such as liquidity, completeness, and custom business rules.
```javascript theme={null}
const advancedTokenFilter = (tokens, options = {}) => {
const {
minLiquidity = 1000,
requireCompleteName = true,
minPriceUsd = 0.000001,
allowLowLiquidity = false
} = options;
return tokens.filter(token => {
// Check if token has complete metadata
if (requireCompleteName && (!token.name || !token.symbol)) {
return false;
}
// Check minimum price threshold
if (token.price_usd && token.price_usd < minPriceUsd) {
return false;
}
// Check liquidity requirements
if (!allowLowLiquidity && token.low_liquidity) {
return false;
}
if (token.pool_size && token.pool_size < minLiquidity) {
return false;
}
return true;
});
};
```
This approach allows you to create nuanced filtering that considers multiple factors simultaneously.
### Token Completeness Filtering
Filter based on whether tokens have complete metadata, ensuring users only see tokens with proper names and symbols.
```javascript theme={null}
const filterCompleteTokens = (tokens) => {
return tokens.filter(token => {
// Require all basic metadata to be present
const hasBasicInfo = token.name &&
token.symbol &&
token.decimals !== undefined;
// Optionally require price data
const hasPriceData = token.price_usd !== undefined;
return hasBasicInfo && hasPriceData;
});
};
// Or create a more flexible version
const filterTokensByCompleteness = (tokens, strict = false) => {
return tokens.filter(token => {
if (strict) {
// Strict mode: require all fields
return token.name && token.symbol && token.decimals &&
token.price_usd && token.pool_size;
} else {
// Lenient mode: require only basic fields
return token.symbol && token.decimals !== undefined;
}
});
};
```
Completeness filtering ensures your users have meaningful information about the tokens they're viewing.